this one's from juliana who used an ikea planter box (can't find it on the website) to make a side table for her backyard.
"my husband was experimenting with concrete to pour a new hearth for our fireplace. the table top was his test piece - the mix made a great pattern that i wanted to be able to use and highlight somehow. i started by using the antonius laundry basket frame - but it was too tall and the metal was too thin to visually balance the concrete top.
i found the planter box and decided to give it a try - it lends a bit of a tropical look to the yard now - i call it our pagoda table. i finished the table with the clear varnish from ikea just to be safe - although i think it's fine outside, i wanted to preserve the rich color as long as possible."
Friday 31 August 2007
Thursday 30 August 2007
unclutter your desk with this super minimal set up
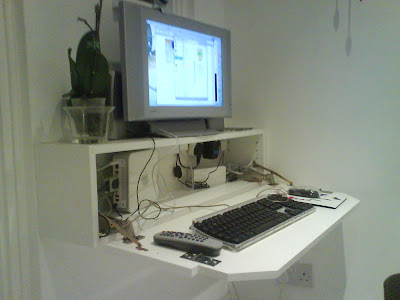
i'm loving this compact tv console and mac mini desk set up that james from london sent in. it does everything a workstation needs to, yet when closed, almost disappears into the background. takes uncluttering to a new level.
james says, "we have a very small dining room which we also wanted to use to house a part-time computer desk. as we had a mac-compatible flatscreen lcd tv, and a lovely tiny mac mini, we were already half way down the line to super-minimalism. the solution was to adapt a faktum 92 x 40 kitchen wall cabinet with its abstrakt door (note: i can't find the faktum on ikea's site but the akurum works the same).
the unit has been reduced in width, height and depth (in fact it would have been cheaper to create the cabinet from scratch with mfc) and we've fitted ikea�s 0-protrusion blum hinges so the two surfaces (the base of the cabinet and the door when opened) align correctly. two brass stays hold the desk/door horizontal.
i would have got chromed stays but i can't find any. there is an additional little flap, made from a strip cut off the depth of the cabinet, which makes the desk deep enough to comfortably use a mousemat.
when it�s all folded up, the cupboard is almost invisible and less than 20cm deep, and is perfect just for tv watching. the keyboard, mouse etc and all the cables fit inside the cabinet � there's trunking running along the inside top, and of course the broadband is wireless, so only one power cable needs to exit the cabinet which runs the tv and mac together. we�re understandably proud of it!"
Wednesday 29 August 2007
how's this for a big capacity laundry bin?
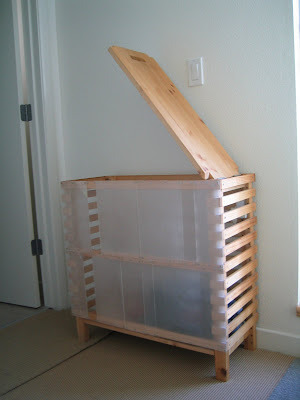
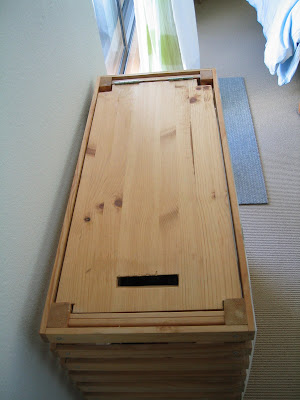
diwa turns the ivar storage system into a stylish and huge laundry bin. i like how it lights up, though not such a good idea when full of dirty clothes. another thought i had about this laundry bin would be to probably add another piece of plexiglass inside to divide the bin for whites and colours.
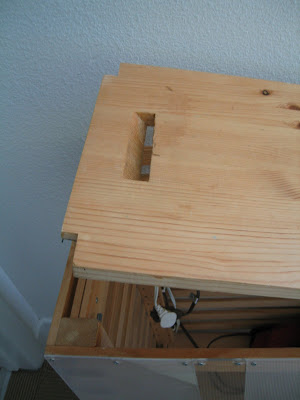
"i always wanted a good-looking laundry bin, something i wouldn't mind having in my bedroom. i had some ivar shelving at home and always thought it would make a great frame to build on. a few slats of pine from home depot, some plexiglass, hinges and floor lamps and voila - a laundry bin. i cut a small opening into one of the shelves to serve as a door with hinges on one side."
Tuesday 28 August 2007
a touch of glass for the humble lack side table
it was a nice surprise to see better homes and gardens hacking ikea too. michelle was the one who spotted this pretty mosaic table featured on their site. i'm loving the geometric design.
the skinny: paint the lack side table a handsome charcoal background colour. then, stick on black and brown bisazza glass tiles (which are gorgeous, by the way), tile by tile with a dab of weldbond. lastly, grout the tiles and smooth it into the spaces. leave to dry.
for the full blow-by-blow mosaic table making instructions, click here. also check out the video how-to.
Thursday 23 August 2007
a minimalistic desk that doesn't max out your budget
james, inspired by the very droolworthy milk desk, went hacking to create a white and minimalistic work and music station. i love how the desk rolls away to reveal the keyboard. click to enlarge the image.
the ikea items used:
vika artur legs (x2) � $60
queensize malm headboard(x1) � $10 in the as-is
lack shelf (x1) � $25
other misc:
wall shelf metal tracking, 48" (x2)
casters (x4)
pipe insulation (to dampen the rolling sound)
screws
it involved lots of dremeling work the end result more than made up for it.
total cost: ~ $130
cost of milk desk: $4700
Wednesday 22 August 2007
59cent ikea diaper bag and changing pad
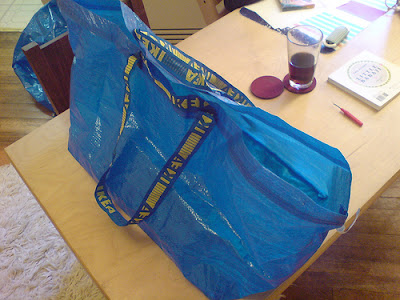
thanks to this ikea bag hack from funk station, greg of daddytypes was inspired to create a diaper bag complete with changing pad out of a single big blue ikea shopping bag.
you'll need to unpick the seams of the bag first. turn the top portion into a narrow tote bag and sew the two identical leftover pieces together as a changing pad.
if the changing pad is a little too thin for your liking, add a padding layer to it.
see greg's diaper bag and changing pad flickr instructions.
Tuesday 21 August 2007
from drab to fab bathroom remodel
the bathroom is supposedly the busiest room in a home. for me, it is also the hardest to furnish because good looking fittings can be so horribly expensive.
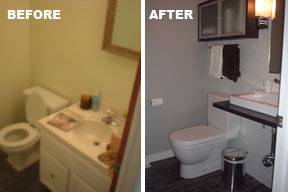
matt came up with this affordable ikea solution for his bathroom, which i think totally works.
"when it came time to redesign our half bath we were unable to find an affordable yet stylish solution for a vanity. our search lead us to ikea where i decided to hack a stolmen shelf and create a floating sink/vanity. i cut a hole to allow the hollviken sink to set down in the shelf and mounted it to the wall.
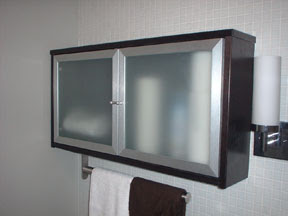
for storage i cut an effektiv storage unit down to 6" depth (originally 14") and mounted it to the wall. then i attached a grundtal towel bar to the bottom.
everything else in the remodel came from special order from the local "home centers". the entire renovation only cost around $1400."
Monday 20 August 2007
an ikea turntable ironing board
stumbled across this turntable ironing board on redwork in germany, inspired by this clover turntable ironing table. especially useful for crafty ones.
made from an ikea snudda lazy susan (can't find the link on ikea website) overlaid with an ironing board cover.
cut the heat resistant batting the exact size as the snudda, whilst the outer cotton fabric should be approximately 10 cm bigger than the snudda. thread a string through the cotton fabric, place the batting on top of the lazy susan and cover with the cotton. pull the thread tight and there you have it.
Friday 17 August 2007
jewelry storage and display racks
two useful ideas if you have lots of accessories and want a way to organise them ikea style.
nora's chain display
nora was searching for a practical storage and display solution for her self-made earrings and necklaces and turned to ikea. here's what she did.
"what you'll need:
i spent less then ten euros for this rack and as a plus i can use the otherwise useless space on the flagstones."
cheryl's jewelry rail
"i'm using the enetri shelving with this item (if you can see- i had to modify that piece of furniture since it didn't fit my stereo system, there are lifters on the shelves).
what i did was take the dignitet curtain wire system and add the curtain hooks (i cannot find them on the website but they are similar to the ones in deka system.) which yeah, this seems pretty normal but i didn't use it for curtains. i used it to unknot the massive blob of costume jewelry i own. as you can see they are all hung up neatly and separated from one another."
nora's chain display
nora was searching for a practical storage and display solution for her self-made earrings and necklaces and turned to ikea. here's what she did.
"what you'll need:
- one bekvam spice rack
- three fixerad knobs (can't find link)
- one meter of chain (about 2 euros at hardware store)
- some drawing pins
- brown acrylic paint
i spent less then ten euros for this rack and as a plus i can use the otherwise useless space on the flagstones."
cheryl's jewelry rail
"i'm using the enetri shelving with this item (if you can see- i had to modify that piece of furniture since it didn't fit my stereo system, there are lifters on the shelves).
what i did was take the dignitet curtain wire system and add the curtain hooks (i cannot find them on the website but they are similar to the ones in deka system.) which yeah, this seems pretty normal but i didn't use it for curtains. i used it to unknot the massive blob of costume jewelry i own. as you can see they are all hung up neatly and separated from one another."
Thursday 16 August 2007
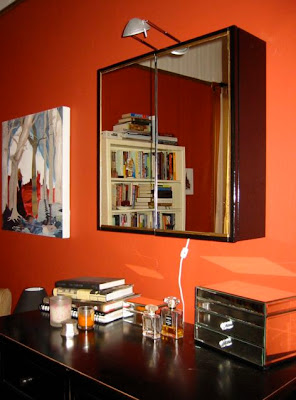
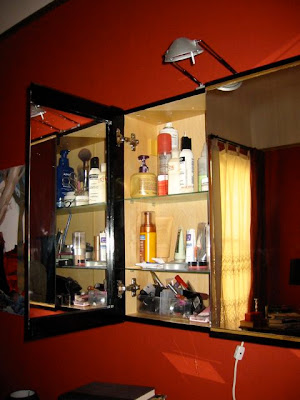
from birch to baroque bathroom cabinet
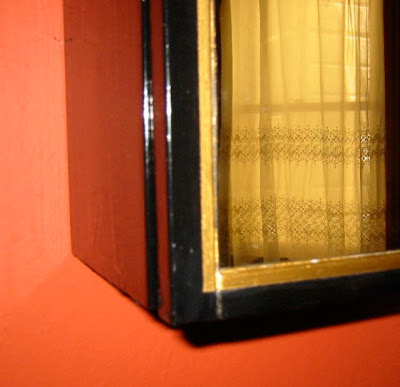
a baroque bathroom cabinet from eleanor. love the glossy black and gold trim.
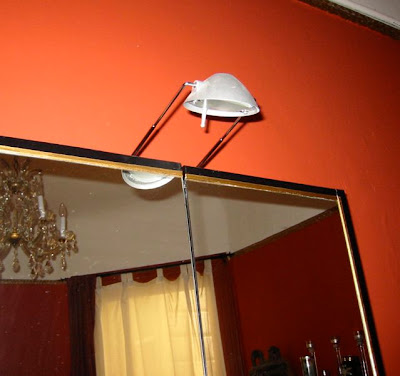
"i started with the bjorken mirror bathroom cabinet which i attached an inreda lamp to. i then decided that it really didn't match my bedroom which is kind of baroque. so i decided to paint it.
i started by sanding it down a bit then priming it then painting the cabinet with 2 coats of really glossy black paint. i then taped off about a quarter inch area and painted that gold.
i know the lamp should be bronze of something but i haven't got around to changing that yet. overall a very pretty vanity though."
Wednesday 15 August 2007
kid's chalk board table with storage
this is sara's idea for a chalk board table and storage area for her daughter.
"we have 3 of those ikea bins holding toys and blankets in our daughter's room. that was also the only spot we had for a kid's table in our small house.
so we got a couple benjamin stools (the bins fit underneath really well), and had a piece of birch plywood cut at our local lumberyard. we drilled 4 holes, and fastened the top to the stools with nuts and bolts. we painted one side with chalk board paint, and finished the other side (and the edges). when our daughter is bored with one side, we can flip it over. and it fits perfectly in her room."
Monday 13 August 2007
light table
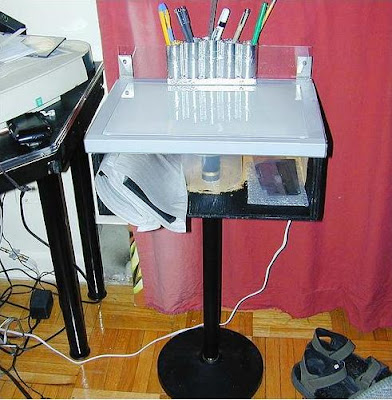
jason diy-ed a compact lightbox with an ikea shelving unit.
"i bought a nian (can't find link on ikea website) lighted shelving from ikea. hacked it up and made a light table out of it. first thing i did was insert some foil inside the shelving unit under the light source. it increased the EV of the light (with dome) from 10 to 11.5. the pedestal base's from an old halogen floor lamp.
the pen holders are made from the remaining pipe from the halogen lamp, cut up with a pipe cutter. then attached with leftover holes from the wooden assembly, and taped up with foil tape. the tubes stay up with a strip of lexan bolted to the shelving brackets included with the shelf. i added some extra support for the pipe under the storage unit, and added the CD spindle case to cover the screws sticking up. it also doubles as a spacer for the storage compartment."
click to view jason's lightbox photos on flickr.
related hack:
> home photography backdrop
more fira mini chest hacks
the ikea fira mini chest should get a page of its own as it is fast becoming the most hacked item on ikeahacker. here are 3 more.
wall of fira storage
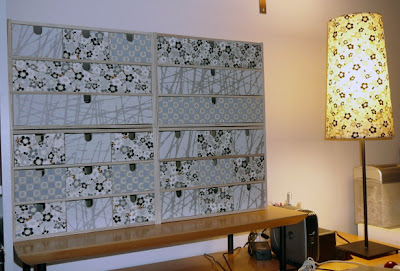
melissa has this handsome storage cabinet made out of fira drawers: "i painted the fira mini chests red, white, and black with glossy craft paint. the black and white patterned drawers are covered with wrapping paper that i bought at ikea and then sprayed with glossy clear spray paint. the label holders were from an online bead supply company, and the random bits of decor were picked up here and there."
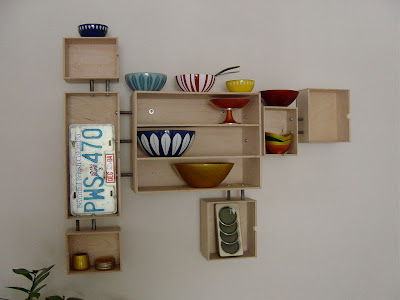
fira wall display
an unusual use of a fira drawer. kyle turned it into a wall mounted display shelf. each box is connected with 2" metal spacers from home depot.
fira in oils
one more from zan (who previously gave us the monogrammed version): "firstly it was lightly stained in a mixture of water and acrylic paints, then the front was painted in oils, i may give it a spray with some sealer at some point."
paige's version
"i spruced up the the fira mini storage chests with some beautiful chiyogami paper that i had picked up while traveling. i used it as the basis for my color combination - covering most of the drawers and a skimra lampshade. i got two sheets of coordinating paper to cover the remainder of the drawers, and trimmed everything to size.
i am a metalsmith and these little drawers are just perfect to organize all the little tools and findings for jewelry making. i print small labels and affix them to the top edge of each drawer front. when fully-loaded the drawers get quite heavy, so i opted to move mine to my heavy maple desk for support instead of the particleboard bookcases that had been their home."
glass pulls for the fira
fleurette makes glass beads and accessories for a living and needed something to bring them to shows. she says, "i took the fira mini chest, drilled holes in the center of the drawers and added drawer pulls that i made. a great way for customers to access the beads and to show off the pulls."
see more of fleurette's glass pulls.
rhonda's version
"i bought two of these� one with 9 small drawers and one with 3 small and 2 large drawers. i made these two boxes using various patterns of scrapbook paper, color coordinated paint, varnish, knobs, feet, felt on the inside of the drawers, and finished them off with a cute little tassel. it took me one full day each to complete them from start to finish plus lots of drying time.
lindsay's version
"basically i painted the outside cabinet and then used my xyron to turn the wrapping paper into a big sticker. before applying it to the drawers i cut it to fit the whole front of the drawers, marked where the 'gaps' between the drawers were and cut the pieces for each drawer and the shelves out. then i applied each sticker and sealed it with clear acrylic medium. i love the way it turned out."
see more of lindsay's fira mini chest.
[added 27 May 2008]
meredith's chrome finished fira
she turned her $13 pine fira mini-chest into her "very own sparkley-disco-drawers".
see instructions and more pictures on her blog.
Updated! February 25, 2009
Decoupaged Fira
Sirah85 from Spain shares her Fira, made with decoupage. She uses it to store her make-up.
Alicia's Fira craft cabinet
She says, "We took six Fira small storage boxes and attached them to each other to make a faux-apothecary type chest. We use it to store our craft supplies (paper, markers, tape, etc.)
See more of Alicia's faux-apothecary craft cabinet. More pictures here.
wall of fira storage
melissa has this handsome storage cabinet made out of fira drawers: "i painted the fira mini chests red, white, and black with glossy craft paint. the black and white patterned drawers are covered with wrapping paper that i bought at ikea and then sprayed with glossy clear spray paint. the label holders were from an online bead supply company, and the random bits of decor were picked up here and there."
fira wall display
an unusual use of a fira drawer. kyle turned it into a wall mounted display shelf. each box is connected with 2" metal spacers from home depot.
fira in oils
one more from zan (who previously gave us the monogrammed version): "firstly it was lightly stained in a mixture of water and acrylic paints, then the front was painted in oils, i may give it a spray with some sealer at some point."
***
updated on 27/2/2008paige's version
"i spruced up the the fira mini storage chests with some beautiful chiyogami paper that i had picked up while traveling. i used it as the basis for my color combination - covering most of the drawers and a skimra lampshade. i got two sheets of coordinating paper to cover the remainder of the drawers, and trimmed everything to size.
i am a metalsmith and these little drawers are just perfect to organize all the little tools and findings for jewelry making. i print small labels and affix them to the top edge of each drawer front. when fully-loaded the drawers get quite heavy, so i opted to move mine to my heavy maple desk for support instead of the particleboard bookcases that had been their home."
glass pulls for the fira
fleurette makes glass beads and accessories for a living and needed something to bring them to shows. she says, "i took the fira mini chest, drilled holes in the center of the drawers and added drawer pulls that i made. a great way for customers to access the beads and to show off the pulls."
see more of fleurette's glass pulls.
rhonda's version
"i bought two of these� one with 9 small drawers and one with 3 small and 2 large drawers. i made these two boxes using various patterns of scrapbook paper, color coordinated paint, varnish, knobs, feet, felt on the inside of the drawers, and finished them off with a cute little tassel. it took me one full day each to complete them from start to finish plus lots of drying time.
lindsay's version
"basically i painted the outside cabinet and then used my xyron to turn the wrapping paper into a big sticker. before applying it to the drawers i cut it to fit the whole front of the drawers, marked where the 'gaps' between the drawers were and cut the pieces for each drawer and the shelves out. then i applied each sticker and sealed it with clear acrylic medium. i love the way it turned out."
see more of lindsay's fira mini chest.
[added 27 May 2008]
meredith's chrome finished fira
she turned her $13 pine fira mini-chest into her "very own sparkley-disco-drawers".
see instructions and more pictures on her blog.
Updated! February 25, 2009
Decoupaged Fira
Sirah85 from Spain shares her Fira, made with decoupage. She uses it to store her make-up.
Alicia's Fira craft cabinet
She says, "We took six Fira small storage boxes and attached them to each other to make a faux-apothecary type chest. We use it to store our craft supplies (paper, markers, tape, etc.)
See more of Alicia's faux-apothecary craft cabinet. More pictures here.
Friday 10 August 2007
new look for the lampan lamp
i have the exact same lamp - the cheap lampan - an impulse purchase which i don't really know what to do with until now.
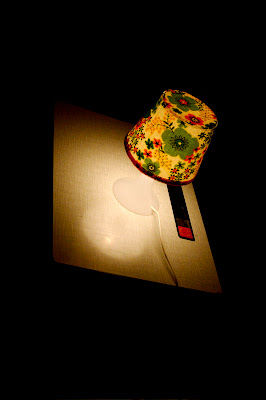
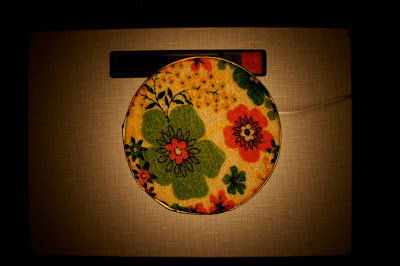
anneke simply glued a piece of cloth to the lamp's plastic shade with textile glue and the plain jane lamp gets a new look.
thanks thijs!
anneke simply glued a piece of cloth to the lamp's plastic shade with textile glue and the plain jane lamp gets a new look.
thanks thijs!
Subscribe to:
Posts (Atom)