ellzrae shares a bedroom with her sis who has one too many things. when they decided to renovate their bedroom, top on their list were a desk and a lot more storage space. here's what they cooked up on a budget.
she writes, "we looked thru ikea, and we both liked the vika amon/vika annefors table. only problem was it was too expensive. so i went ikea shopping and found 2 faktum/akurum kitchen base cabinets at as-is. then i bought a vika table top and put 2 L-brackets to hold the table top to the cabinet tops.
we looked through ikea for nice inexpensive shelves, but could only find lack shelves which did not seem strong enough to hold up stuff. so it was back to the drawing board for me. after looking through various measurements, i concluded that we could add some trones shoe cabinets (to use as storage) at the left side and 3 faktum fan cabinets at the top of the desk.
attached a noticeboard, a magnetic strip and non lights to the wall. the result may not be as elegant, but it shows what a little planning can achieve for a small budget. i love the desk and for once, all her clutter goes where it ought to be - hidden.
word of caution though: pay to have someone professional mount the wall cabinets. we had one of them fall down! too short screws, wrong plug, lazy drilling."
Friday 29 February 2008
Thursday 28 February 2008
a little bit of green for your feet
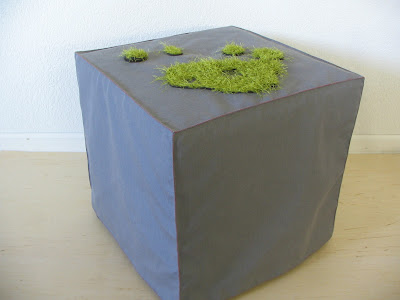
a crop of moss growing on your footstool? definitely an unusual take on the solsta pallbo from ottoman (the hacker, not the stool).
"earlier this year, i thought it would be pretty rad to make an ottoman that looked like a rock with moss growing on it. after much hashing out in my head, i decided that the solsta pallbo footstool from ikea would do the trick! so, i made a slipcover for it that i needle felted with 'faux moss' to go over the existing slipcover.
the 'moss' is a three layer process, starting with a chocolate brown layer, then a dark green layer, and finally, the lime green 'moss' layer."
the one and only slipcover with moss is available on her etsy shop for $120.
Wednesday 27 February 2008
a tidy trash and recycling center
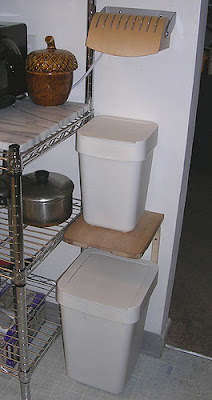
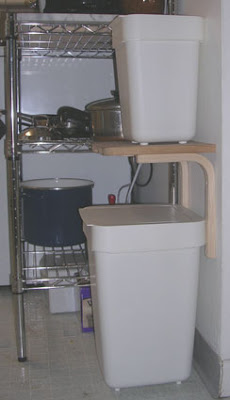
alison whips up a tidy trash and recycling center which allows for easy mail sorting and trashing.
she says, "the kitchen is on one side of the front door, and there was space just inside the kitchen doorway for this tidy trash and recycling center. the hacking part was more like sawing, as one of my ikea cutting boards was re-sized to become the shelf (aligned with the adjacent wire shelving) that supports the smaller wastebasket. now junk mail can immediately be recycled upon entry; and having the debris 'trashcan' available without opening a cupboard i find very handy.
i used:
the wall-mounted light was also from ikea, but old enough that i have no idea what its ikea name is."
link to trash and recycling hack entry on alison's blog
Tuesday 26 February 2008
all to do with shoes, shoes, shoes
a siljan shoe rack for narrow places
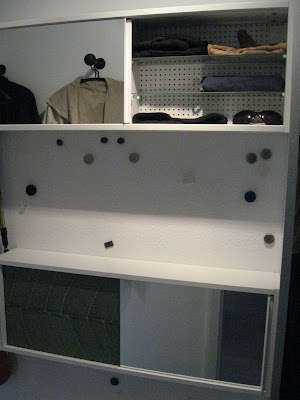
almut has a very narrow hall and was looking for storage to fit shoes, scrafs, gloves, umbrellas, sunglasses etc.
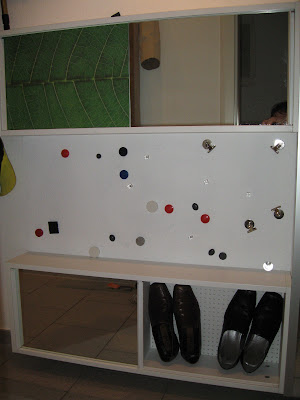
whathe she did was, "take three siljan bathroom mirror cabinets and hung them on the wall. they are only 16 cm deep (6 1/4")! i put shoes in the lowest one and the other items in the remaining siljans. i even exchanged the blue sliding doors with placemats, because i didn�t like the blue ones."
a floating shoe rack
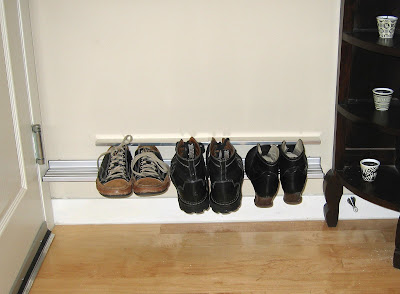
wendy from vancouver, bc, fell in love with this slot-style shoe rack from design within reach and made her own version with a few ikea items.
"it was small enough to fit in behind my door without preventing it from swinging open, however at $110, it wasn�t so within reach. so, i took a trip to ikea to find the raw materials that could help me build something similar.
basically i hung the klang wall shelf (with drywall anchors � i have heavy shoes), and then mounted both strecket cabinet handles about 6 cm (2 1/2") above it (using drywall anchors again).
almut has a very narrow hall and was looking for storage to fit shoes, scrafs, gloves, umbrellas, sunglasses etc.
what
a floating shoe rack
wendy from vancouver, bc, fell in love with this slot-style shoe rack from design within reach and made her own version with a few ikea items.
"it was small enough to fit in behind my door without preventing it from swinging open, however at $110, it wasn�t so within reach. so, i took a trip to ikea to find the raw materials that could help me build something similar.
basically i hung the klang wall shelf (with drywall anchors � i have heavy shoes), and then mounted both strecket cabinet handles about 6 cm (2 1/2") above it (using drywall anchors again).
Monday 25 February 2008
save your old chair with a new look
a pretty one from holly.
"this one is really simple, but turned out to be quite a task. i took this rolly chair (svenning) and punched it up a little with some fabric from JoAnn's. when i bought it in 2003, they offered a camo option. now that i'm married and decorating my first home, it needed a softer touch to match the rest of the office. when i took the chair apart, there were about a million staples holding the camo fabric around the pads. prying the staples out of the plastic was tough, but not as tough as stapling the new fabric back on. it took me about 20 minutes to find the perfect way to hold the staple gun against the plastic so that the staples wouldn't just bounce off. in the end, i had one very sore hand and one very pretty chair!
see holly's svenning flickr set
Updated! February 25, 2009
Reupholstery with Patricia fabric
Ruby saw the Kip chair and was inspired to do her own.
She says, "I was given an old office chair by my father that was still in super condition, except for the cover. After living with it for months wondering how I could make it look better, I decided to 'hack' it with some nice fabric. The only thing was, it had to be really cheap and that's where Ikea came in: some lovely Patricia fabric! We used the patterned dark grey.
I covered the backrest easily, by pushing the fabric down under the plastic backing with a butter knife. The seat was more difficult, I had to take the chair apart and hot glue gun the fabric to the wooden plate before putting it back on the plastic backing. we took the arms off to make the chair more comfortable."
Saturday 23 February 2008
hackeas: an instant attic, legs and kitchen utensil holders
an instant attic
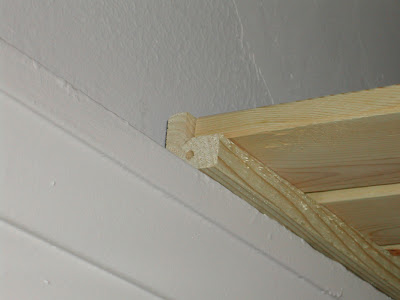
kathleen created an "instant attic," courtesy of ikea's gorm shelves, which somehow fitted her old-style high ceiling 1920s house perfectly. the shelves rest on the molding snugly. two gorm shelves which cost her a total of $19 are used to create the additional space and they are plenty sturdy for holding bulky storage items like blankets and sleeping bags.
legs for the lack
sophia decides to give the lack shelving unit a little lift. she scoured the internet for brushed chrome, tubular, coffee table legs and found them on tablelegsonline.com. heck, the legs cost more than the shelf... but it looks much better.
andy's magnetic kitchen utensils hanger
"i always hated the fact that most magnetic hangers can't cut the mustard when it comes to even lightweight utensils. enter: grundtal!
i took a simple grundtal rail, and paired that with a reversed grundtal magnetic knife rack. the knife rack has more than enough mag power to hold up the rack as well as all the stuff i'm hanging on it!"
Wednesday 20 February 2008
spot ikea in jim's new galley
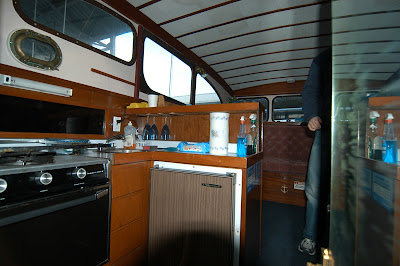
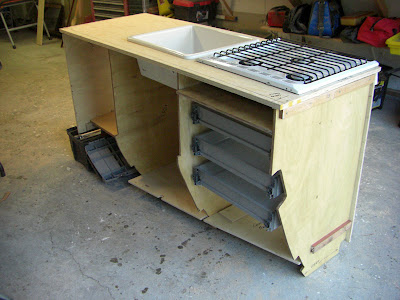
his 1947 32' skansie-built edwin monk design cruiser needed a new galley and jim turned to ikea to get it fitted.
jim says, "we decided we needed to remove the galley from the old boat and re-arrange to to make it better fit our needs, upgrade to propane, replace the rusted sink and get better use of the space in the galley area. only thing to do is rip the whole thing out and start again."
the sink is a domsjo and jim used 3 rationell drawers to complete the set-up. the drawers have excellent runners and dampening action that prevent them from opening, even with the rolling of the boat.
done! the drawers now wear mahogany fronts to match the new slimmer galley.
go here to see more of jim's galley.
Tuesday 19 February 2008
trash can turns into photography light tent
tanya takes a wastepaper basket and turns it into a photography light tent, with good results too.
"my hack is a fniss wastepaper basket camera mount for doing macro photography. i call it the 'trashcanulator 2000', with the '2000' added simply to sound more pompous."
the camera is mounted on a l-shaped plywood frame for stability.
look at a sample!
see instructions on building your own fniss light tent on tanya's blog.
related hack:
> skimra lamp shade photography light tent
> photography light table
> home photography backdrop
Monday 18 February 2008
another way to hack a murphy bed
a little while back i featured the moddi murphybed which got rave reviews. this is diana's version - much simpler but it works just as great.
diana writes, "living in a one bedroom flat in central london, i really needed an easy, convenient place to put overnight guests. this turned out to be the perfect solution: a horizontal, single murphy bed that projects out a mere 25 cm (10") from the wall.
i started with a sultan landon slatted bed base, added swiveling wooden legs (with an extra screw hole for locking them in place when down) and a metal reinforcement along one end (one of those white steel narrow bars used for mounting wall shelves, which come (happily) in 200 cm (79") lengths).
i then mounted the whole thing with strong screws on two short wooden legs (with the base screwed into the floor) that could swivel up and down. the bed was finished by strapping on an ikea mattress - i chose the sultan enebakk because it had the best combination of thinness and comfort/firmness, but it is quite heavy so in retrospect i might now prefer a slightly less comfy foam mattress, just to make things a bit easier.
i then purchased a piece of plywood cut exactly to measure and applied it to the back of the bed base using heavy duty velcro tape (to allow for easy access to the inside of the base later on), mounted a wall shelf on top to hide the legs when they are pivoted in, and painted the whole thing the same color as the walls. the bed works great - and was much cheaper and actually is much slimmer and less intrusive than what i could have bought ready-made. most commercially available murphy beds cost over $2000 and are over 30 cm thick (some as thick as 45 cm), so i'm really happy with my ikea hack!"
Thursday 14 February 2008
what's an ikea baby changing table gotta do with the blue man group?
ever seen the blue man group perform? i've not had the good fortune of catching them live, just on the tube. those guys are absolutely exhilarating.
christopher creates a blue man group type of pipe instrument with a sniglar baby changing table as its base. the 22-note pvc pipe instrument is playable with paddle slappers or drumsticks.
looks good. how does it sound? hear it play the flintstone theme.
see more of christopher's hotpipes or the instrument in action (my sherona, ac/dc thunderstruck intro) on youtube.
i heart this valentine's wreath
happy valentine's day! and a special post to celebrate all things lovey dovey.
jenny rescued a half-priced ikea christmas wreath (can't find the link on the website) and gave it a little love. it's pretty easy too. all you need to do is cut your selected fabric into strips (treat the fabric first to minimise fire hazard) with a rotary cutter and tie them round the wreath.
see more of jenny's valentine wreath.
Wednesday 13 February 2008
how to recover your ironing board
not really hacks but two fantastic how-tos on recovering ironing boards. if you have an ironing board, you're bound to find this useful. i won't go into the details of how it is done - just hop over to their blogs for their clear-as-day instructions.
julie restored her old stryka ironing board using the ikea ps gersby fabric. go here for her tutorial.
feed dog recovered a d�nka ironing board with pernilla fabric. go here for feed dog's tutorial.
julie restored her old stryka ironing board using the ikea ps gersby fabric. go here for her tutorial.
feed dog recovered a d�nka ironing board with pernilla fabric. go here for feed dog's tutorial.
a leksvik works great as a window seat
lin does a great job with the leksvik tv bench - turning it into a window seat.
she says, "i wanted a window seat with storage for my room at a reasonable price. after wandering around ikea for days searching and measuring and discussing pieces, (we did go home in between!) we found this beauty, the leksvik tv bench. my dad put in a supporting leg in the center so it can take a considerable load. without that, the bench will flex if sat on, as it is quite long.
unfortunately it didn't have doors to keep dust out so my dad put in some ring eyelets and curtain wires and i sewed up curtains for 'doors'. i had trouble finding a nice white mat that fit though, so i used chair seats instead till i get around to sewing my own mat!
the lamp on the seat is a half ikea creation as well, constructed with the ikea ripe lampshade and glass pebbles."
Tuesday 12 February 2008
a diaper wallet for quick change
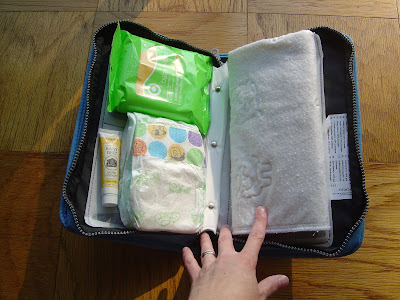
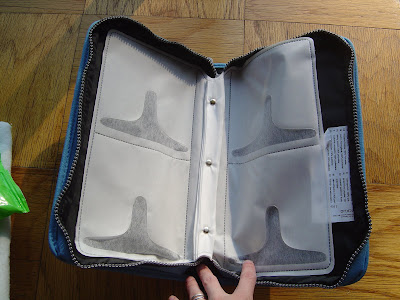
emily shares a handy parent hack - turning the lycklig cd case into a mini diaper bag, great for quick outings with baby.
"i made a 'diaper wallet' inspired by the skip hop pronto mini changer (pic, right) that's easier to grab for short outings and makes any bag into a diaper bag.
all i did was take a scissors to the cd pockets in the lycklig cd case (leaving a couple in for pacifiers, etc.)
now it keeps diapers from getting squashed in a larger bag and organizes everything i need for a change in one spot - for a lot less $ than the skip hop!"
adding shelves to the aneboda
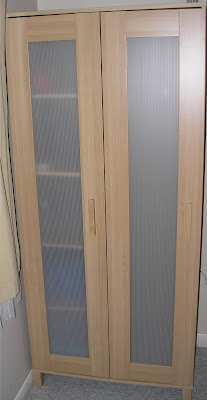
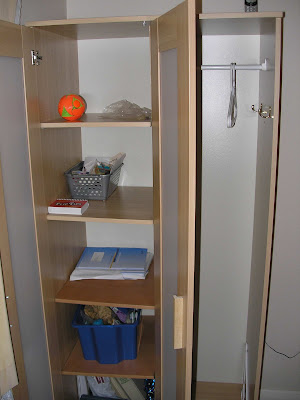
dale divides the aneboda wardrobe and adds shelves for more storage.
"i needed some more closet space but i also need storage for boxes and papers. i bought the wardrobe and some sides of another cabinet in the as-is, and some standard hardware pieces, and put it all together.
one side has part of the clothes rail (cut to fit with a pipe cutter), and the other has shelves (also wood from the as-is).
i turned both doors to open in the same direction because of my preference and room set up. i drilled holes in the inside of the walls of the cabinet to fit the standard peg-style shelf holders."
Monday 11 February 2008
moebler 's designer hacks
haymon tips me on german design studio, moebler and their line of eye-catching and cheeky, i might say, hacks. i particularly "spot the looney" (second picture below) - the optical illusion is a nice touch.
feast your eyes. see more of moebler's designer hacks.
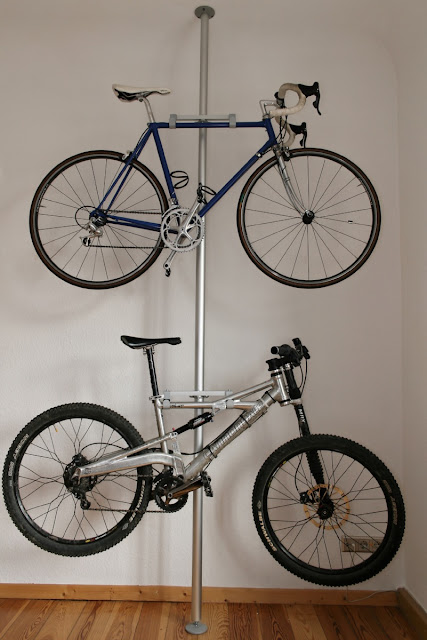
stolmen bike rack
i really like michael's idea for bicycle storage with the stolmen posts. i just wonder how easy it is to get the bikes up and down the pole. that's a workout in itself!
he says, "there are a lot bicycle storage/rack-systems on the market, but none of them met my expectations in function/style and price. i wanted to get 2 bikes on a wall in my apartment.
so i build one on my own. here's how it looks:
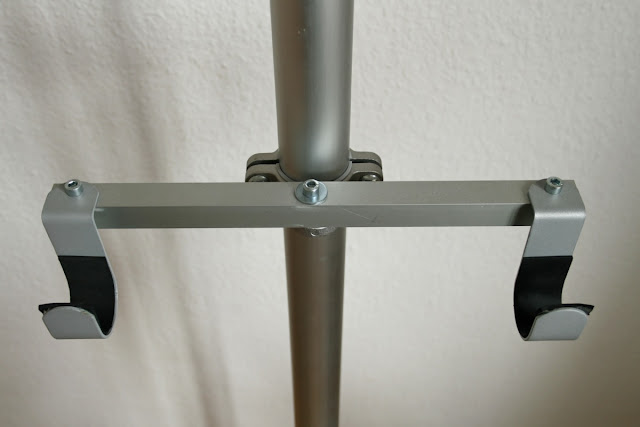
all you need to get from ikea is one stolmen post, two brackets and four hooks. you�ll also need some screws and some aluminium 20x20mm square pipe, maybe some foam rubber.
1. cut two pieces of the square pipe; choose the length depending on the design of your bike frame.
2. drill 3 holes into the pieces of square pipes.
3. screw a hook on each end of the pipe; screw the pipe to the bracket.
4. now you can mount the stolmen post and adjust the two brackets on it.
5. finally glue some of the rubber foam to the hooks to not scratch the bike frame.
that�s it! all in all this should just take you like � hour. the price of approximately 40euro is unbeatable."
Subscribe to:
Posts (Atom)