Wednesday, 30 September 2009

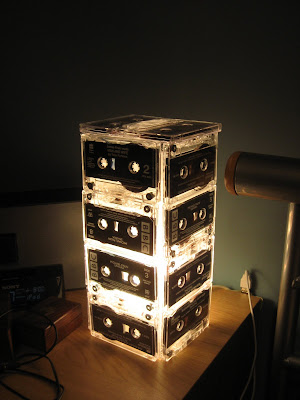
Grono lamp that's a tune

Another lamp to brighten your day. This one is from Tom. Aah ... reminds me of my old mix tapes.

"I saw this on Gizmodo and thought 'I can do that! It turns out the Grono table lamp is exactly on cassette tape width wide. All you do is lay out a 4x4 grid of tapes (missing one for the cable to come out) and tape them together with clear sticky tape. Then just fold it around your Grono lamp and you're done."

cassette tape lamp

Rimfrost table lamp

Iris makes a big bold light for her room by mating 2 Ikea lamps together.

"As a renter, I find it difficult to hang ceiling lamps in an attractive way without either permanent damage or cords everywhere. And so, I hacked together an Ikea Rimfrost ceiling chandelier shade, with another Ikea lamp shade, and an Ikea Januari lamp base to turn the ceiling lamp into a table lamp. The only additional materials the hack required was a bit of wire, to combine the two shades together. My step-by-step photos are here. But it's essentially a really simple hack."


Tuesday, 29 September 2009

Shaky no more Billy

Andrew adds some stability to the Billy bookcases.

"My wife and I just purchased 6 Billy bookcases to go in our dining room. Having read some people complain that they could be a bit wobbly, I did the following. When assembling, I put glue in all the dowel holes connecting the top/bottom/middle shelf to the case sides, and then when installing, I connected them together into 2 groups of 3 to make a rigid structure, that's attached to the wall."


See the process photos on Flickr.

Monday, 28 September 2009

Lekman cover up

Genna who is one of the Kitchen and Dining co-workers at Ikea Houston (hello to all you guys out there!) glams up the Lekman box. Nice touch.

"This one is pretty straight forward. I have an Expedit tv unit but needed closed storage. I didn't want to spend a lot and so the Lekman box was the best price. Although, the Lekman by itself is not the best looking thing. So, I took some spray adhesive and some wrapping paper from the Container Store and covered just the fronts. Hope you like them."


Makeup stand hack

Konstantin hacks a dresser for his girlfriend.

"I could not wait to come up with an own hack that fits my new apartment in Berlin. I tried building shelves on my own from scratch, but that is more expensive, less flexible and does not even look better. So here you go - that is my first Ikea creation. I was inspired by the floating Billies hack and a few other hacks where putting a plank on a dresser or chests of drawers making them tables. The aim was to build a makeup table for my girlfriend, that matches the other furniture in the bedroom, beautify the naked wall and not take up too much space. I used a white Koppang dresser, mounted it on the wall and put a black plank on it that I found in the Ikea 'as-is' department. An old Ikea mirror is mounted horizontally above. That black and white furniture perfectly fits my set of Odda wardrobes."


Other vanity hacks:
- Besta Vanity / Make up Armoire
- Make up organizer

Friday, 25 September 2009

Bamboo blackberry cradle

Just plonking your Blackberry on your dresser nestled in a trail of cords? No way for Hrishikesh. This has to be the zen of Blackberry charging. It's a simple tweak but a solution a Blackberry user may find useful.

Hrishikesh says, "I�ve always been annoyed by my phone charger. I keep the cord out of sight behind a dresser, but when the phone is unplugged, the cord ends up on the ground and I have to fumble around for it. I also don�t love how the phone looks when it just hangs out atop my dresser � it looks kind of unconsidered and messy. I wanted to make a little spot to keep it, but I don�t have anything in the way of woodworking skills. I did discover, though, that an Ikea Molger soap dish fits my Blackberry perfectly and goes well with my teak dresser. I added rubber grip feet to the bottom of the soap dish so it doesn�t slide around the dresser top (otherwise the cord can pull it). Then I added cut small strips of Velcro and affixed them to the end of the charger and the top of the dish, for when I�m using the phone. That�s it! I�m so happy to have found a very inexpensive solution that was easy to make and looks good with my stuff, and so I wanted to share."

Thursday, 24 September 2009

Fjus turned dog "feeding station"

Carley's lucky puppies are getting a happy feeding station.

"We are adding a new Golden Retriever puppy, to be named Jaxon (pr. Jackson) to our family in a couple weeks. We already have one Golden named Jewel, who eats from an elevated food dish. Rather than drop another $25 on another ugly set, my husband and I decided that we would rather build one which we thought would at least be more aesthetically pleasing.

We were trying to figure out where we could get the wood for cheaper than is available at Home Depot, and then realized that we had a half-stained Fjus book shelf that we were just going to get rid of. We cut that up, sawed some holes for the bowls, then left a space large enough to place a small Trofast storage bin.


After making a trip to Home Depot to pick up some brown paint and one more piece of wood for the front (which we got cut for free), we came home and nailed the front panels on. We then added a personal touch by adding their names and bone/mod designs and Voila!


We're pleased with the way it turned out, as is the dog (picture below), although we are thinking about adding doors on the two open sides, and maybe adding a watering system so we can hook up a reservoir. Perhaps sometime in the near future, we've still got other projects to work on.

You may ask whether the feeder is too high for a puppy. Nope, that was my first reaction when we got our first elevated feeder for Jewel when she was the same size as our new puppy, but she just hopped up with her front paws and chowed down. Also, Jaxon is already used to an elevated feeder since the breeder uses one (keeps the puppies from falling asleep in their food or drowning in their water).


Cost breakdown:
Shelf (thus wood/hardware) - FREE (although we did spend the $35 but we've had it for so long and we were just going to throw it away anyway)
Bowls - FREE (already had, but they're super cheap to buy)
Water bin - $3
Extra wood for front panels - $8
Paint - $13 Total: $59 (including cost of shelf) We really only count $24 though since the shelf was re-purposed.

You may also want to check out these elevated dog feeder hacks:
- It's a dining table for pooch
- Elevated dog bowl for $22
- Raise the dining standards for your dog
Wednesday, 23 September 2009

Sideboard beauty

You can make a mistake and redeem it with some hacking. Adam's "oops" turns out to be a sideboard with "oomph". 

"I am always looking for new ways to use things and Ikea is great for that. Especially when you make a mistake ordering a kitchen. I bought 2 tall wall units at 400mm wide instead of 500mm. Promptly bought and fitted the right size (to avoid the fury of the wife) and hid the 400mm ones in the garage while I thought of something to use them for.

When I was building an extension a couple of years later decided that if I turned them on there side and fitted them together they would be an ideal size as a sideboard unit in my sun room. Fitted them with a couple of shelves put a couple of Abstrakt doors to match the kitchen ones and oak worktop from Ikea to match the kitchen also. We always get comments on it and people have asked where I bought it from, and I tell them how I had it all planned this way from the beginning. Only my wife knows the real story! Or does she?


I have also used the Ikea oak worktop every where in my house, for various different applications I have attached some pics as examples."


Tuesday, 22 September 2009

And baby makes three

Irma makes it easy to sleep next to baby, with a modified Gulliver crib.

"We made this co-sleeper. The bed was made 20cm shorter. We removed one side and adapted the bottom to the same height as our own bed. We ordered a custom size mattress."


Check out other hacks like this dining-room-baby-nook, these lovely kid's bedroom hacks and how to transform your Gulliver into something snazzier.

Monday, 21 September 2009

Signum cable manager to handbag rack

Jana found another use for the Signum cable manager. So if you've got one of those lying around too, here's a great tip on what to do with it.

"Two years ago I bought a new desk and also a Signum cable manager horizontal. After setting the desk up I realised that I don't need the cable manager and so it was gathering dust in a corner. One day my mom visited, saw this, saw my handbags lying around and suggested using the cable manager as hook. So we simply applied it directly to the wall of my closet with some screws and voil� you have immediately 30 hooks on the upper side. If you are really desperate you can attach small S-hooks to the bottom side and you are with 60 hooks on a space of 1 meter. It's not overly stylish but it's simple and my handbags have a place to go."

Friday, 18 September 2009

Ikea bed sheets turned wedding deco

It's an easy hack but wonderful idea for a wedding. Sheri's wedding gets a touch of Ikea.

"For our August 2008 wedding, my wonderful mother and her best friend transformed three sets of twin bed sheets from Ikea into 130 table napkins for our wedding reception, and an equal number of jam jar covers (aka a jam jar cosy). I wish I could remember the name of the sheet set but as it was last summer I forget, and it is no longer in stock. Regardless, we already had our wedding stationary designed and I was absolutely floored when I was shopping at my local Ikea store and came across the nearly identical pattern on the sheet sets."


You may also want to check out this wedding centrepiece.

Thursday, 17 September 2009

Varde work bench

Minor hack but big impact. Nice work on the workshop remodel, Brett.

"My recent project, altho' there's not too much 'hacking' going on, there is some. I used two Varde free standing kitchen units in my recent workshop remodel. I needed a sturdy bench, so I was able to use a single 57"span of extra Varde counter-top to span across the two units giving a strong bench to work on. I cut the other two counters tops to fit the remaining space."

Wednesday, 16 September 2009

Albert mobile clothes rack

A mobile wardrobe. How about that? Liz goes nomading with an Albert rack, which kind of looks like a Gorm, yet not quite.

"I hacked the Albert rack, or whatever this type of thing is called in English. My Ikea-hack is incredibly simple. It involves hacking two Albert racks/shelves into one closet. The reason behind my hack is my lifestyle, which is somewhat of an urban nomad. My whole life needs to fit into the back of a car or two � in the last picture of my room you see about half of the stuff I own (in volume). My furniture needs to take up as little space as possible and be easy to assemble and disassemble. I suppose I could get one of those telescope racks and hang all of my clothing in it, but I�m more of a folding rather than a hanging type and plus, I�m just really a sucker for wood. So off to Ikea I was (one could actually build this from scratch but it turns out raw materials cost more than these racks). There I found Albert racks, which take up next to no space when completely disassembled. Purrrfect.


The top shelf of the rack consists of 3 boards. I took the middle board and sawed it in two along the length axis. For this, I picked a board with as little dark spots as possible to ensure maximum construction strength. This (half) board became the bar on which to hang all the clothing that needs to hang. I decided to sandpaper it �sometime later�, but normally that would have to be done as well. Then, I left out 3 boards from the second from the top shelf (but left the side boards for structural integrity). I assembled the shelf in accordance with the Ikea manual from there on, and then, I assembled another (entirely in accordance with the manual) and put the two racks together with screws in 8 places.


As you can see on the pictures, I also added some simple hooks attached by screws on one of the sides in order to hang jewelry and belts from them. An automatic screwdriver is going to be your best friend for this project by the way, unless you really dig blisters. The careful reader will realize that this assembly method left me with three and a half boards which went unused. I used them elsewhere, but one could make an extra shelf in the closet out of those if one wanted to. Say, to hold Kasett (or any other kind of) boxes for the socks and the underwear. Mine are actually in the drawer beside the closet, so I didn�t need it. In the pictures, you can see the resulting top shelf of the closet viewed from below and from above, the closet when it�s empty, and how I use the space. The width of the Albert rack was enough to hang my hanging-required clothing when all of it is clean (in the pictures, half of my button-down shirts were in the laundry). Originally, I wanted to fill the bottom shelf with heavy boxes to keep the closet from tumbling over (I�m renting so drilling walls isn�t a very good idea), but it turns out the whole construction is stable even when top-heavy, so now I can put something else there, like boxes with shoes. Nomad lifestyle or not, I have fifteen pair or so anyway and stuffing them under the bed isn�t very feng-shui. Not to mention, my sport sneakers are basically a chemical weapon and shouldn�t be anywhere near sleeping people."

Tuesday, 15 September 2009

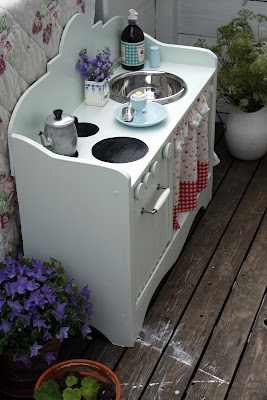
Fairy tale play kitchen

Mali-mo from Norway does a few hacks on an her Ivar and out comes a dreamy play kitchen.

"I started with an Ivar box and ended up with a little fairytale-kitchen for my 2 year old daughter. I cut out the sides and the door for the stove in some cheap pine-boards. The knobs are some old leftovers, and the stove door has a Lindsdal from Ikea as a door handle. I cut out a circle for the basin, an ordinary bowl from a hardware store. The curtain is sewed from some leftovers, and the paint is also mixed from various almost-empty tins. I am absolutely no carpenter, but I have done all of this by myself and it wasn't really that difficult, and it almost didn't cost me anything! A very easy project-and my daughter absolutely loves it!"

play kitchenplay kitchen


Click to see more play kitchen hacks.

Monday, 14 September 2009

Framing up your entertainment center

This is a pretty interesting entertainment set up from Tien. The frame does "hold" the ensemble together and makes an eye-catching wall feature. And the Chinese opera faces is a nice touch.

"I just wanted to show you my Ikea hack now that it's all done. I wanted a simple, uncluttered system. Luckily, I only have a few components. Here's a breakdown of what I used:

4 Lack long shelves
2 Lack side tables
1 Anno Sanela - Panel curtain
a few L brackets
a cardboard box
red ribbon
cut vinyls
Pioneer KURO TV
Pioneer LX-01 sound system
PS3


1) I painted the background a glossy white, mounted the four shelves in a "pinwheel" and flipped the top one upside down so that the screw holes wouldn't show.

2) Then I took the two table tops, attached them perpendicular to each other and mounted it directly to the wall using L-brackets. I sawed off the table legs to extend the shelf to fit the PS3 underneath.

3) On the bottom shelf and table top, I cut holes so that I could run my wiring through. I wrapped it all together with a red ribbon (my logic - if it's going to visible, I might as well make it stand out). Though it looks like one long wire, it actually goes in and out of the box - the in is for all the power and the out is for all the sound system cables.

4) I cut pieces and spray glued it to a cheap cardboard box and hid all the cords inside.

5) Mounted vinyls.
Later on, I'll add a laptop that will sit on the connection box that will control streaming media."

Friday, 11 September 2009

A Besta bunny hutch for Eames

Nicole and boyfriend has the cutest bunny ever, Eames, named after the renowned designers. And of course, a bunny with a famous name can't live in a shabby hole. It needs a specially designed hutch.


Nicole says, "My boyfriend and I created a bunny hutch from a Besta shelving unit. We wanted something that wouldn't be an eyesore. The frame is an Ikea piece, the door on the right has hinges so it can easily be closed - the back of that half is wire grate, like you see on the front. We cut a hop through hole in the vertical piece that separated the two halves. The left door was the most complicated - it was made from scratch. It has hidden hinges near the top - so it can be opened, and pins near the bottom that lock it in place. The legs are Ikea as well. The floor of the hutch is tiled, with very nice glass tile. Spoiled bunny? I think so."


See more of the bunny hutch.

Thursday, 10 September 2009

A baby room with ikea hacks

New mom Alison carves out a baby 'room' in her dining area with clever use of space and Ikea.

"Living in a 700 square foot, 1 bedroom condo, did not stop us from creating a cute and functional "room" for our 4-month-old baby girl. We converted our dining room nook into her room from Ikea stuff, and created tons of storage for all the things babies entail, with room to grow through her crawling and tolddling years.


Total cost: $250
Ikea Expedit bookcases, 2 ($130)
Ikea Crib: Used (Free)
Ikea Malm Dresser ($35 on Craigslist)
Ikea Komplement Boxes, 6 ($40)
Ikea Branas Basket, 2 ($16)Paint, 3 colors: ($4 each for little samples from Home Depot)Frames: ($10 on Craigslist)
Frame mats: ($5 on Craigslist)
Pictures: Free (Walmart screwed up and had to give me my money back!)

I built a box out of spare plywood and secured it to the bottom of the Malm dresser for two reasons:
-To create a storage area for toys that the baby could get to herself when she started crawling
-To raise it up to proper changing table height

I painted the bookcases to match the walls and flipped them on their side to utilize all the vertical space of our 9-foot ceilings. The wall hangers that come with these bookcases are a joke, so I secured them with 8 L-brackets screwed into the studs, and a 2x4 underneath the shelves to act as a bottom support. The baby seems to love it, as she slept through the night in her new room. What else can you ask of a 4-month-old?"

Wednesday, 9 September 2009

Spice up your Grundtal racks

Autumn does some mixing and matching to get the idea Grundtal rack.

"In setting up a Grundtal rail next to our stove, I found that the Grundtal spice rack was not deep or tall enough for the larger bottles that we use while cooking. And the Grundtal wall rack/dish drainer is not tall enough for bottles. So, I combined the Grundtal spice rack frame with the shelf from the wall rack to make a tall, deep shelf (see the rack on the right side of the lower rail), and then a spice rack frame and spice rack shelf with a wall rack shelf to make a two-tiered shelf (see the lower left rack).


The tall, deep shelf was easy, since all you have to do is screw the wall rack shelf to the spice rack frame. To avoid having holes show in the frame where the spice rack shelves are missing, we just used the existing screws to plug the holes. (Note that there's a little bit of bend to this rack, especially with heavy glass bottles on it. If it bothers you, you can always just screw the whole thing into the wall where the non-functional screws are.) The two-tiered shelf was a little trickier, since the two kinds of shelves are not exactly the same width. We used a drill bit designed for drilling metal to drill an extra hole into the spice rack shelf so that the holes would match the width of the wall rack shelf. I acknowledge that this isn't an extremely cost-effective hack, since you end up with a lot of extra Grundtal parts, but even double-buying at Ikea is cheaper than the alternatives! And you can always mount the extra shelves directly to the wall per the Ikea instructions.


Related hacks:
- The art of kitchen utensils
- Andy's magnetic kitchen utensil holder
- Easy storage for utensils
- Hanging long stemmed utensils
- Omar pot rack
- Grundtal pot hanger and rack

Tuesday, 8 September 2009

Ikea classifieds

Well, if you're thinking of offloading your used Ikea furniture, you gotta get creative. Like how this guy did. He demonstrates the multi-uses of Ikea trestles with the finesse of gymnast. Thank you Ashli for sending me the ad. Too funny.


I'm not sure if the legs are still available but if you are in the market for a pair, you gotta get them from him. Hop over to craigslist now.

Talking about classifieds ads, have you seen Ikea Nation? It's kinda like craigslist but dedicated to all things Ikea. Wunderbar. It's free too. Woohoo! At a glance the navigation looks good with searches by categories or States (US only, unfortunately for me). The prices looks even better. Spotted a Mikael computer desk going for $60 (new, $109) and a Karlstad Loveseat going for $0. Zilch. Nada. Sounds like the place to score your next Ikea hacking items.


Anyone have any experience buying or selling on it? Do share with us.

Corked-out Ikea PS workspace

The wall mounted PS Laptop Workstation is a neat idea, space saving and all but my only gripe is that it feels so "locker-ish" if you know what I mean. John's little hack gives it a nice warm touch.

I just doped up an Ikea PS Laptop Workstation with some cork lining on its interior surfaces. Doesn't interfere with door operation at all, and makes it look about 1000% nicer. Plus gives some shock-absorption for the laptops when being placed onto the desk panel. Not sure if this qualifies as much of a hack, but it's a nice touch to spruce things up a bit.


See more of John's corked out laptop station.

Monday, 7 September 2009

A rolling curtain panel

Michael finally gets rid of the temporary paper curtain panel with a merry combination of the Flyn Ofelia and Isdans roller blind. The Flyn Ofelia panel curtain is sewed on top of the Isdans blind. Not exactly simple to do as sewing it wrongly will get you wrinkles and bulges when you roll the curtain up.

Paper curtain has to go!

All pretty now!

See Michael's rolling panel curtain instructions here.