Showing posts with label Aneboda. Show all posts
Wednesday, 18 April 2012
Hollywood Regency Baby Changing Station
Materials: Two Aneboda chest of drawers, Ballard Designs Fretwork panels, cut- to-order mirrors
Description: I love the look of mirrored fretwork furniture and had always wanted to attempt an Ikea hack.
I needed a place to change my baby and store her clothes. When I came across the Aneboda drawers for about $59 each, I thought that they would work perfectly.
At my local glass shop I had them cut mirrors to fit the drawer panels which originally came with just corrugated plastic panels.
Next I used mirror adhesive that I bought at the hardware store and applied it generously to the back of the mirror. With the door off of the drawer, I stuck the mirror onto the plastic and left to dry completely.
I then purchased the wooden fretwork panels from Ballard Design. Using a table saw, I cut them to fit the front of the drawers. Before gluing them on with the same adhesive, I sanded the edges and painted them white.
I am so happy with how it came out that my next project will be the wardrobe.
~ Anne
Thursday, 29 March 2012
Vintage bedroom dresser
Materials: Ikea Aneboda Dresser
Description: I removed the chunky white wooden handles.
Then I replaced these with some vintage black handles.
For the clear or polypropylene sections I purchased some fun wrapping paper.
I measured the wrapping paper and cut them out to fit the clear sections of the dresser.
Then using all purpose glue I stuck the paper over the clear sections and smoothed.
See more of the vintage dresser.
~ Tracey Meyer, Gold Coast, Australia
Friday, 9 March 2012
Hacker Help: Sliding doors for the Aneboda?
Materials: Aneboda
Description: Hi everyone :)
I have a relatively small bedroom and not enough money to afford a sliding door wardrobe.
I've been eyeing the Aneboda wardrobes for sale on the second hand websites and ever since I stumbled on Ikeahackers I've wanted to do some hacking myself!
Is there any way to transform two Aneboda wardrobes into one large sliding wardrobe?
Any ideas??
Thanks!
~ Diana, Australia
Tuesday, 14 February 2012
Billy Meets Aneboda -- Dining cabinet
Materials: Billy (new,deeper) bookcase, Aneboda 3-drawer drawer chest, 2 Billy Olsbo glass/panel doors
Description: Once upon a time there was a girl named Aneboda. She was the shy type, usually likes to stay in her private bedroom.
Then there was Billy. Billy was the cool kid on the block. Many like him and you can find him hanging out anywhere and everywhere. After many years, people were surprised to see Billy mature and start shedding his "shallow" side.
Aneboda always had a thing for Billy and she was refreshed to see this new deeper side of him.
As chance would have it, that girl in the corner caught Billy's eye. Perhaps it was her looks that reminded him of a girl Ydre he once knew.
They fell in love. From any dimension, you could tell they were a fit. They got married and would live happily ever after.
Alright, enough of the fairy-telling.
Here's the deal. I have to post this fast as Aneboda's have been designated as a clearance item at my local Ikea. So if you like to make this, get them while you still can.
I was looking for a dining cabinet with drawers of the right size. Found the new Billy bookcase and Aneboda chest dimensions matched almost perfectly. I wanted to use the bottom panel of Aneboda (with legs!) and use Billy's tall side panels. The widths of both were an exact match (31.5"). There was initially some concern that the Aneboda drawers would not fit the interior width of Billy which is just a bit smaller due to its thicker side panels. Finished product shows the drawers are just a little bit tighter but definitely not a problem.
Materials:
- 1 Billy Bookcase
(newer 31 1/2" x 15 3/8" x 79 1/2")
- 1 Aneboda Chest of drawers Width: (31 1/2" x 15 3/4" x 39 3/8")
- 2 Billy doors (your choice, I used Billy Olsbo glass/panel), can also use Ydre.
Steps:
1. Assemble Billy bookcase top, middle and side panels as per instruction manual. Leave out the bottom panel.
2. Align the bottom panel of Aneboda. measure and mark bottom edge of side panels to align to holes in bottom panel for drilling. Drilling particle board can be tricky. I recommend using brad point bits and a dowel kit. After drilling the right holes, install the bottom panel.
3. Next step is to transfer holes of Aneboda side panel for the drawer guides to Billy's side panel. This is the most important alignment step. I taped a big piece of paper on Aneboda side panel and punctured the hole locations. This serves as template to mark the Billy side panels. Drill the holes on Billy and screw in the guide rails from Aneboda.
4. Install back board panel of Billy. The bottom has no panel to nail to so would hang loose. I initially drilled some holes on the side to install Billy's bottom support strip from the back side to also be used for nailing support but this turned out to be a bad idea as the drawers would hit against it. I broke that and later installed a strip of wood for extra support on the bottom on the back side.
5. Assemble drawers of Aneboda per manual. Stand up the bookcase/cabinet and test the drawers. If things are properly aligned, they should be able to slide in and out easily with just a little bit of tightness.
6. Install the legs from Aneboda with another person's help to tilt the cabinet while installing.
7. Add Billy shelves. One of the shelves should be placed on the first hole set of the bottom half of Billy to line up with the top of the top drawer. I was pleasantly surprised to find this is a perfect alignment! This creates a small shelf pocket in the middle with the fixed mid shelf as you can see in the picture. At this point, the basic frame is done and the cabinet is already usable.
8. Adding doors. I had a choice. The Billy Ydre naturally matches the Aneboda front panel. Cutting it to exactly cover the top exposed half all the way to the top of the drawers should be doable and would probably turn out nice. But I wanted glass doors. Billy Byom glass doors would have been perfect -- no cutting and covers all but the short pocket I mentioned earlier. Unfortunately Ikea discontinued these a while back. I settled for the Billy Olsbo half glass/half panel. Saw off the bottom (panel) half just like the one done by a fellow hacker. After installation, the doors extend about an inch from the mid fixed shelf but that allowed me to install the push latches that came with the doors on the bottom of that shelf.
9. Top the whole thing off with the Aneboda top panel. Seems to look better that way. Final results: couldn't be happier with my new cabinet!
~ W Chan, Mountain View, CA
Thursday, 22 December 2011
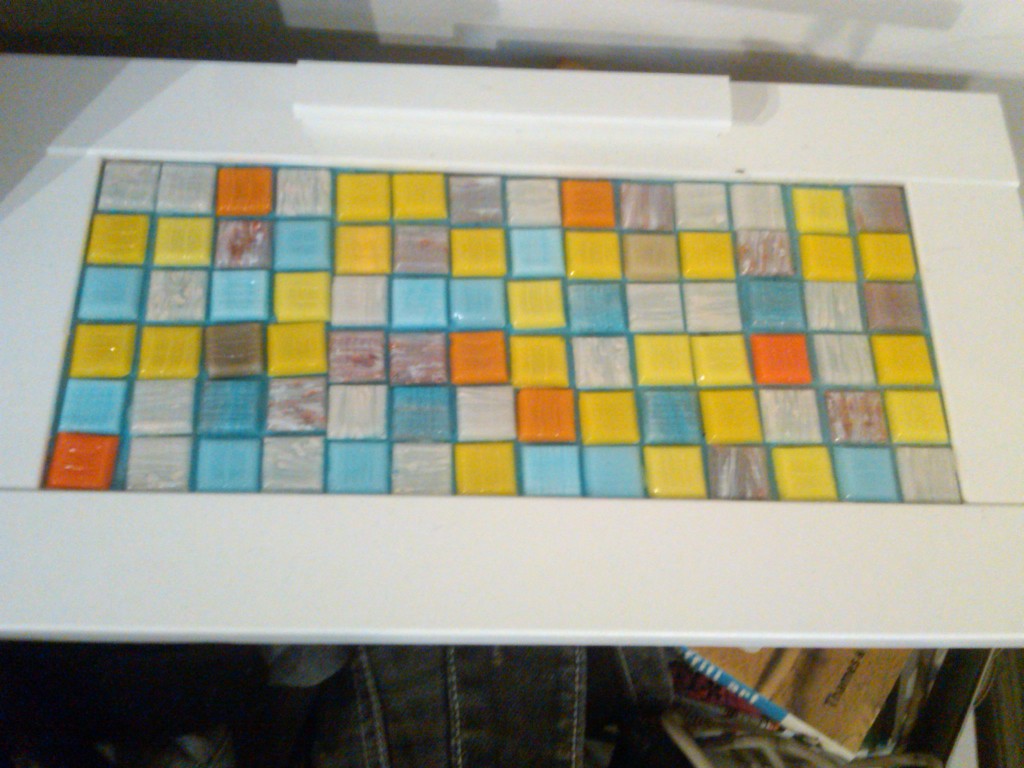
Aneboda goes Mosaic
Materials: Aneboda 3-drawer Dressers (white), Black Sanded Grout, mixed color glass mosaic tiles, rags, grout tool, tile adhesive, assembly tools (screw driver, etc.)
Description: After finding an adorable yellow vintage cabinet/dresser at a thrift store, I needed to find a way to work in additional colors to my bedroom's color scheme. I already had blue and some eggplant, so I went with a dual complimentary colors scheme, which brought in the yellow and required some orange.
I had already purchased and assembled (2) 3-drawer Aneboda bedside chests and (2) 3-drawer dressers, but had to wait for inspiration to strike to fix the ugly plastic drawer fronts. The yellow vintage cabinet was that inspiration, as I wanted to add a vintage feel to the Aneboda pieces while adding in the full spread of colors. Most of the mods that I've seen on Aneboda were painting or using paper over the drawers, but they just didn't strike my fancy.
So, I hopped onto eBay and found a source for bulk mosaic tiles - and hit the craft store for my supplies.
1.) Since my cabinets were already put together, I went ahead to took off the drawer faces and prepped the surface by lightly scouring with an abrasive pad.
2.) Using freehand style for placement, I went with a grid formation and random color pattern, and placed the tiles by first spreading Mosaic Tile Adhesive (clear drying) over the plastic part and waited overnight for it to dry. I made sure that all tiles locked on properly the next day.
3.) Next, I did my mixing for grout. I used sanded black un-mixed grout, and if you do, take your time with mixing in water. You can go from dry to too wet VERY fast. You could also buy pre-mixed.
4.) Apply grout over the entire face of the drawer, making sure to get it in all rows, and try to miss getting too much on the sides. Luckily, the coating that IKEA uses on furniture kept the dye from affecting the white portion of the cabinet (this was tested beforehand). Wait 20 minutes.
5.) After waiting 20 minutes, use a damp rag to wipe the excess grout away. Be careful to not dig into the areas between tiles, just keep a flat motion to get excess. Leave to dry overnight. This doesn't have to be perfect, but I made sure to get all grout off of the wood part of the drawer, just to not push my luck with staining.
6.) Once dry, use a dry rag to brush off remaining excess. Place drawer front back onto cabinet - make sure that bottom of drawer is in place with the slits on the front and back. You can use a sealant, but since I used black grout, I went without.
VOILA!
In the end, the recessed plastic panel worked out perfectly for mosaic work. I may replace the square white feet eventually with something more vintage and the drawer-pulls may eventually be replaced by something wrought iron, but for now, much better! Ignore the current paint job in room, that's the next project.
Ease of project - Beginner Mosaic work, low level difficulty
Cost of project - Moderate. Costs could have been reduced using broken tiles or vintage plates and buying grout in bulk. This *could* be a very cheap project. You can break the cost spending down by doing the project in phases, such as 2 drawers at a time. Mosaic tile calculators are available online to determine how many to order for the portion you want to do.
~ Emily I., Washington DC
Wednesday, 7 September 2011
Boring Birch Ikea Chest of Drawers Makeover: From Drab to Fab
Materials: Aneboda chest, Screw Driver, Spray Paint, Fine Sanding Blocks or Sand Paper
Description:
1. Remove/unscrew original block handles.
2. Since the dressers are laminate {like all things Ikea}, I had to hand-sand them to add a bit of texture so my paint would adhere.
3. Using a gloss white spray paint {because that was all I had at the moment though interior paint would work as well} ...and I painted right over the plastic fronts.
4. After they dried, I took the same sanders I used prior to texture them, now, to scruff up the paint giving it a vintage/shabby chic look.
5. Found these hilariously awesome little lion's head pulls for about $1.75 each and purchased 20 of them {the original handles had 2 screws each}.
See more of the home office dresser makeover. Also check out the fabulous Ikea curtain dress up.
~ ...love Maegan {Maegan Tintari}, Los Angeles
Wednesday, 11 May 2011
Aneboda High Cabinet
Materials: Aneboda Night Stand (Discontinued) and Aneboda three drawer small chest
Description: I had an old aneboda nightstand I used as a printer stand. I also had a small Aneboda three drawer chest my niece had adorned with stickers. I was already thinking of painting them over, but when I moved into yet another tiny NYC apartment, I realized there was not enough room for both of them. So I put the nightstand over the dresster and connected them with brackets. There was about a quarter inch difference in their sizes after painting and stenciling it seems like one tall piece. Voila, my very own linen tower.
~ Nora, NYC
Wednesday, 4 August 2010
Hiding the Goodies
Materials: Fabric, 2 Aneboda Dressers
Description:
1. Using the cardboard packaging from the dressers, I measured out 6 rectangular panels, marking where to cut each panel with masking tape.
2. With an X-acto knife
3. Using two yards of fabric I purchased online, I cut out six pieces of fabric just slightly (less than 1/2 an inch) larger than each of my panels and used hot glue to secure each fabric piece to the cardboard. To make sure that the fabric stayed in place, I used packing tape over each glued side.
4. With some heavy-duty double-sided tape (think carpet tape), I secured each panel to a dresser front.
The whole project cost me less than $20 and only took an afternoon, even with my 30-minute belly adjustment period.
See more of the Aneboda dresser.
~ Ann K., Kuala Lumpur, Malaysia
Tuesday, 8 June 2010
If MIKAEL was an ANEBODA wardrobe
Materials: ANEBODA
Description: ANEBODA wardrobe with extra shelf, space for belts and ties, metal file dividers on top, and other MIKAEL features.
Basically, I wanted to incorporate the space-saving features of the MIKAEL desk (discontinued and replaced by the inferior MICKE) into my aging, wobbly ANEBODA. This is how I did it (in about 2.5 hours), while making the ANEBODA a much more solid piece of furniture.
Major components:
ANEBODA- $99
FLANG- $2.99 each (I'd recommend getting 5)
SPONTAN- $9.99
Hanging file frames- $6 each set (get 7 sets) at Office Depot or here for real cheap:
Message board- $29 I'm using Tacktile from CB2 since I had one lying around, but it would probably look better with a cork board
Brackets- $1 to $5 each depending on size/style (get 6)
Shelf- $10 to $40 depending on style/etc
1. If your wardrobe is as old as mine, no doubt the back has already fallen off (or is just hanging by a thread). We'll get to fixing that later. If it isn't off, remove it; it'll make all these steps easier if you can access the inside from both the front and back. We'll put it on later with wood glue so we won't have to worry about it ever coming off again.
2. Brace the wardrobe with the 6 shelf brackets. Do two at the top back and 4 on the bottom. Use wood screws size #6x1/2. Don't get the largest size brackets as they will interfere with your shelf placement. For example, if you want to put a shelf 8" from the bottom, don't get 12" brackets.
3. Place the wooden shelf on the bottom section just above the brackets.
4. My file frames came from an office that was going to throw them out. You can get yours for cheap from the link above. Each set has 2 metal stands, so it works out to about $1.50 to $3 per stand depending on where you get them.
If the file frames stands are attached to metal bars, you need to unscrew them.
5. Grab a pencil and step on a stool or ladder so you can easily see the top of the wardrobe. Measure back about an inch from the front. Giving yourself a couple inches from the left or right edge, mark every 2 or 3 inches. If you plan on putting files and folders up top, do 2". If you think you want to put binders up there, do 3" or 4".
6. Using the appropriate sized drill bit for the file frame screws, drill at each of the marks.
7. Now we'll make our file dividers from the frame stands and metal bars. Take the metal bar that goes from one side of a frame stand to the other side of the same frame stand. These are going to go underneath the top of the wardrobe to hold the file frame stands in place and help us find the correct distance for drilling the back row of holes.
Put the bolt through one end of the metal bar and through the hole you drilled. Place the file frame stand upside down on the top and thread the bolt through. You shouldn't need a nut for the bolt as the file frame stands are typically already threaded.
8. Once one side of the bar and stand are secure, we can secure the other side really easily. Making sure the bar is aligned straight, draw a mark through the bar's bolt hole into the underside of the top of the wardrobe. Rotate the bar out of your way and drill through the mark. Now you can secure the other side of the bar and stand to each other. Do this for all the bars and stands.
9. Use a ratchet to really tighten the bolts as much as you can. Once done, up top you'll have metal file dividers, and underneath you'll have a bunch of metal bars that are good for hanging little things via small hooks; like jewelry, keys, etc. Also good for holding notes/bills...
10. Properly secure the back of the wardrobe for added stength. On their own, the nails it came with easily rip the backing, fall out, and bend. Instead, apply a line of wood glue all the way around the back edge, then nail the backing back on.
11. Add a shelf for extra storage. Armed with my measuring tape, I went to the As-Is section of the IKEA warehouse. I found an 18"x30" AVSIKT glass cabinet door in perfect condition for $10. The ANEBODA shelf is actually a tiny bit larger than this, but 18x30 will still fit� though just barely. Use bolts or screws or extra IKEA hardware (my local IKEA store has a random hardware bin by the As-is area) to rest the shelf on.
Keep in mind that adding an extra shelf means you won't be able to hang long garments like dresses in this thing.
12. Be even more efficent with space. Add the FLANG hooks to the inside of the doors, and the wardrobe sides (both inside and out) for hanging ties and belts.
13. Add a corkboard�
14. And a file organizer�
Finished! It's like ANEBODA and MIKAEL mated!
~ James Cobalt, Boston, MA
Tuesday, 1 June 2010
Stacked nightstands
Materials: 2 Aneboda nightstands
Description: After moving a pair of Billy bookcases into our Aneboda-stocked guest room, we realized the nightstands suddenly had no home. There wasn't enough floorspace to keep them both around, given that we already have a narrow 5-drawer and standard sized 3-drawer dresser in there. To maintain storage space, but use less floorspace, I simply stacked the leftover nightstands, with a minor modification.
I removed the top board on the lower nightstand, and removed the feet from the upper nightstand. With a few holes drilled, I was able to fit them together with the existing twist-in metal rods and wooden dowels. I added steel L-brackets to give a bit more structural integrity between the walls of the lower unit and the floor of the upper unit.
Now we have a really nice looking place to keep spare linens and towels for the guests, and we were able to reuse about $100 worth of furniture that otherwise would have had no home.
They don't sell these units anymore, but this is basically the same, only with 3 drawers, whereas ours has only a drawer on the bottom.
~ Benjamin, Fort Worth, Texas
Subscribe to:
Posts (Atom)