Materials: Besta TV storage combination
Description: Besta TV storage combination + wooden 10 legs, and LED backlite.
~ Lucas, Polska
Materials: BESTA door, paint, nails, polymer clay, glue
Description: My front entrance hall - like many front entrance halls - suffers from a semi-perpetual pile of clutter. A little while ago, I started fixing this by making a coat rack/bag hooks by up-cycling a plank from a shipping pallet a friend gave me.
I've been wanting a key rack for that space, and am also planning to build a shoe rack from the remainder of the pallet.
Then a recent trip to IKEA yielded a BESTA cupboard door in the seconds section for $10, and this weekend project was born...
As always, the first (and least fun!) part of this project was surface prep. The door not only had that dirty great sticker on it, but had been wrapped in sticky tape, as well as having some minor chips and dents in the paint work. Getting the sticky residue off proved interesting. The frame was not such an issue, as I needed to sand it lightly anyway to create a good surface for the paint to adhere to. The glass...believe it or not, I ended up using a toothbrush to scrub the residue with TOOTHPASTE and white vinegar, before polishing off vigorously with a towel.
Next up, I created the "hooks" for the key rack along the bottom. Previous experience making the bag rack taught me that polymer clay by itself tends not to be strong enough to use as a load bearing material. So I used bullet head nails to create the sub structure of my hooks (Baker Boy very kindly bent the ends of them for me to create the hook shape).
I deliberately left the final portion of my nails "bare", so that at assembly time I would have a uniform diameter for drilling the holes for them. It also helped in ensuring that the front of the hooks was even after assembly - as I made each hook, I lined it up with the others to make sure the length of blue clay from the bend to the start of the bare nail, was the same. That way, once the nails were placed in the holes to sit flush against the start of the blue, all the hooks lined up.
Then, painting everything. First, I cleaned the glass REALLY well, then spray painted it on the "wrong" side in Dulux Ultra Chrome, to create an opaque back for the "whiteboard" surface. You could use any light colour for this. Then I used some Jo Sonja greens to paint the frame, after masking the edge of the glass with tape so I didn't over brush onto the glass. I wanted the slight "streaks" with the white showing through, to match the somewhat rustic finish on my coat rack - if you wanted a really smooth finish, I recommend REALLY sanding the existing finish from the door to give the paint a good surface to adhere to.
Finally, time to put it all together. I measured out equal spacing for the hooks, and then drilled holes just wide enough for the portion of nail that was extruding from each hook, then fixed them into the holes with glue. I also glued the letters on to the top of the door and...ta-da! we hung it on the wall. I'm pretty stoked - it gives us not only a key rack but a great place to leave messages, reminders, etc.
See more of the Besta whiteboard and keyrack.
~ Kath, Adelaide, Australia
Materials: BESTA shelves
Description: I needed storage for DVD's, photo albums, CD's, games controllers, board games and a display shelf. I had enough space for six Besta units.
There are two taller units on the sides acting as pillars. Middle shelves on these needed to be fixed with angle brackets to the sides as the weight from the units on the top started to bow the side panels.
Above the TV is one unit to tie the pillars together and I was able to get two more units on the top of the pillars, so to use the full height on the room.
By using the glass doors in the middle, the height is broken down and it works well as a display shelf.
47 inch TV sits on the sixth unit with enough space for media units.
~ Design by Mika, UK
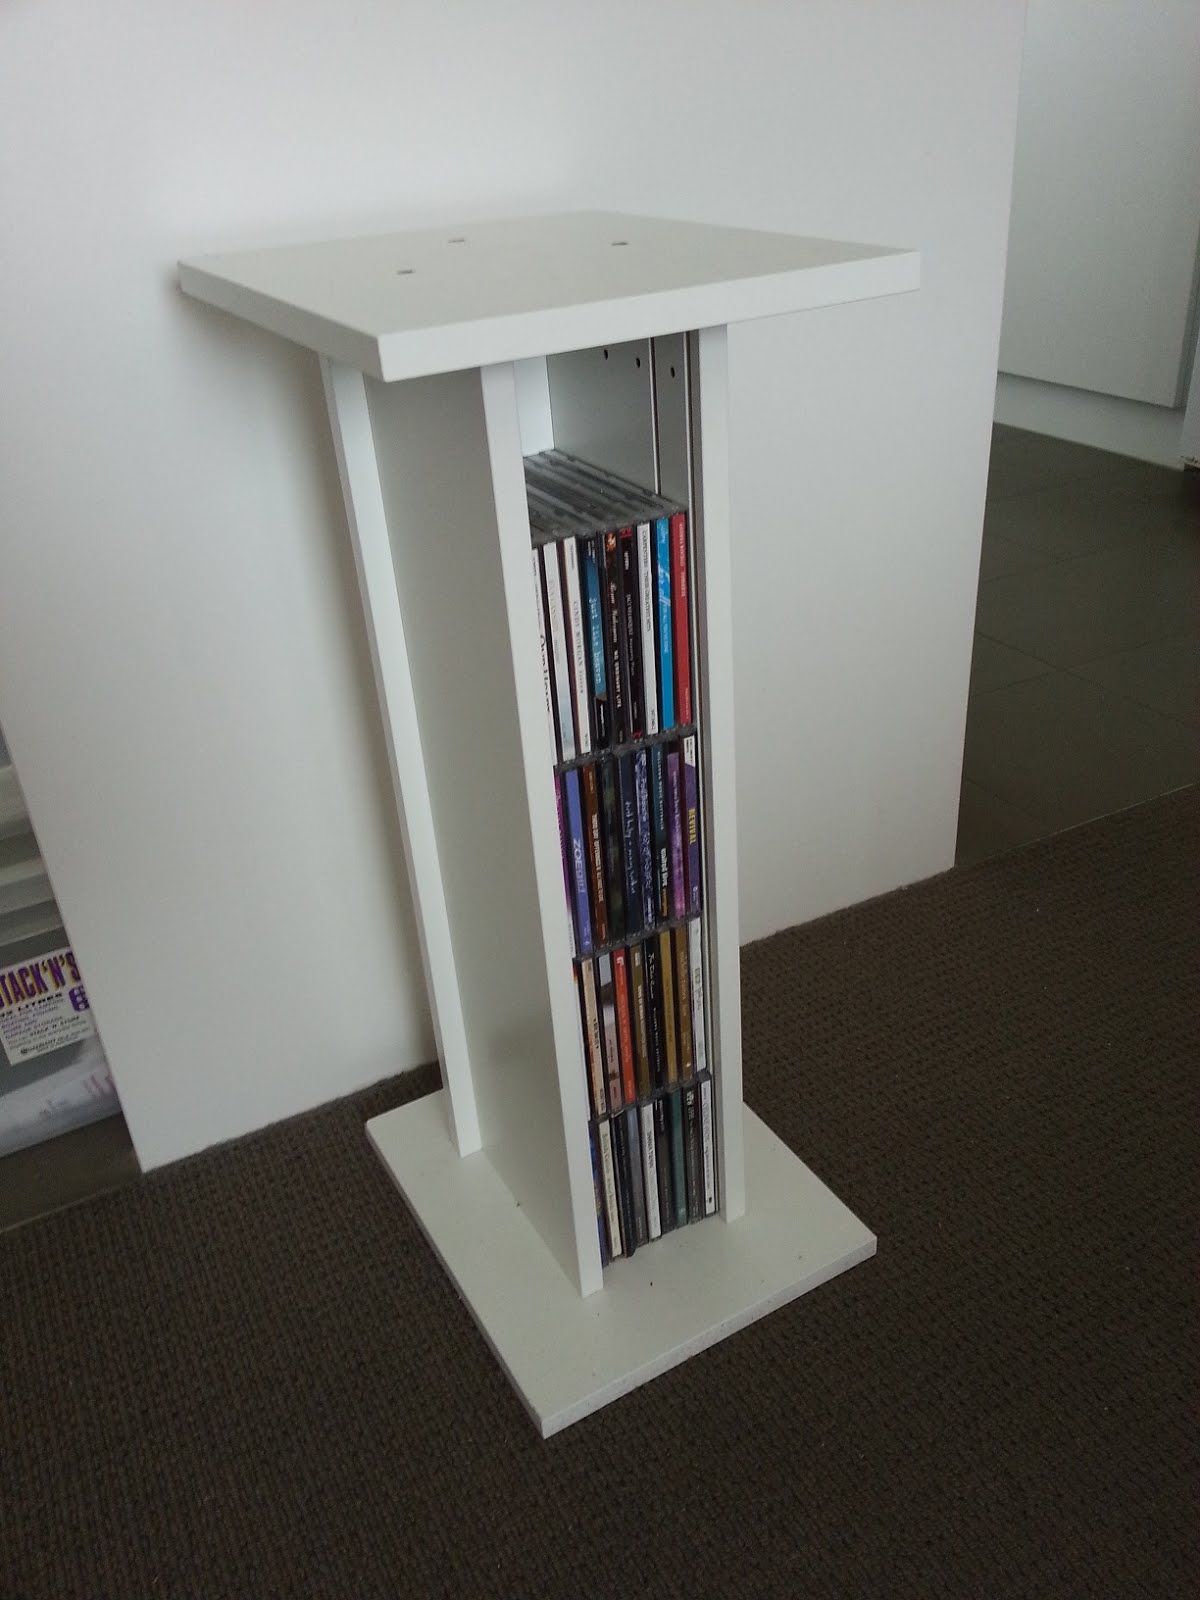
Materials: Besta Vara Drawer Front (2 of 60x26cm, 6 of 60x16cm), electric drill, hand saw, ruler, screws
Description: For easiest directions, please go to this video tutorial.
1) Cut the two large panels in half - these will serve as the top and bottom base.
2) Three small panels will be assembled together for the leg support with one panel for the back, and two for the sides. Four screws from the back to attach to the four corners of the back panel into the sides of the other two panels.
3) Three screws to attach the top and bottom panel to the support each.
See a tutorial video of the Speaker Stand.
~ Winston, Australia
Materials: Besta closet, mdf board, wire
Description: The base is an Ikea Besta closet. I made an opening between the two cabinets and finished the hole with some wood slats.
To make wire doors I made an MDF board frame with a slit to fasten the wire.
The body of the inside needs to be waterproof, so I made it from some mosaic tiles.
Bunny like to lie soft, so I've put a nice soft mat inside the hutch.
~ Evelien Lulofs, Deventer, The Netherlands
Materials: Besta
Description: Just bought my first apartment and have begun the process of furnishing it. When it came to the TV area I wanted this one. It wasn't only the look of it that caught my attention. The doors are covered in speaker fabric, and this way I would be able to hide my old, ugly stereo system in it. It would let IR signals in and sound out. Only problem was that it costs about $1000 here in Norway.
So I turned to Ikea. Here's a list of the items i needed to create my own version:
- BESTÅ Shelf unit (120cm)
- BESTÅ Shelf unit (60cm)
- 3x BESTÅ VARA door
I also picked up speaker fabric and a stapler from the local hardware store for about $25.
The clue with creating the bench the way I wanted was to trim the size of the doors and move the placement of the vertical bench plates. This way the doors would be placed within the bench instead of in front. This might not seem like a big deal, but in my opinion the bench gets a completely different look by doing this.
So I did my measuring and sawed off about 3 cm from the top and bottom of the doors. I then sawed out a rectangular from the two doors I was going to cover with fabric. Using a normal stapler to cover them is not recommended. I wasted about 300 staples in the process just because these were clearly meant for paper, not wood. But whatever, I was just focused on the end result.
Total hours spent: 10
Total amount spent: 1300 kroner ($220)
Check out the pictures and don't hesitate to leave a message if this inspires you!
~ Henrik, Oslo, Norway
Materials: Besta TV Bench
Description: I stumbled across a bargain in the scratch and dent room at Ikea. It was a Besta TV Bench with a small scratch on the top. I placed it in our foyer and topped it with one long piece of lumber. I removed one of the shelves and used it for a leg on the opposite end of the bench. Then, I built four simple lockers above. I painted the wall behind the lockers with chalkboard paint. In hindsight, I wish that I had painted the wall and then built the lockers.
~ Stacy Davis, Orlando, FL
Materials: BESTA TV unit, INREDA Flip down fixture, AINA fabric, 32x120cm 16mm MDF, 4.2x16mm wood screws
Description: Since IKEA didn't have a door for the BESTA TV bench that met my requirements, I decided to make one myself. It had to be able to let air through to provide ventilation for my home cinema system, so I opted for a textile front. This also let me use remote controls with the door closed.
Instructions:
1. Drill holes in each corner of the MDF plate and use a jigsaw to cut the large holes. You have to leave at least 5cm edges where you are going to attach the flip down fixtures. 6cm would probably be a smart idea.
2. Either use glue or staples to fasten the textile to the frame. I used contact glue. Apply the glue to both surfaces, wait 15 minutes until dry before pressing the surfaces together.
3. Use clamps to provide sufficient pressure
4. Attach the fixture to the TV bench with the supplied screws and to the front with 4.2x16mm wood screws.
~ Are, Oslo, Norway
Materials: Malm occasional tables, Expedit 2x4, Besta, Lillangen
Description: We needed a work@home desk to be included in our living room. But we didn't want to see cables and PCs! We needed to fight against 2 desktop PCs, 2 laptops and 4 monitors. We opted for 2 Malm occasional tables (length 211 cm) to be used as shelves, without the legs. These 2 Malm have been hung between the wall on the right side and the Expedit 2x4 on the left. To do this, we used L profiled aluminium bars, screwed into the wall and into Expedit.
One Malm occasional table (length 191 cm) was used as sliding desk for hosting 2 keyboards a 2 laptops.
On the bottom, 1 Besta 20x120x64 with a Lillangen 20x60x64 contain 2 desktop PCs. We refined this base storage with Besta/Vara sliding doors with a structure 180 cm large.
When it is closed, cables disappear, as well as keyboards and laptops go under the monitors' shelf!
~ FROLA, italy
Materials: Besta bookcases, shelf units, Dioder LED strips
Description: My wife desperately needed some bookcases in her rather large home office, and I'm neither a carpenter nor rich enough to pay someone $8K for custom units. But, I've done quite a few trim projects around the house and have previously transformed some other Ikea pieces, so I figured I could buy some basic Ikea bookshelves and transform them as well, using a lot of moulding and incorporating some other features found in custom cabinetry.
Initially, we had wanted to use the Hemnes pieces for this project because they are solid wood and thus easier to modify and 'dress-up' (solid wood is easier to paint and nail into). However, the Besta stuff was on sale and offered more options, like soft close drawers, a variety of glass doors, etc. Moreover, there was a large Besta wall unit that had been created and displayed at our local Ikea, and it was very, very close to what we were looking for.
The office wall in question is fairly large, so we decided on a double wide Besta shelf unit on each side, and a three wide Besta shelf unit for the bottom and for the bridge between the two bookshelves. This thing was going to be huge! I think the top of the center section turned out to be nearly 10' tall.
Because I wanted to create the look of built ins, I had to find a way to raise all of the pieces off the floor so the baseboard moulding would fit along the bottom. So, after assembling all of the bookcases/shelves and measuring the finished size, I built a base using 2x6s, and this framework was nailed to studs in the wall. I then placed the Ikea units on top of the base. I also nailed some 1x6 trim boards to the face of the 2x6s, to create more depth and a finished edge.
This is where I encountered my first snag. Turns out that the Besta drawers and doors are flush with the top or bottom of the units. This meant that I had to raise the bookcases/shelf units off the base that I had just built, in order to keep the drawers or doors from hitting the base or crown when opened. I raised the bookshelves/shelf units with 1x4 trim boards glued to the bottom of each bookshelf/shelf unit (except the bridge). I did this with the unit upside down, and when the glue dried I flipped it over and placed it on the base.
Permanently installing the bookcases and shelf units was next. I had spent some time looking at custom cabinetry at Lowes and Home Depot, and noticed that a lot of high end cabinet installations feature at least one cabinet that is taller/shorter, and/or deeper/shallower than the rest. I incorporated these ideas into my project by 'bumping out' the center shelf/bridge units 4" from the wall, and the bridge was also raised about 4" higher than the adjacent bookcases. These changes would create some architectural interest and allow for some really large crown moulding at the top.
Bumping out the lower piece was simple; I pulled it out 4" and used construction adhesive to secure it to each adjacent bookcase. The bridge unit was more problematic. First, I had to glue the two pieces of the bridge together, because the bridge is only available as a single or a double. Thus, I glued a single unit to a double unit, to create one that was as wide as the bottom unit. Second, I had to find a way to 'hang' the bridge 4" away from the wall. I did this by securing a two rows of 2x4s to the studs with large bolts, and then used the hanging brackets that come with the bridge to secure the bridge to the 2x4s. Worked like a charm! Sorry I don't photos of this step.
After getting the bookcases and the shelf units installed, it was time to tackle the crown. Normally, I would simply nail the crown to the face of the bookcase, but remember that the top of the Besta doors are flush with the top of bookcase. Thus, I glued/nailed some strips of 1x4 trim boards to the top of the bookshelves and to the top of the bridge. This gave me something to nail the crown onto.
I like large, built-up crown, so instead of just using one piece of large crown I used 4 separate pieces. The first piece is a strip of backband moulding, which has a rabbeted lip on it and sits on the 1x4 trim piece. On top of that I glued and nailed a 1x4 piece of basic trim board, followed by 1x4 baseboard (inverted). Finally, I capped it off with a fairly large piece of cove moulding. In this photo you can see why I raised and bumped out the the center bridge - it allows the crown on the bookshelves to terminate gracefully into the ends of the bridge. I was very lucky that the terminated end fit so well.
Wish I had photos of the base, because I think it's more beautiful than the crown. I used the same 5.25" baseboard and shoe moulding used in the rest of of the room, but I also capped it off with a chunky piece of cove moulding that covers the 2x6 that forms the base. The cove profile is the same as the cove on the crown, so it ties everything together nicely.
After all of the moulding was primed and painted (luckily, the white paint I used is nearly a perfect match for the white finish on the Besta pieces), I turned my attention to the area behind where the TV would reside. Initially, I had wanted to use some faux stone sold by Lowes, but my wife found some silk fabric that she wanted, so I took several yards of that and nailed/glued it to a piece of 2" thick foam insulation board and pressed it into place behind the TV. With that behind me, I installed the drawers, doors, and installed Ikea Dioder LED strips in each upper cabinet. I also installed 4 strips above the TV, secured to the bottom of the bridge and hidden by a piece of moulding. All of the LED strips were connected to a switched outlet so they all turn off/on at the wall switch.
Took me nearly a month and almost every spare minute. Great result tho.
~ D. Hale, Alexandria, VA
Materials: Besta Cabinets & doors
Description: We have this Besta unit with two doors that we'd love to convert into sliding doors. Anyone know of a track system we could adapt? Thanks!
~ Ainhoa, Spain
Materials: White Besta frames, 7" wide oil finished wide plank engineered oak flooring, 1/16" X 3/4" hot rolled steel, 1 1/4" finish nails, 6 170 degree overlay hinges, wood strips for french cleats.
Description: For our media storage in our studio, we wanted an industrial meets modern look that would go with our vintage fir floors. We had some leftover oak flooring from another room that worked perfectly for this.
1. First job was to figure out how to suspend unit on wall. For this I made french cleats using 3/4" fir.
2. We had some 6' lengths for flooring that we lined up to create 3 doors with continuous grain pattern. The planks were joined with biscuit joints and glue. (a lot of flooring comes 5/8" thick, which would be easy to use by glueing to 1/8" masonite), then cut to size.
3. The edge of the flooring was wrapped in
3/4" X 1/16" hot rolled steel. (You can get this steel from a metal supplier). I cut the lengths and mitered the corners using 1/8 grinding wheel on a chop saw. (could easily be done without mitering corners). I pre-drilled holes for finish nails. Glued and nailed to edge of flooring.
4. I used 170 degree spring loaded overlay surface mounted hinges. Ended up having them open down as doors were a bit heavy.
~ Michael, Seattle, WA
Materials: besta storage unit, billy (or, LIKE billy) bookshelves, framing nails, pre-painted white trim pieces, screws, painters caulk, hand saw and miter box, spray paint (maybe) various lengths of: 2x4's 1x12, 1x4
Description: First, measure the space you have to fill - I had wanted to use 2 besta units and 2 billy units, but the billy's were too big, so I decided to use 2 besta units and 2 white bookshelves from target and filled in the spaces with 1x4s. Once you have your pieces from the store - go at the assembly as directed. If you are going to need to fill in spaces, remember it is hard to replicate a wood grain, so pick a solid color besta/billy/whatever.
Steps for installation:
1. Use the 2x4's to create frames to place on the floor under the besta and bookshelves, this way I was able to add the trim to them and make them look more seamless. I used the hand saw and screws to make simple squares that just sit underneath and are small enough to hide but big enough to support what is on top of them.
2. Install the bookshelves and besta units on top of the 2x4's, use the materials provided to attach them to the back wall securely - it's a built-in, you will leave it there forever anyway - you can fill in the space between the pieces with 1x4 or 1x3 or whatever amount of space you need to fill.
3. I used screws to attach the 1x4s and filled up the gaps between the pieces, if you countersink them - it is easier to hide them, but you can paint them over and they aren't too noticeable.
4. I cut trim for the top and bottom edges - running it from wall to wall and making sure it matched up with the current trim around the floor. Use framing nails to attach these to the shelving units
5. I cut the 1x12 to go over the top of the bookshelves in the middle for a pseudo "counter top" - I painted it with glossy black spray paint
6. Fill in holes, gaps, seams, etc with the painters caulk, and paint the 1x4s or spacers that you utilized so they all match the shelving units.
7. Step back and realize it looks like it has always been there!
See more of the Besta built-in.
~ naomi c
Materials: BESTA
Description: I drew the exact size of each component needed to create the boombox and I cut the door to accommodate the stereo, speakers and other components.
To power and customize the boombox I used the following items:
1) Car stereo
2) Speakers
3) Regulated Switching Power Supply
4) Toggle Switch
5) Volt meter
6) Cable grommet
After connecting the wires I assembled the rest of the unit and fastened with screws and caps the door.
Now the car stereo has become a boombox and I can listen music with tuner, cd player, usb and iPod dock in the house or wherever I want.
~ Stefano, Rome, Italy
Materials: 1 Lack shelf, 3 pair Besta wooden legs, glue
Description: Take 1 Lack shelf and glue the six legs right on. The back of the shelf is still raw, but it works for me.
~ Tom
Materials: Micke Desk (top only), Utby Legs, Besta Storage Unit
Description: My wife had a Besta sliding storage unit that she was using for her crafts drawer. Long story short... we are having our first child and things in the house had to change and transform into something a bit more space conscious.
So that leads me to the hack. Like I said we had the Besta storage unit already so I had to measure up from that to get the ideal height for the turntables, it worked out that legs just under 4" would work well with a 1" (roughly) desk top.
Every table top seemed to be too large in either one direction or the other until I ran across the Micke desk. The first thing I noticed and loved about this desk was that it had a hole directly in the center of the table where cords could be directed (for turntables this is a huge bonus). Now all I needed was a way to prop it up to the right height. Most of the legs that IKEA sell wouldn't just screw in to the bottom - so I had to find a set that had a flat piece to screw directly into the bottom of the table top. I ran across the Utby legs in the warehouse section (I did not see these in the showroom). They ended up working perfectly! Also when I picked up the desk from the warehouse they had it on sale for only $40!
I screwed the legs directly into the bottom of the table top at 3 inches from the fronts and backs and 6 1/2" in from the sides. This gave it the appearance of "floating" while still remaining very sturdy.
I'd say it's a wicked setup for turntables if you are a scratch DJ like myself and have your decks turned 90 degrees. The only draw back to this hack is that there is A LOT of waste. I feel bad just throwing the remaining desk parts away so I will most likely store them and figure out another hack to use these parts. (That desk top was just too perfect and only $40!)
~ Sean Herman, Denver, Colorado
Materials: Besta shelves & doors, wooden coasters, DIODER, spray paint
Description: On Christmas I was brainstorming with my mother on her workspace makeover, I finally got the idea how to design some more shelves next to my Mandal LEGO storage. I noticed that BESTA doors could transform into giant LEGO plates.
So I started working on it, bought the shelves, doors and some wooden coasters, spraypainted everything in different colours and ... was already done. Since there is no 3x3 plate from LEGO, I thought that I could turn the giant square door into a LEGO logo, and I did.
You can see the whole process on the link to snapguide below. Took me ... well from Christmas until today (but I only worked in the evenings...)
By leaving a little space between the shelves I was able to put in some display areas which I lit up using DIODER lights. It turned out to be a great piece, everyone who enters the room suddenly turns to the shelves and smiles.
For everyone who'd like to build something like it on his own, have a look at the detailed steps I documented in the snapguide:
Check out How to Build LEGO-themed Shelves With Display Areas by Martin Storbeck on Snapguide.
Happy IKEAhacking!
~ Martin Storbeck, Böblingen