Showing posts with label FJELLSE. Show all posts

Monday, 31 December 2012

Space Saving Pull Out Fjellse Daybed


Materials: Fjellse Full-size Bed Frame, Sutlan Florvag, wood screws, 4
lag bolts, wood glue

Description: The whole idea for this project stemmed from our need to turn our guest room into more than just a place that gets used by friends and family 2 weeks a year. Most of our visitors are couples, so we needed more than just a standard twin daybed, the width of the space was also just a bit too small to fit a queen size bed. Enter the idea of the pull out daybed.

We started with a Fjellse bed frame and took meticulous measurements and sketched out plans to have the bed pull apart to expand to a full size bed. Using almost every single piece of wood that came with the bed and a 2X6 piece of wood, we constructed the frame. The lag bolds and a few extra wood screws were the only additions.


The middle support was cannibalized to make laminated legs (attractive and sturdy) for the frame that was made out of the headboard, baseboard, and the rails that were cut in half. We narrowed the spacing of the rails that attached to the headboard,before eventually constructed a sliding bed base out of hardwood slats (DO NOT USE PINE OR THE BED BASES SOLD AT IKEA).

Once the bed was slats were attached to the appropriate sliding side, I took some old fence boards that we cut to size to make a flat headboard, and then upholstered it using batting, DIY fabric buttons, a linen-like material, and our handy dandy staple gun.

After that, we took a serrated bread knife to an ikea foam double mattress, cut it in half before putting its back in its outer covering, and fold it in half as need for a full bed, or a day bed!

The bed fits the space perfectly and is rather comfy too!

~ Lynn, Seattle, WA

Friday, 13 July 2012

Outdoor sofa from Fjellse bed


Materials: 2x FJELLSE, SULTAN LADE, 1 shelf 200x30, 140 cm of 2x3 pine, outdoor heavy duty stain, SULTAN FAGERAS

Description: Looking for quality outdoor furniture and not finding what I am looking for, I came up with this in the mean time. I only bought the 2 beds and the slatted base. Everything else I already had.

I assembled 1 bed but with the headboards on either side.
You then have 2 end pieces and 2 side pieces left.


The 2 end parts are cut in half and each with a Dremel at one side (top) made to fit into the slid where the 3 smaller pieces are placed.They fit in very snug, place next to the 3 smaller bits and secure it with a screw or metal corner. You could place another piece here to close it all up.

Cut 2 pieces of 50 cm and 2 pieces of 20 cm from the 2x3.
Place the 2 pieces of 50 cm at an angel that is comfortable for you on both sides and screw in to place.

Screw the 2 side pieces as backrests onto them, make sure that the mattress still fits underneath.

At the top back end screw the 2 pieces of 20 cm to rest the shelf onto. In this case the shelf just rests on the 2 side pieces and on the top backrest for easier winter storage. But could easily be secured with some screws. Stained it 2 times.

It took an hour or so to assemble the bed, another 2 hours to screw the pieces of 2x3 into place and use the Dremel for the side pieces and 2 days to stain because of drying time in between layers.

~ Carol, Granada, Spain

Tuesday, 8 May 2012

Padded Headboard and Bed Rails for the Dalselv (or Fjellse)


Materials:
Dalselv (or Fjellse) Twin Bed, Vikare Guard Rails, Large Wooden Boards, Foam Core Board, Fabric, Batting, Iron On Hemming Tape

Description: My husband hacked some Vikare Guard Rails by removing the hardware from the very small boards (way too low to be useful when used on the Dalselv) and used a much larger wooden board in it's place. In the meantime, I wrapped some fabric backed in batting around a piece of foam core board to give my kid a headboard that would prevent him from whacking his head into the wall. It is easily secured to the foam core board by using some iron on hem tape around the back.

See details on the how-to of this kid's bed padded headboard.

~ Skooks, MI

Thursday, 29 December 2011

Upholstered Fjellse

Upholstered Fjellse

Materials: Fjellse bed frame, Sultan Lade slatted bed base, plywood, pine beams, foam batting, fabric, staples & screws

Description: After seeing an similar hack on Ikea Hackers, I took the cheapy Fjellse bed frame, heightened the headboard with a sheet of plywood, and upholstered it all with foam batting and fabric.

Upholstered Fjellse


Upholstered Fjellse
Upholstered Fjellse
Upholstered Fjellse

Click to read the Fjellse upholster tutorial.

~ Lizzie, Chicago

Wednesday, 7 December 2011

Two Fjellse Twin Beds into a Trundle


Materials: 2 Fjellse twin beds, 2 sultan lade slats, 2 tag handles, 4 felt furniture sliders,2 twin mattresses, wood screws, drill, saw, screwdriver

Description: Our office/music studio needed a place to relax and space for guests. An upholstered day bed plus trundle is the perfect solution!


1. Assemble the headboards and drill new holes for the bed rails about 4" above current holes.
2. Attach the bed rails to the two headboards and put in the slats. The main bed is done.
3. Cut two inches off of each of the remaining long bed rails. Flip them over and screw in the cross pieces that belong to the foot boards.
4. Attach felt furniture sliders to the underside of the trundle.
5. Add the slats, screwing the end slats in place for added stability.
6. Screw on the handles, put your mattresses in place and slide your trundle into position.
7. You can stop here, or upholster the ends (like I did) for a more complete look.

More detailed instructions can be found on my blog.

See more of the Fjellse trundle bed.

~ Ellen Quillen, United States

Wednesday, 26 October 2011

FJELLSE bedframe hack

Materials: fjellse bed frame, wood for headboard, stain, screws

Description: I had been eyeballing a simply designed designer bed that cost over 2 grand. With less than $100 I recreated the design out of a Fjellse bed frame..

Step 1: Buy the Fjellse bed frame for $49.99.
Step 2: Put the bed frame together and then stain it with your favorite stain color. I chose a dark color called Jacobean. It's my go to color and gives it a nice rich feel and easily hides the blah Fjellse frame.
Step 3: Stain two slabs of pine
Step 4: Coat if desired. I coated it with Osmo. It gives it a smooth finish, without the plasticy poly look.
Step 4: Screw the two slabs of pine on to the Fjellse head board.

Ta da!

See more of the Fjellse headboard.

~ Megan Rolerkite, Portland, OR

Monday, 27 June 2011

Race Car bed


Materials: Fjellse full size bed frame

Description: My 3 year old son wanted a race car bed, but we needed at least a full size for his large bedroom. I also did not want a plastic car bed. I purchsed the Ikea Fjellse bed frame then drew a race car side which I scanned to my computer and printed at Kinkos in a blown up size.


This served as the template for the sides of the bed. We then cut 2 pieces of birch plywood to match the template. Bolted everything to each side of the assembled bed frame and then added a couple of boards in the front of the bed to look like a hood. Then came the painting. Lots of red. Details were drawn in black. We later added another piece of plywood painted in black to the headboard. (not shown in pics). Saved a ton of money and he loves his custom full size race car bed!

~ Ely, Florida

Tuesday, 14 June 2011

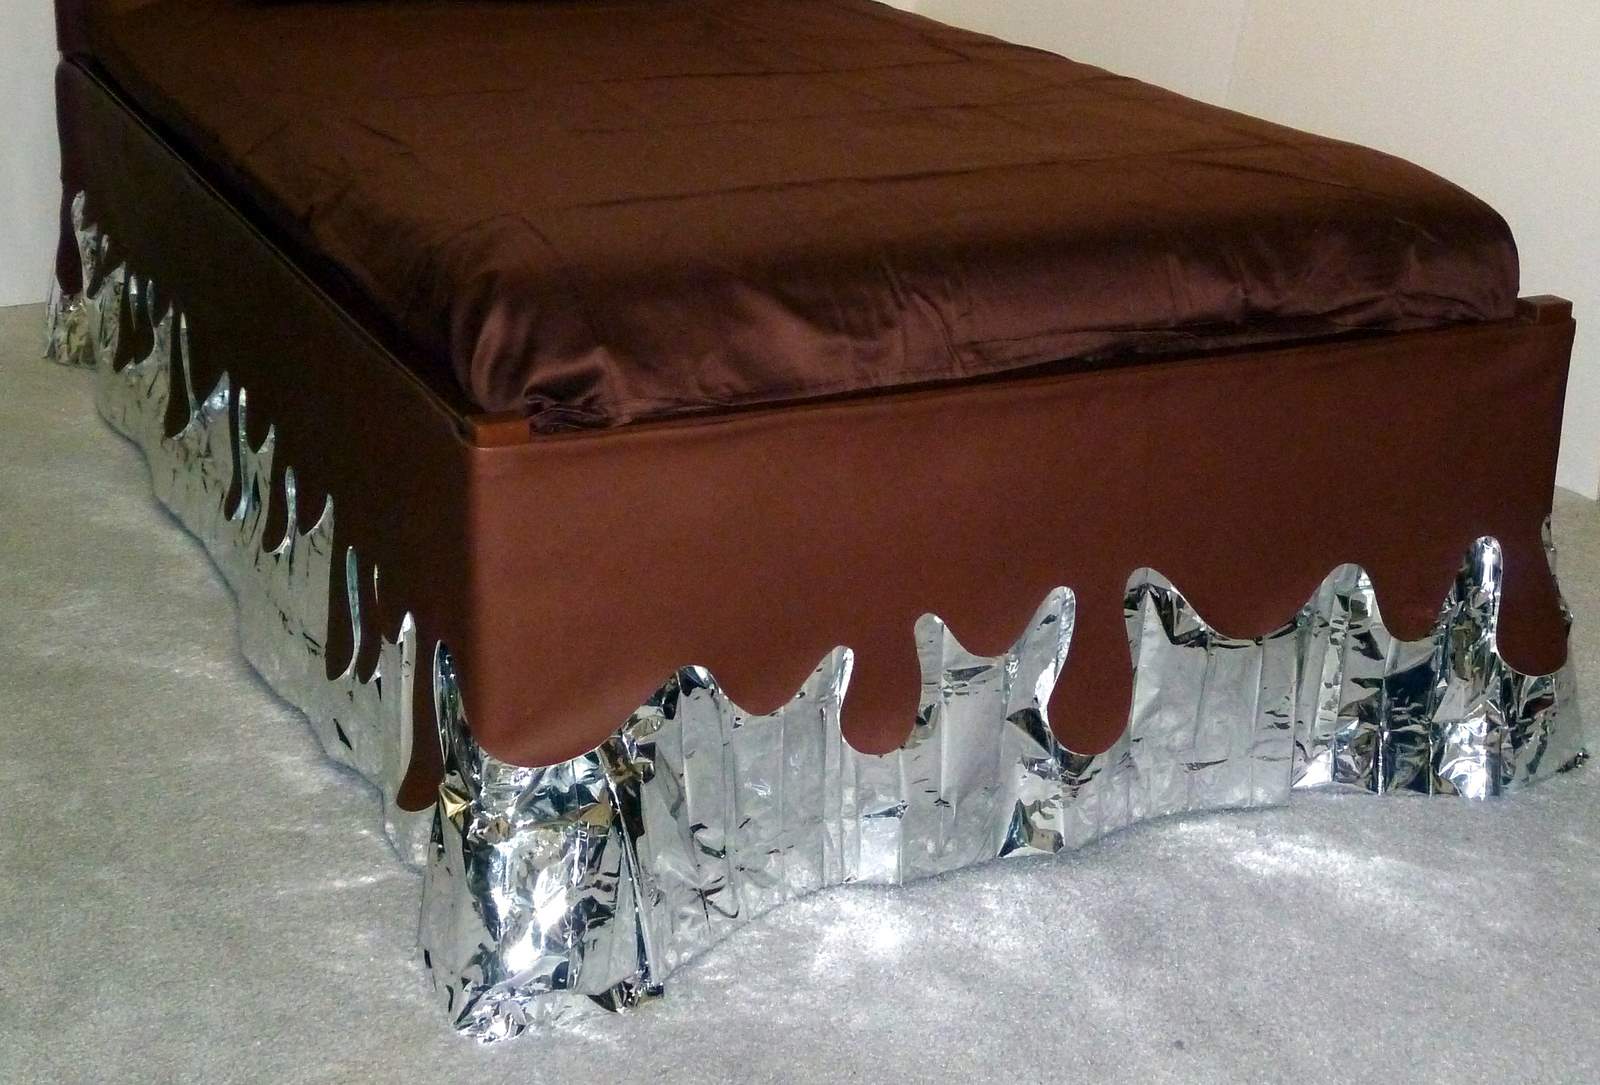
Bed with huge chocolate bar


Materials: Ikea Fjellse twin size bed, Ikea bed risers, Hershey's muffin pans, space blanket, brown vinyl

Description: I love chocolate!

That's the inspiration behind my latest Ikea hack: Bed with a gigantic chocolate bar headboard and a drippy chocolate bedskirt.

With a bed like this, I'll be dreaming of chocolate without the calories!

How did I make this chocolatey bed, you ask?

The base piece is the Ikea Fjellse twin size bed, at $39 in the US. To make the chocolate bar headboard, I got a bunch of Hershey's silicone muffin baking pans, attached them onto a piece of brown vinyl fabric, and wrapped the whole thing around the headboard.


As for the bedskirt, I want it to look like melting chocolate in a candy wrapper. After scratching my head on what material to use as the candy wrapper, I came across a space blanket which fit the bill perfectly. Tada! With some brown vinyl fabric and a space blanket, I made the drippy chocolate bedskirt.

With the bed now finished, I can catch some sleep and have sweet chocolatey dreams!

P.S. For those of you who've been reading IKEA Hackers since 2007, you may remember my chocolatey-marshmallowy footstool covers, upside-down man lamp, cheese cabinet, and other silly hacks.

See more of the chocolate bed.

~ Winnie Lam, Mountain View, CA

Thursday, 20 January 2011

FJELLSE Headboard


Materials: FJELLSE full bed, stain, piece of pine, L brackets, drill, screws, screwdriver

Description:
I needed a bed, was on a budget and hated everything on Craigslist. For under $100 I got a bed a like that I think looks great.

The FJELLSE full bed was on sale for only $49. I picked it up and skipped the $20 slats and got a free box spring from Craigslist.

The headboard with the bed is ugly in my opinion and so I wanted to cover it up. I saw some hacks for this style of bed, but most of them were padded headboards. I wanted something rustic. Originally I was going to purchase several planks of wood and stack them on top of each other. I found a 2'x 8'x1/4" piece of wood at Home Depot and had them cut it down from 8' to a couple inches under 6' which would be the length of the bed. This piece was $27.99 and listed as "shelving" on my receipt, though it was just in the general lumber area.


We also purchased to packages of L brackets to use to affix the headboard to the bed. You can see how we did in the photo. My dad was also concerned about it holding and adding a screw on each side through the posts of the bed.

In terms of assembly, we assembled the bed like the instructions, only adding the piece of wood to the bed at the beginning after we assembled the headboard. We had measured the box spring and mattress to know how much higher on the headboard to place the lumber too (about 12" with a standard 9" box spring).

The unfinished pine also screams IKEA so that also needed fixing (note: I originally tried using a spray on stain. Horrible. Wound up using old stain we already had that had a finish to it. Would have saved about $20 had this goof-up not occurred!). This was also done days before we assembled as it took awhile to dry with the rain. We also didn't bother staining the parts that wouldn't show, like the midbeam.


I feel like the end product doesn't look IKEA at all!

~ Sharon, Long Beach, CA

Monday, 17 January 2011

Upholstered IKEA Fjellse


Materials: Fjellse bed, staple gun, mattress pad topper, fabric

Description:
I wanted to create a substantial guest bed on a major budget. I began with the IKEA Fjellse bed, cut up an inexpensive foam mattress pad topper, stapled it to the backside of the frame, and stapled fabric over it. The fabric I used was an IKEA curtain panel that was leftover from another room. I think it definitely upgraded the very cheap looking bed!


See more of the upholstered IKEA Fjellse bed.

~ Amanda, Michigan

Thursday, 25 November 2010

Turn your blah Fjellse into a FAB upholstered bed


Materials: Fjellse bedframe (double)

Description: Now that I'm living like a grown up after college, it's time for my sleeping situation to look the part too. So although the Fjellse bedframe has great bones (solid pine, not particleboard!) and the price at $50 cannot be beat, it's just a bit too plain and cheapie-college looking for my taste. Although I could just slap on some nice paint and call it a day, my inner interior decorator really really wanted a luxe upholstered bed ever since I laid eyes on them.

Here's how to do it too:

1) Prepare your wood to be painted and primed by wiping it clean and filling in any grooves in the wood knots with wood filler. Sand down the wood filler when dry.

2) Apply 2 coats of primer and 2 coats of latex paint allowing enough time to dry between coats. I used Martha Stewart Living in Sharkey Grey.

3) Build the wood frame add on to increase the height of the headboard. Use 2 inch wood screws to attach the 3 pieces of wood like so. You only need one screw on each side. For more strength, add some wood glue between the joints:


4) Now attach the plywood to the frame you just built using 1 1/4 inch wood screws. Attach that to the bedframe by screwing the plywood to the Fjellse frame using more 1 1/4 inch wood screws. Attach mending plates to strengthen the joint between the add on and the Fjellse frame. It should look like this:


5) Next, attach your foam by stapling it into the plywood at the bottom edge of the headboard and then stretch the foam over the top edge and staple onto the back of the headboard. Do the same with the quilt batting. Make sure to pull everything taughtly and evenly before stapling so you'll get nice smooth edges. When you're done, it'll look like this:


6) Lastly, align and staple your fabric onto the headboard pulling taughtly. Make sure your fabric is straight if you're using a print and take your time on this part to make sure everything looks smooth and professional.


Now you're done and your Fjellse is looking fantastic! :) If you wanna see more pictures or are confused about any steps, see my blog post where I talk about it more extensively.

See more of the DIY upholstered bed.

~ Trinh, New York

Monday, 2 August 2010

From FJELLSE to FAB!

Materials: FJELLSE

Description: Have you guys seen this amazing hack? Not mine, wish it were.

 before

 after


See more of the upholstered bed.

~ Lauren, Austin, TX