Showing posts with label Ivar. Show all posts

Friday, 15 February 2013

IVAR jird's cage


Materials: IVAR shelf, plywood, acrylic glass, hinges, ...

Description: I used an IVAR shelf as framework for my jird's cage. At the moment, it houses 3 fat-tailed jirds and 6 bushy-tailed jirds.


The cage is in total 2,28m high (1,80m on the right), 0,50m deep and in an L-shape: from left to right: two 80cm-shelves, a corner element and a 80cm-shelf shortened to about 65cm, so that it fits exactly in the corner.

I finished the shelves with clear paint, fulfilling the German DIN EN 71-3-Norm (safety of toys, so the paint is not poisonous for the rodents and resistant against the urine).

The back is made of 4mm-plywood, at the front side I fitted acrylic glass in aluminum U-profiles, so they are easily removable for cleaning. The doors were made from 2x4cm laths and chicken wire. A few hinges and locks and voila, there is the jird's palace!

In the spare room on the left fit's an 80cm-Aquarium and there's storing room in the cabinet.
And the cats also love the IVAR!

~ Cryptomon, Germany

Friday, 28 December 2012

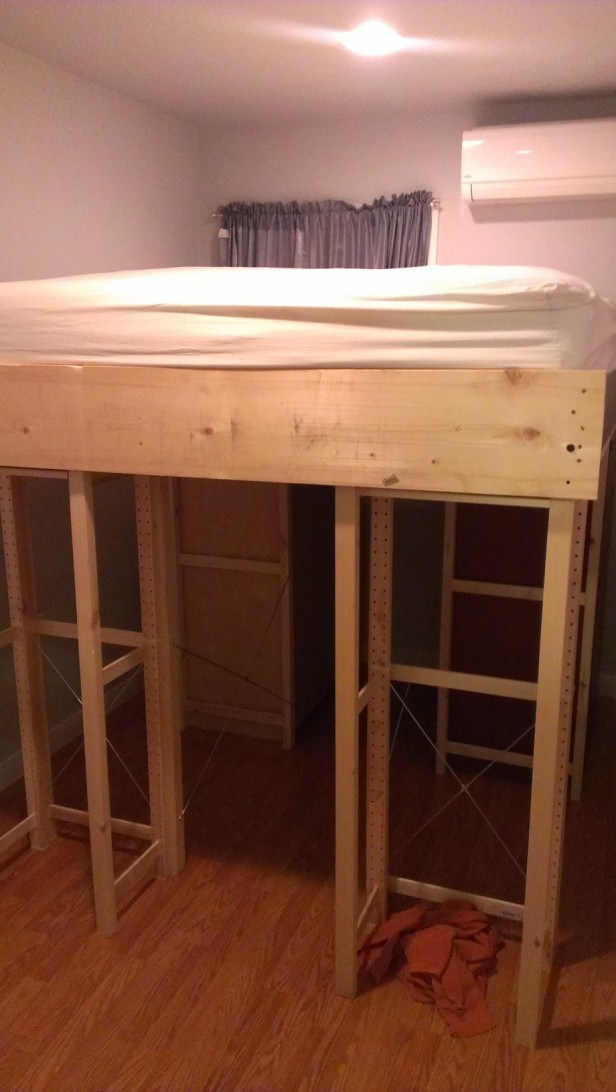
Ivar/Aspelund/Malm Loft Storage Bed


Materials: Ivar shelving system, Aspelund bed frame parts, Malm Chests

Description: The problem was a room that only fit the queen sized bed we have. The solution, building a bed out of Ivar shelving, our Aspelund bed frame, and Malm 6 drawer Chests to address both the lack of space and lack of storage.

Tools required:
Screwdrivers (philips and standard)
drill
Ruler/straight edge
T-square
marking object
Safety glasses (that you actually wear while using the power tools)
Optional:
hammer (very helpful)
circular saw

Items we purchased from Ikea specifically for this project:
2 Ivar shelves 17"x 12"
2 Ivar side unit 12"x 49"
4 Ivar shelves 33"x 20"
6 Ivar side units 20"x 49"
2 Observator cross brace 28"
2 Observator cross brace 39"

Items purchased previously from Ikea but used in this project:
Aspelund Bed frame
Skorva Midbeam
2 Sultan Lade (wood slats)
Sultan Queen size mattress

Items purchased from the hardware store:
Unfinished pine cut to 68"Lx 8"Hx 3/4"W
L brackets
Zip ties
Craft wood (pine) 3/8" thick cut to fit the Ivar side unit dimensions
Items purchased from Craigslist:
4 Malm Chests with 6 drawers (color not important)


Regarding the zip ties... (NOT RECOMMENDED!!)
Note: Neither the author, her family, nor anyone associated in any way with her, recommends or condones using zip ties in a bed structure. (Even I am pushing for something sturdier.) It is HIGHLY recommended that, should you decide to construct or assemble a bed similar to the one featured, you consider a more sturdy solution to our use of the zip ties. Likewise, the author and such associated persons, etc. assume no responsibility whatsoever for any damage incurred as a result of constructing a similar structure. Attempt at your own risk!

Having washed my hands of that...
Here's how we did it.


1. Cut down small wood to use as extensions for shelving

2. Glue small pieces of wood to bottom of Ivar supports.

3. Assemble Ivar shelves over Malm Chests

4. If your room is as small as ours, make sure to space the chests evenly so
so that drawers can be accessed.

5. Connect the 2 large sets of Ivar shelves on each side of where the bed will be.

6. Add the cross braces to the shelves (without Malm chests, in our case).

7. The 4 sets of shelves should be centered such that there is ample storage behind the Malms.

8. Assemble the smaller shelf sets.

9. Place the smaller shelves at the ends such that the back of the smaller shelves are against the sides of the larger ones.

10. Use the aforementioned zip ties to hold the smaller Ivar units to the larger ones. For any questions regarding the use of zip ties in this structure, please refer to the disclaimer above.

11. Cut the head/foot board to the correct length

12. Measure the wood for the holes (sides and center) so they match with the existing side frames (or use all new wood-probably easier).

13. Measure, measure, measure! Then mark, then measure again. Only after you are 100% sure, should you even consider drilling!!! Even then, you should probably still check again.

14. Once you have all the holes drilled, you can assemble the bed frame as if it were the original bed. Then secure it to the Ivar units with the L brackets. We used 6.

16. Lift the matress over the frame. Position the slats correctly in the support frame. Move mattress into position.

17. Create a stair/step system that fits your needs both in space and person. We have not yet found our solution yet, so we are currently using a regular ladder (see disclaimer).

18. You should probably put some sort of side rails up since the bed is so high. We have assembled the basic structure that works for us for the time being.

See more of the IVAR loft bed.

~ J. Yeh

Tuesday, 19 June 2012

Kai's great IVAR cot


Materials: 2 x IVAR shelf 80 x 50 cm, 2 x IVAR side panel 50 x 125 cm, 1 x IVAR side panel IVAR 30 x 125 cm, 1 x blind ENJE white 60 x 250 cm, 4 x RILL roles, 1 x OBSERVAT�R Cross-brace, thin rope, screw, paint, Mattress

Description:
1. Drill ventilation holes in one shelf.
2. Cut the two 50-cm IVAR side unit to about 70 cm.
3. Cut the 30-inch IVAR side unit into two 80 cm long wooden spacers.
4. Paint all wooden parts.
5. The IVAR shelving unit assembled according to instructions.
6. Stabilize anything with brackets and screws (except the mattress board to ensure that the height is adjustable).
7. Screw the bottom rollers.
8. Fit between the two sides panels the 80 cm long wooden bar top.
9. Cut the Roller Blind fit for the side pieces (2 pieces 60 x 80cm and 2 pieces x 60 x 43.5 cm) and attach with a staple gun (under the bed surface mount only slightly to the left board height adjustable).
10. Drill small holes in the sides pierced and pull through a thin rope or a washing line or a cable.
11. Cut mattress if necessary, clean linens, finished.


1. The cot has wheels. So the baby is always near you.
2. The mattress is adjustable in height.
3. The mattress is 50 x 80 cm. The baby can lie long in bed.
4. The cot has storage space for wrapping things or toys.
5. The baby can see through the transparent side panels.
6. The cot has a good amount to save for their own backs.
7. The cot is very easy to build.
8. We find that the cot looks great.
9. The baby bed is only about 72�.
10. If the baby is too big for the baby bed, the bed is simply turned back into a shelf.

~ Bianca Reinecke, Germany

Sunday, 20 May 2012

Help kickstart the largest IVAR hack


Materials: Ikea Ivar Chair

Description: Our Ikea hack could quite possibly be the largest Ikea hack ever! This summer we will be constructing a 1000 square foot pavilion made of 400 Ikea Ivar chairs arrayed and stacked in a 3-dimensional sine wave surface rising above the ground in Freedom Park, Atlanta Georgia. It's public art, but also usable in that people can actually sit on it to socialize and spend time in the park sitting in the chairs.

The design is very particular to the Ikea Ivar chair because the slightly bent angle of the seatback creates a special texture to the sculpture. And the fact that the Ivar chair is constructed with 2 full prefabricated side pieces allows the transfer of load vertically from chair to chair down to the ground in a monolithic, continuous way; the prefab sides act each as bridges, unlike other chairs where the legs are independent of the other elements. The Ivar is optimized structural unit and texture. The other advantage is also the flatpack design made by Ikea. Transporting 400 chairs would be impossible without the flatpack. And the simple assembly is also what makes this chair the perfect chair to be a construction unit for a public pavilion.


We construct SEAT by additively attaching chairs to each other, using wooden wedges and threaded rods to bridge the gaps between the legs and seatbacks. First a central spine arch is made to which all of the "suspended" chairs are then "hung." Where the chairs touch the ground they are cast into two concrete pads which anchor the pavilion.

Our idea is that from afar, SEAT will appear like a foreign object in the landscape. Closer yet, SEAT will reveal its unique geometric texture created by the special shape of the Ivar chairs. Upon approach, the audience will recognize the compositional objects, and the dexterity with which the chairs are repurposed for art. The audience will be free to sit upon, inside, and underneath SEAT, exploring it as a personal garden playground.

Conceptually, we're responding to the idea that chairs really are remarkable pieces of furniture. When you think about the loads they are required to carry, both dynamic and static, in supporting people of all sizes and dimensions, you realize just how strong they actually are. But of course we don't think of them as structural components, we just think of them as chairs. Their domestic identity overwhelms almost any other interpretation of their use. With SEAT we're turning that identity inside out using chairs as a whimsical element of structural sculpture.

We're also trying to drum up some help to realize the project. So I'm sending along our Kickstarter campaign. We know it's a tough time to help, but it's also a tough time to build. Maybe some of your enthusiastic readers could lend us a hand. We tried Ikea, but they weren't interested unfortunately. Anyway, it really could be an amazing hack! Thanks for your time and hope you like it.

See more of the 400 IVAR seater.

~ Brian Brush, Atlanta, GA

Thursday, 17 May 2012

Lacked a piano bench, so made a Lack piano bench


Materials:
Lack shelf, discontinued shelf parts from As-Is, metal brackets and screws

Description:
I bought my wife a digital piano, but didn't want to buy a piano bench since they tend to be fairly expensive. So I took a trip to Ikea and had a browse of the As-Is section.

I found a pine Lack shelf and some parts from a different discontinued pine shelf, which I decided to chop up and attach to the Lack as legs.


To do so, I used some metal L brackets and screws.

I think it's better looking than a metal bench, and cost much less!

~ Dan, Adelaide, Australia

Wednesday, 16 May 2012

Extensive Ivar Hack: Workstation & Micro-foyer


Materials: Ivar shelving, lumber (luan, pine plank, molding), various mending plates, L-brackets, handtools (saw, screwdrivers), power tools (circular saw, drill, Dremel).

Description: My flat is rather small and I have a large computer workstation so maximizing space and being able to integrate work and living space is important to me. Also, from the outside, the flat's front door opened into my living room. If the front door was open there wasn't much privacy and too much gear would be potentially on display for my taste. This Ivar hack solved these two issues for me.

The "smart" side of the hack provides adequate ergonomic space for my workstation and the "dumb" side works to create a micro-foyer. By adding a "ceiling" above the smart side I was able to create some space to keep the gear I'm not using on any particular project nearby.


This is a big, multi-day, project for those with intermediate "home improvement" experience. For those with several years of intermediate experience I don't think this hack should present any challenges not encountered before but there are a couple of areas where calling on a friend for an hour or so of their time to assist is a good idea.

The unit is mostly standard Ivar shelving & cabinets. Ikea discontinued their corner shelves so I had to go to my local home improvement store for lumber that I cut to size and secured to the adjacent shelves with mending plates and to the Ivar vertical supports with L-brackets. Brackets and mending plates are used to secure the "ceiling" and elsewhere, throughout, for structural reinforcement. Where necessary and appropriate, shims were used during leveling.

To create the micro-foyer I used luan and standard molding to construct a "flat" or fake wall. The fake wall is two parts, a top panel and a bottom panel, with their seam hidden behind molding. In order to access the back of my equipment and patchbay, the upper fake wall panel is hinged at the top and the lower panel is completely removed. When closed the two panels are secured in place with screws & bolts at the corners and 3M Dual Lock attached to the Ivar vertical supports along the edges.

It's important to use angle brackets for reinforcement during assembly and, as always with any shelving unit, judiciously distribute the weight among the shelves after completion. This amount of pine will noticeably contract and expand with the weather as it continues to cure (most Ikea pine pieces I've assembled seemed to finish curing over time) and the extra reinforcement helps mitigate the potential for going catawampus. If you live in earthquake country and secure it to a wall make sure there is some give; the straps included with the Ivar units, when properly secured to a properly assembled unit, should be enough.

Everything associated with wood working and "home improvement" apply to this hack: measure twice (or more), cut once, use the proper (quality) tool for the task at hand, give yourself enough time and be realistic about the time it takes to complete. I used an accurate carpenter's level throughout. When measuring and cutting the luan I used a carpenter's chalk line. I also used hand tools for most of this. When using wood screws on the Ivar vertical supports use a hand screwdriver to avoid splitting, even when screwing into predrilled starter holes.

~ m1ckDELTA

Wednesday, 9 May 2012

Not Stolmen but Ivar (bike) racks!


Materials: Best� legs, Ivar wooden ladder (30�226), Ekby Valter brackets (28cm)

Description:
In order to maintain the harmony in the family, we had to figure out a compromise between the dimension of our apartment and the fact that my partner has no intention to park the bicycles outside. Although a bike rack seemed like the most obvious solution, we couldn't find anything that could meet our needs. So, we decided to build it by ourselves. Our two main goals were: 1) it has to stand without drilling the wall, since we're renting and we're not allowed to do so; 2) it has be cheap.

We went to Ikea and with a bit of work we came up with a cool bike rack, that cost about 300 SEK (yes, we are extremely proud of it!)


INGREDIENTS

- Best� legs, 20 SEK at the sale corner
- Ivar wooden ladder (30�226), 125 SEK
- Ekby Valter brackets (28cm � the big ones), 25 SEK each
- Stuff we already had at home (screws, drill, wood glue, an old inner tube, tennis racket grip, felts)


INSTRUCTION

We used 2 Ekby Valter brackets as frontal feet for the structure, using the already made holes for the screws. We also put some wood glue in addition to the screws, just for being 100% sure.

Making the lateral feet was a little bit tricky. We cut away the jutting part and made some new holes for the screws, in order to not cross the screws used for the frontal feet.

We used the last 2 Ekby Valter brackets as frame props. We attached the two pieces you cut off from the lateral feet, in order to prevent the risk of bike falling. Then we covered it with an old inner tube and some tennis racket grip, to avoid annoying scratches on the bike frame.

For the upper part, we changed the Best� legs' normal screws, with some wood/iron ones.

We mounted the Best� legs, put some felts on the surfaces in contact with floor and ceiling, placed the rack and regulated the length of Best� legs. Put the bikes on and enjoyed! :)

See more of the IVAR bike rack.

~ Pam, Uppsala

Wednesday, 25 April 2012

IVAR "Good Old Days" Bookcase


Materials: IVAR, decorative moulding, mdf, paint

Description: A boring corner next to our two-wing bedroom door had to be pimped. Ivar fitted perfectly in there, but it needed some old fashioned look to go with the 19th century door. The Ivar skeletal structure is 30cm deep and 226cm high. We placed a mdf panel on the sides and on the top. After that we painted it in the same colour like our wall.


~ Leila&Mario, Vienna, Austria

Saturday, 21 April 2012

Custom-fit Ivar shelves


Materials: Ivar shelves, shelf L-brackets, screws

Description:
I wanted to fill a whole wall with shelving in my office/library area, but could not find any bookcases that were exactly the right width for my space. I decided to make a 5-bay Ivar configuration and cut the set of shelves on one end to fit. Since they're solid pine, cutting them is easy; the hack is how to attach the shelves to the uprights after you've cut off the original mounting bracket fixed to the end of each shelf.

I needed to shorten the shelves by about 4". Measure carefully and cut to leave a tab to fit between the upright posts. Sand and apply finish of your choice (I used multiple coats of Minwax Tung Oil finish).

To support the shelves, I used L-brackets with 1/4" pins from Home Depot. These are exactly the right size to fit in the predrilled holes in the uprights.


Note that the regular Ivar mounting hardware "locks" the shelves over the pins, but with these L-brackets the shelves just rest on top of the supports and have no lateral stability. So, you should also get some small screws and use them to secure at least some of the shelves to the L-brackets -- see the first photo showing the underside of the top shelf. Since the screws are close to the edges of the shelf tab, mark and drill pilot holes first to avoid splitting the wood. For additional stability, I also put an extra cross-brace on the back of this section.

You may notice that the L-brackets position the shelf a little bit lower than the regular Ivar shelf pins, so the shelves may not be level. I had to shim the uprights anyway to compensate for uneven floors, otherwise you can use some washers or nylon spacers between the L-brackets and shelves.

The first photo shows the end result, with the cut-down set of shelves on the right next to one of the full-width shelf bays with a cabinet.

~ pondscum

Wednesday, 4 April 2012

Ivar Babystation


Materials: Ivar, Bekvam, Bygel, Kvart, Dimma

Description: Material used:
- IVAR (rack and shelves, chest of 3 drawers, cabinet)
- BEKVAM (spice rack)
- BYGEL (rail)
- Kvart (wall/clamp spotlight)
- Dimma (dimmer switch)
- boards (from DIY store)
- drawer runner (from DIY store)
- screws and double sided tape

As we got our baby, there was not that much space in our flat. so we decided to use space as efficient as possible. Most baby changing tables don't use space above and also don't give protection to baby to fall down on flanks.

The so called baby station is built in the main with IVAR components. For flanks and backs of baby table, I used thin boards and for table a 19mm board, with side boards mounted.


When you make your baby happy with new swaddling bands during night, I made a dimmable, indirect light (switch is mounted with tape). Also material you use for baby care can be stored in small racks on the side (Bekvam).

To have everything additionally at hand, I made a drawer out of boards with a 50cm drawer runner which is very handy.


A rail (BYGEL) is also mounted on top drawer to hang out some stinky clothing :-)


Have fun!

~ Jochen, Mistelbach an der Zaya, Austria

Thursday, 8 March 2012

Ivar sideboard (or "hidealottastuff")

Ivar sideboard

Materials: Ivar cabinets (two, 80x30x83 cm), Ivar side/upright unit (one, 30x226 cm), shellac, paint, varnish, wood glue, screws. Optional: Rationell Door Damper (4)

Description: I had some Ivar cabinets and some Ivar shelving in my living room. But I wanted a more "grown-up" look. My friend/colour consultant/interior designer suggested I needed more closed storage in the living room and wondered if something could be done with the cabinets (they had already been painted for a previous incarnation). And this is where that idea went. I still love it, 3 years later.


Ivar sideboard
Ivar sideboard
Ivar sideboard
Ivar sideboard

1. Paint and varnish the cabinets. It looks and feels nicer if you sand it all first. You should probably shellac to seal the knots before you paint unless your paint is very dark, because the knots will discolour and show through your paint over time, especially with sun exposure. I had already painted them so they matched my pale green Robin bookshelf (found in the as-is section around 1998 and I still love it). I only painted the outsides of the top, sides and doors. I had used 2 coats of paint and then I added 3 coats of varnish.

2. Make the plinth out of the side/upright unit. The main part of the plinth will be the same length as the two cabinets side-by-side. Cut it so that the cross-pieces of the side/upright unit are at least 10 cm in from the end. I did a lot of turning and looking and turning again to decide which edge was the most attractive, and made that the front edge.

3. With the remaining pieces of the side/upright unit, cut two pairs of legs - I cut it so that each pair of legs were held together by one of the cross pieces of the side/upright unit. I made the legs 13.5 cm tall. Again, I turned and looked and turned again to decide which was the more attractive side of each leg, and made that side the front. I have baseboards around my walls, so I trimmed what would be the back legs by 1 cm to allow for the baseboards, so the cabinets will sit right against the wall. I also cut one piece for each end of the plinth, and just attached those pieces with glue. Then the plinth becomes a full rectangle, rather than parallel lines connected by cross pieces.

4. Sand the plinth and legs and varnish them. I did 3 coats and sanded lightly between coats. I even used small bits of the side/upright unit to make little sanding blocks.

5. Attach the legs to the underside of the plinth, using glue and 7.5 cm screws. Place them so the proportions please you, but make sure each leg's center is lined up in between the shelf pin holes, so the screw is not going through those holes.

6. Attach the cabinets to the plinth. I lined it up so the fronts of the doors were just slightly protruding beyond the edge of the plinth. This means the top of the front of the plinth shows when the door is open (red arrow in that picture.) I put 3 screws through the bottom of each cabinet at the back into the back side of the plinth (green arrow). I didn't screw the front edge because they were lined up such that there wasn't really enough overlap. (Though you could use tiny metal L-brackets on the underside.) And I should have screwed the two cabinets together through their sides, but because I wanted to be able to take this apart one day if it no longer fit my needs in this configuration, I didn't. It holds together ok, I just have to be careful when moving it around.

7. Finishing touch: Add door dampers so the doors close a little more quietly. I found these ones in a clearance bin - the newer Rationell door dampers probably work better!

~ Lori H., Vancouver

Wednesday, 22 February 2012

Ivar library and storage

Ivar library and storage

Materials: IVAR shelving units

Description: We wanted to build a library in the short part of our L-shaped living room. We decided to build storage space in the lower part (for which we used the IVAR units that are 50 cm deep) and build bookshelves on top that (30 cm deep).


Ivar library and storage

The lower shelves were covered with sliding doors, for which a railing system was installed, and this part was covered with large MDF counter tops. On top we built the bookshelves which were attached to the wall. Because of the electric circuit board in the corner we built a cabinet there.

~ Geert, Rotterdam, The Netherlands

Wednesday, 14 December 2011

Hidden Workbench in a Bookshelf


Materials: Ivar - shelf, Nobro-folding table

Description: Since space is very rare in my flat I made a small workbench that is hidden in an IKEA-shelf. I combined a folding table and an IKEA shelf. Then I added some small cabinets with drawers and an adjustable lamp. I had to add some heavy stuff to the bottom of the shelf to prevent it from toppling over.


Old computer displays and scanners that haven't been ripped for parts yet are very convenient.


Now I have a workbench that's big has a decent light and can be put away very easy when not in use.

See more of the workbench hidden in a bookshelf.

~ Nikolaus Gradwohl, Vienna