Showing posts with label Mandal. Show all posts

Thursday, 18 April 2013

Mandal room divider


Materials: Mandal

Description: For my single room flat, I was looking for a nice and beautiful way to part my room into a living area and a sleeping area. Having guests, sitting for a chat at the sofa, without seeing my bed was very important. Now I have the perfect partition, space for decoration and not congested. Use Mandal for a great divider.


~ ron, Hamburg/Germany

Wednesday, 26 December 2012

Use MANDAL to store your LEGO bricks for quick & easy building


Materials: MANDAL headboards, GLIS boxes, binder clips

Description: I needed some space to store my LEGO brick but have them accessible as well when I want to use them. When we came across some MANDAL headboards in the IKEA as-is section, I slowly figured out what to do:

Using binder clips I could hang GLIS boxes to the MANDAL headboard. You have to detach the hinged covers first, then attach the binder clips to the boxes. With the binder clips attached to the boxes, you can hang them easily on the headboard.


You can even put the covers back on to keep the dust out while not using the bricks.

Detailed instructions can be found on the project page on Snapguide.


Happy building!

~ Martin Storbeck, Stuttgart, Germany

Indirect Lighting for MANDAL headboard using LEGO


Materials: MANDAL, DIODER, LEGO bricks

Description: I used the MANDAL headboard to add some shelves to my desk, where I can display my LEGO models. They needed some highlighting so I started adding DIODER led strips on the top and bottom of the shelves.

But DIODER doesn't look too good , so I wanted to hide it, creating some indirect lighting. I built frames using LEGO that you can slide onto the shelf. These frames hide the DIODER. By adjusting the distance between DIODER and the frame, you can control the brightness and the reach of the light beam.


You can use LEGO in many different ways to hide lights on any kind of shelf. Have fun creating your own version of this hack!

Check out the project-page on Snapguide for detailed instructions!


Or go directly to the snapguide via this link.

~ Martin Storbeck, Stuttgart, Germany

Wednesday, 16 May 2012

Wraparound Mandal


Materials: Mandal Headboard

Description: Not really a hack but a modification.

I love the look of the Mandal but our recent downsize left us with a very cramped bedroom. So we chopped the ends of of two Mandals and mounted them on the side walls. The only addition was to add a extra strip of wood along the back of the side pieces to keep all the slats from moving about. The headboards are affixed directly to the wall. One final touch, not done yet, will be to paint the screw heads used to affix them white so they will not be visible.


Many thanks to Ernest who helped us make this happen!

~ C I, London

Wednesday, 16 November 2011

Mandal Headboard Wall Hack


Materials: 2x MANDAL headboards, 1/4" plywood with a finished surface, 2" x 4" lumber, at least 8ft long, brackets, wood screws, black paint, wood saw, screwdriver, drill to make starter holes for screws

Description:
I like the MANDAL headboards, except for three things:

1. A single headboard looks too short above the MANDAL bedframe.
2. The spacing between the wall brackets don't match standard stud spacing in American homes.
3. The black metal brackets stand out, especially against a white wall.

I fixed all three issues by mounting 2 headboards to a wooden frame with a black backdrop, which is then mounted to the wall. It also left room to place some LED Christmas lights behind the plywood for ambient backlighting.


Instructions:
Assemble both MANDAL headboards, except don't attach the wall brackets to the wall. Space the shelves sensibly since one headboard will be above the other. I used 4 shelves on the top headboard and only 2 on the bottom.

Prepare the black backdrop. (I had the hardware store cut a larger 1/4" plywood panel into four 2ft x 4ft sections to fit in my car.) Paint one side of the plywood black. Don't forget to paint the edges since some of them will be showing. Technically, the backdrop should be a little more than the full width (240cm) and double the height (124cm) of a single headboard.


Create a frame to mount the backdrop and headboards. I made a (very crude) box structure out of 2x4s by screwing them together with metal brackets. The center of the main supports need to be ~77 inches (~196cm) apart so the MANDAL wall brackets can be mounted to them. (You can measure the distance with the assembled headboards.) I started with the bottom board, laying it flat on the floor so the frame can more or less stand on its own.


When the backdrop is dry, screw it to the frame so it hides the frame and doesn't extend beyond the width and height of 2 headboards. Screw the MANDAL wall brackets through the backdrop to the main supports so the lower headboard rests on the bottom board of the frame. Repeat for the upper headboard but leave a gap between the 2 headboards so the top plank of the lower headboard is the same distance away as the gap between the MANDAL planks. Attach the frame to the wall with brackets attached to the top of the frame. (The top supports of my frame are too close to the top of the backdrop and don't hide the brackets attached to the wall. My backdrop also extends too far over the edges on the sides.) Slide the headboards onto the MANDAL brackets attached to the plywood/frame and the headboard hack is done!

~ Zhu Hanuku, Houston

Sunday, 24 April 2011

Studio Bed Solution


Materials: Mandal Bed Frame and Mattress

Description: We designed the project based on an idea in the NY Times about a Cube in a loft apartment. The designer used the basic idea, but applied it to a studio without a high ceiling.


To keep the cost lower than starting from scratch we used an IKEA bed frame. We also wanted to have extra storage and the Mandal has drawer space in the frame.


Step one: my carpenter built a frame on to the Mandal structure using pre-painted and finished lumber. The frame includes shelves made from poplar wood. We left the shelves unpainted, but added a coat of white paint to the entire upper structure to match the Mandal storage drawers.


Step two: We added nine wheels to the Mandal to make the entire structure mobile. The wheels are from Coolcastors.com. Nine wheels were necessary for each part of the Mandal that was load-bearing. The wheels can be locked easily with fingers or with a gentle push from the toes.


Step three: We added a plastic material to the exterior from Piedmont Plastics. The material is polycarbonate plastic. We chose green and blue as more soothing colors.


Steps four and five: are yet to be completed. A headboard will be added with a material not yet chose covering it. Also a drop-down desk will be added to the structure that will allow a person to sit on the bed and use it or outside the structure to use it while sitting on a chair. Remote controlled battery operate lights are also planned.

See more photos of the studio bed solution.

~ Timothy Poe, Washington, DC

Monday, 31 January 2011

Mandal Nightstand Hack


Materials: Expedit shelving unit, saw.

Description: If you have ever purchased the IKEA Mandal bed with its really cool storage drawers, you know that they only offer the Mandal wall-mounted headboard combined with the adjustable shelves as a possible nightstand. I prefer a nightstand where I can discretely hide things away.

Step 1) Get the single (1x5) Expedit shelving unit and cut it in half. The cut will be ugly and the inside of the Expedit is cardboard, but this will not be seen in the final result. If this really bothers you, you can purchase wooden veneer tape at a hardware store to cover the bottom cut.

Step 2) Mount each half of your Expedit shelving to each side of the wall next to your Mandal bed. Make sure to use proper wall-mounting brackets that will be screwed into the wall studs or that use drywall anchors. In this case, I also used the Expedit drawers and anchored them to the wall as well.

You can use any of the Expedit accessories that IKEA sells to give your nightstands the storage options you require.

~ Nicholas, Montreal, Canada

Thursday, 30 September 2010

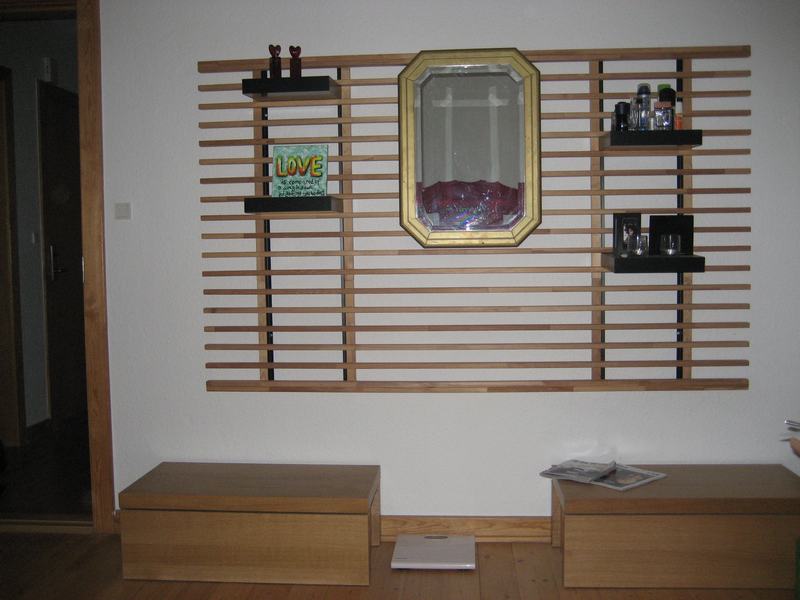
Almost a Mandal Wall hack


Materials: BOD� bed (not on the US page), Malm storage unit x2, Lack wall shelf (any size you choose) and a battery drill with bits and drills.

Description: I where greatly inspired by the Mandal Wall-mounted headboard (see here and here), but thought it was too expensive.

By luck I found the bed part (BOD�) for my hack, in the basement for my apartment, and asked my landlord if I could have it.

I took off the legs, and turned the brackets underneath 90 degrees and put them back on. I made two holes in each of the two brackets farthest apart with a metal drill, for the screws that would hold it on the wall.


When mounting the bed too the wall, be sure to use the right kind of plugs for your wall type, and use some heavy duty screws.

After the wall mounting, I put a mirror in the middle of my new wall hack, and then placed my Malm storage units underneath it.

I bought myself 4 Lack shelves at 11'3/4" x 12'1/4" to mount in "the bed". Luckily the space between the boards is exactly the same as the height of the shelves, so they fit right in.

Last I decorated with a painting made by my girlfriend and some other stuff.

I must confess that I'm rather proud of my first Ikea hack. It was pretty easy to do, and the result is actually pretty good.

Hope this will inspire some of the European readers in here, as the bed is only sold here.

~ Anders Dalsgaard, Denmark