Materials: EXPEDIT Wall shelf, BLADIS Baskets, FIXA Stick-ons, Lack sofa table
Description: Simple 'Hack'. I was looking for something to support a granite slab for a coffee table which I got from a granite supplier 'bone yard' at a 75% discount - $150. I found the IKEA EXPEDIT cubes which were the perfect height and used the BLADIS wicker storage cubes for magazines and remote controls.
Also by placing the cubes on two corners this allowed for leg room under the table in the corner of the sectional. I also used the FIXA stick-ons to protect the cubes. Total cost of IKEA products $75 - total $225. Interior designer friend said it would sell for $1,000 at a high end furniture store.
I paid only $60 for this sofa table sized beautiful granite piece and in looking for a way to support it I ran across the IKEA LACK Sofa Table $30 - perfect fit - $90 total. An interior design friend thought I paid at least $500 for it. Oh yes - I put IKEA FIXA Stick-on floor protectors on the bottom of the granite to protect the table top.
~ Robert Youngberg, Denver
Materials: Klubbo side table, Fjellse bed slats, stain, polyacrylic, screws, spray paint
Description: I found a Klubbo side table in the garbage and the same evening I stumbled across the wooden bed slats from a Fjellse.
I started by measuring my wood so I have about a 3/4" overhang and I cut the wood (using my husbands mitre saw all by myself for the first time ever!). I used black satin finish Rustoleum spray paint and covered the base with three coats.
While that was drying I lightly sanded and then stained the wood using Special Walnut colour stain. When dried I laid the wood on the ground and used some offcuts of the wood to join them all together on the bottom. I attached the top using wood screws to the frame. To finish off the table and to protect it, I used two coats of Polyacrylic in satin finish and left it to dry.
See more of the Klubbo industrial table.
~ Julie, Toronto, Canada
Materials: Two Nordmyra chairs, One big and heavy window (1/2" X 17.5" X 52.5"), sand paper, handsaw or jigsaw, self-adhesive felt strip.
Description: 1. Remove the seat of both chairs, and keep bolts on the side.
2. Take the saw and cut the stiles of each chairs sharply.
3. To get a good finishing cut, use the sand paper.
4. Put back the 8 bolts, head on top (if you want to have a metal/wood style)
5. Put felt strip on each corner. Make sure that those strips are thicker than the bolt head.
6. Take the window and put it on the structure. The window is 30kg, so there's no need to fix it.
7. That's it, enjoy!
~ Dominic St-Aubin, Montréal, Canada
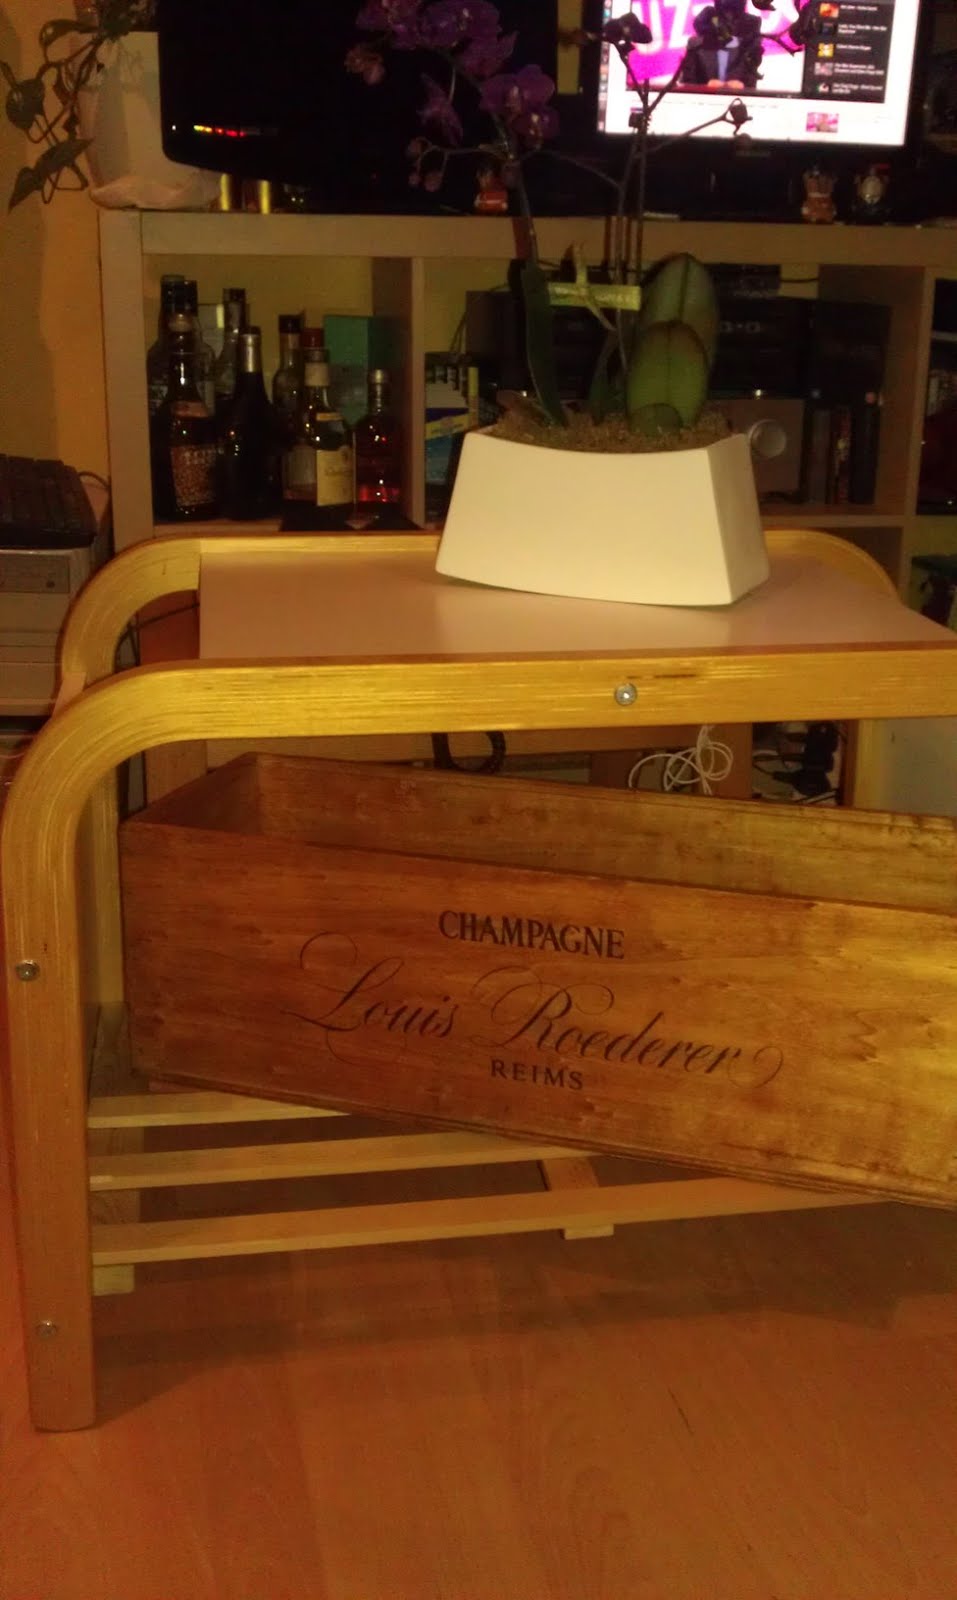
Materials: 4 dowels, 2 x 6cm screws, 2 pieces of wood 44cm x 5cm x 2cm, 6 pieces of wood 72cm x 3,5cm x 1cm; 1 pieces of wood 44cm x 3,5cm x 1cm; old champagne box(optional)
Description: I decided to turn my old computer table in to a coffee table. Rather than buy one, I liked the curves of this discontinued Nenne. Initially my plan was to use copper pipes, but since I had plenty of leftover wood from other DIY projects, it was better to use it in this. Here are the steps:
1 - remove the castors, net and keyboard tray
2 - the bottom panel which had the castor, needs to the turned 180 degrees, so that the castor holes are facing inside.
3 - mark the inside of the panels where the supporting pieces of wood will be (I marked them at 6,5cm from the edge)
4 - drill the holes on the pieces of wood for the dowels and the screws (I used 1 screw and 2 dowels for each)
5 - mark the holes for the dowels and the screws on the table panels
6 - screw the wood pieces in place (I used a bit of wood glue to fix the dowels, but this is not essential)
7 - take the 6 pieces of wood and make them in to a straddle, and place it above the supporting pieces of wood.(i used the cut-offs for the transversal)
8 - place the champagne box (optional!) and voila!
~ wilson mintilana, London
Materials: $29.99 Lack coffee table, 1x2 wood, foam, upholstery fabric, staple gun, screws
Description: I wanted a coffee table that I can rest my feet and still be able to use the table for drinks.
The $29.99 lack coffee table was the perfect dimension for my u-shape sectional. Started framing a 16x16 square for the center.
Then stapled the fabric to the frame on one side, turned it over and attached frame to the table with screws. Glued the foam (already cut to size) around the frame to the top of table. Screwed wood pieces to bottom of the Lack table so the fabric will be stretched over and stapled down.
~ Chenda, Gilbert, AZ
Materials: Lack table
Description: 2 6mm mdf boards, side 18mm mdf and inside also 18mm mdf strips. All glued and nailed. Cut out the space for the original Lack table. Old Lack legs shortened by 20 mm were used for the legs of the bigger table. Have fun. It's easy to make.
~ gerard rhebergen, the netherlands
Materials: 2x Lack coffee table, Circular Saw, 4x angle iron with holes, black spray paint
Description: Our old Lack coffee table was a little bit worn-out, so we kept looking for a new table that would fit into our U-shaped couch. It turned out that tables from Ikea or other stores did not fit so perfectly or were much more expensive.
So we bought a new Lack and thought about a way to make it look a little bit less "standard". As the old Lack had some dents but was still useable, I cut its top in half with a circular saw and used the two halves as table-legs. I connected the legs with the table plate with some wood plugs and attached two angle irons in the corners to give it some more strength.
Finally the inner side of the legs (the former underside of the table plate) had to be spray-painted black and the lower shelf needed to be shortened a bit to fit between the side plates.
The new side panels are a little bit longer than the original legs, what i appreciate because the original Lack sometimes was a bit too low. Now it has the right height and you need to take a second look to recognize that it's "only" a Lack :-)
~ Thomas Krechel, Germany
Materials: Lack side table cedar wood strips, stencil, wood stain, paint
Description: I picked up this lack table with an idea to re-purpose it but I had no idea how. Then I remembered this technique of gluing wood strips to make a new top. I got cedar wood strips, cut them to size. I glued them to the top, I painted the table white. I stenciled the raw wood and stained over that. Voila! Sweet little table.
See more of the stencilled Lack table.
~ Melissa Aldana, Pompano Beach, Fl
Materials: Vittsjo Laptop Table
Description: Inspired by the stylish "C" shaped side tables from stores such as West Elm and Crate & Barrel, we turned the Ikea Vittsjo laptop table into a beautiful wood topped side table.
We removed the glass top that came with the Vittsjo, and replaced it with a dark stained wood top that sits on top of the frame. It is secured with a few screws through the original glass brackets. It is finished with several coats of furniture wax and buffed to a shine. It is the perfect side table in our cozy living room, and can be moved over the arm of the sofa to hold a beverage, or to work on a laptop.
See more of the Vittsjo side table.
~ Kristen, Toronto
Materials: Granas coffee table
Description: Maanzzon found this on Youtube and tipped me. It's really cool way to display your wares. I didn't know there was a whole world of Granas coffee table hacked into display cases for Star Wars figurines to the Godfather. Check out this link to the SideShow Collectors Forum and also the video below.
Link to video on Youtube.
Materials: Hemnes Square Grey Brown Coffee Table
Description: I loved the size and shape of my Hemnes Coffee Table but thought it needed to be beautified just a bit.
I began by painting the base of this coffee table in Anne Sloans Chalkpaint in French Linen and then sanding with a fine sand paper.
I then cut 5 lengths of 1"(d) x 7.25"(h) pine planks to 36"(l). I hit them with a hammer, crow bar and heavy chains to give them a worn appearance. I then sanded these with a heavy sandpaper to make sure it was smooth & the edges were not sharp.
I began the process by staining the wood with a steel wool and vinegar mixture, this gave the wood a nice aged patina. I then watered down BM Texas Leather to a milky consistency and applied evenly. Then, it was onto my light gray layers.
First I watered down ASCP in French Linen(base color) and applied unevenly, then I filled in the gaps with BM Revere Pewter(watered down). I let dry for a few hours in a cool, dry place and then sanded aggressively and unevenly, letting each plank maintain some originality.
I then adhered it to a mdf base(subfloor) measuring 35 x 35(slightly smaller),from bottom of subfloor. I then flipped it back over planks side up and nailed decorative nails to the top, leaving the pre-drilled holes empty at each corner. I laid the barnboard top over the Hemnes base and adhered it with long roofing nails at each corner.
To finish this top, I used ASCP clear wax to preserve the look.
I couldn't be happier with how it turned out, it is perfect statement piece for the room.
See more of the Hemnes Barnboard coffee table.
~ Jennifer, New York
Materials: Lack TV Unit, 2x Lack Side Tables, Rill Caster
Description: I had another "Lack TV Unit" in the basement and this time I needed a new coffee Table. I use the cheap "Lack Side Tables" to hack this coffee table.
I unmounted the legs of both side tables and also of the TV unit. Then I screwed the tabletops on the bottom (the standard holes fits!), I also put some wood glue on it. After that I screwed the rill caster to the tabletops. Done.
Click here for the TV stand hack.
~ Lukas H., Hamburg
Materials: Stencils, paint, primer
Description: Michael's stencils and a weekend of patience.
Step 1, tape out paint area, I did a wide border. Measure and double check lines. It must remain straight
Step 2, paint 2 coats of primer and let dry for around 2 hours
Step 3, use stencil (read Martha Stewart's tips, and practice before you paint table) and paint sponge. A brush will not work. This part is what takes forever. Do the main areas, let dry, and fill in gaps as areas dry.
Step 4, remove tape around edges. I had to go over the lines with a wet rag, as there was some primer bleed. This was pretty easy.
Step 5, about 3-4 layers of protective lacquer, otherwise all this work will scratch and chip
Then let it cure for about a week.
~ Kate, Vancouver
Materials: Lack side table, leatherette, silver paint, furniture molding; hammer, brush, jigsaw
Description: I wanted a chic coffee table in silver!
Using a jigsaw, I cut 20 cm off of each leg and painted the table!
I attached the leatherette square to the table top using furniture molding! Love it!!!
~ Alina Krat, St. Petersburg Russia
Materials: 2 old hardwood pallets and 2 IKEA lack tables.
Description: Basically had the idea to make a bigger table out of 2 lack tables a while back and removed 2 legs from each table then screwed them together with old boards on the bottom. We found a couple of old hardwood Pallets and decided it would look cool to cut the pieces down to size and nail them on the top of our already customized ikea table. So I did... cut, nailed, sanded and stained. Looks AWESOME!
~ Eddie Sherman, Hazard, KY
Materials: LACK Coffee Table, VHS Collection, Bit of Wood and Paint, Glass
Description: For my new offices (I'm a filmmaker), I wanted a coffee table that would be a talking point and I also wanted to do something with my (possibly quite valuable) VHS collection rather than allowing it to gather dust (which it has been doing for about 6 years).
So with a little help from my crafty girlfriend, we took a coffee table that was ready for the charity shop (if not the tip) and turned it into the envy of all my filmmaker friends.
It just involved painting the top, sticking some appropriately sized bits of wood to the edges, arranging the VHS tapes and ordering a piece of glass for the top.
Sweet.
See if you can name all the films from the photos included. :-)
~ Ed Cartledge, United Kingdom
Materials: SOLSTA PALLBO footstool, candle holders (4), screws (4), jigsaw, polisher, plywood, upholstery foam, lining, stapler, textile, sewing machine
Description: I took the footstool apart and turned it upside down. I drilled four holes on the bottom and screwed in the candle holders. I sawed the new top from plywood, and I polished the edges a bit.
I covered the sides and the top separately with the foam and the lining fixing them with a stapler.
Then I upholstered these items with textile with the stapler again, and sewed where needed (e.g. at the sides).
Now the new footstool doubles as a storage item for magazines or a soft throw.
See more of the madeover Solsta Pallbo.
~ Judit, Budapest