Materials: IKEA blanda blank diameter 12 cm and 20 cm
Description: How to create a lamp that looks like the Verner Panton Flowerpot using 2 IKEA Blanda bowls:
- Drill a 10 mm hole in the centre of a 20 cm IKEA blanda blank bowl
- Mount a light bulb socket.
- Create some structure that will keep the 12 cm bowl. Use whatever you have lying around for this task. I used an old biscuit can that I cut up and made the hooks. These hooks are glued in place, 3 in the 12 cm bowl and 3 in the 20 cm bowl. This system allows you to change the light bulb.
In the present form, the lamp does not let out a lot of light. The inside of the bowls can be painted white to improve this.
Thanks for reading and happy hacking ;-)
~ Jacob Lawaetz, Denmark
Materials: APA storage box
Description: Lately I have been drooling over the very expensive, and very few dress up storage garment racks on the market, but I didn't want to spend $200 on furniture we'd only use for a few years. Meanwhile, I'd already been using an Apa storage box for dress up clothes when one day I realized, it might work great with a rack built-in!
The construction is simple- I screwed two 3-foot long 1x4's into the inside panels of the toy box. Then I cut a dowel and screwed it between the two lengths of wood. Easy peasy! I used some pink hangers from the dollar store to add some cohesiveness (I like matching hangers) but didn't need to paint, since the toy box also has unfinished wood trim.
Now we hang clothes on the rack and store purses, shoes and hats below. It takes up no more room than our toy box was taking, and makes for easy dress-up!
~ Sarah, United States
Materials: Hova armchair (1993, discontinued), painters tape, paint, fabric medium
Description: My aunt gave us an old accent chair she no longer had room for. It was 20 years old and from Ikea. My initial idea was to make a new cover out of a fun patterned fabric. The problem? I don't really know how to sew, so I'd either have to learn, or ask someone for help. My next idea was to dye it. That posed another issue: it wouldn't be patterned, something I think is severely lacking in the living room.
So I decided to try my hand at stenciling the slipcover with paint. I had already done something similar with a rug and I loved the results, plus I figured if it didn't turn out okay this time I could sew a new cover eventually. After checking out other armchairs out there I settled on a hexagonal design. My idea was to tape off all the areas I wanted to leave as-is (the lines between the hexagons) and leave the hexagons bare so that I could paint them.
I started in the middle of the armchair, and with painter's tape, I taped around a cut-out hexagon. I moved it around and continued to tape, tape, tape.
Once all the lines between hexagons were taped off, I started painting. The best thing about using the painter's tape method is that you can use a roller if you taped off everything properly. I used normal latex paint mixed with fabric medium. Unfortunately one coat of paint wasn't enough in most places so I had to do two. Once it was dry I sprayed it with Scotchgard to protect it a bit.
The verdict? Well, to be honest, I'm not sure. I really like the design, but the paint has more texture than I expected. I only spent 10€ on this - and I have half a can of paint left over. So, maybe eventually I will decide to reupholster it properly, but in the meantime, I can totally live with this.
See more of the stenciled armchair.
~ Ainhoa
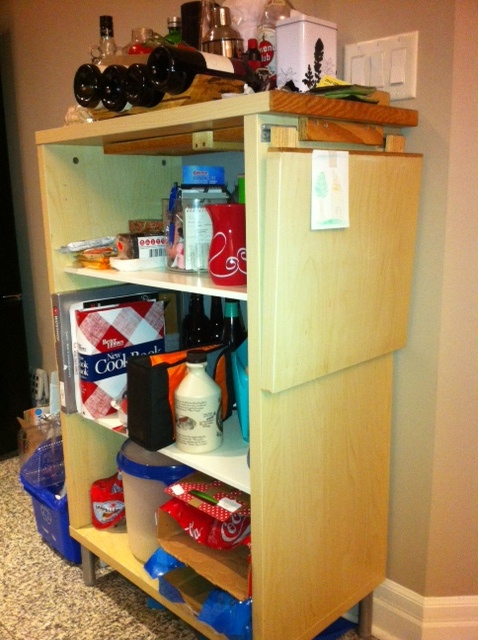
Materials: IKEA cabinet of unknown name, 1/4" X 1 1/2" wood, 1/2" X 1 3/4" wood, 3/4" X 2 1/2" wood, wood glue, some hinges, hacksaw
Description: I started with this kitchen storage cabinet from IKEA, whose name I don't know. The top was originally a single piece which was much wider than the base, overhanging in a way that always made it a bit awkward to place in the kitchen.
After some time, I decided to cut off the extending portion, but I didn't want to lose the 'counter' space it provided. So, I patched up the cut ends, screwed them back together with hinges, and added a support which slides in and out of the unit to either allow the extension to hang down, taking up less space, or stay up, providing the counter space occasionally needed.
The top is made of two layers of a thin paperboard with a paper honeycomb structure sandwiched between them. After cutting the extension off, I had to do something to hide the hollow top. I glued some 1/4" thin wood strips to each of the cut ends. I unfortunately used a wood that didn't quite match the finish of the cabinet - with some searching, I'm sure a better match could be found.
Using a couple of hinges, I connected the two pieces back together, minimizing the gap between them at the 'flat' position.
Next came the sliding support that would slide in and out of the base cabinet. It's shape is a long, narrow rectangle - two strong pieces of 3/4" thick by 2 1/2" wide wood connected at the inside end (the end that would be hidden inside the base cabinet) with some of the same wood, and on the outside end with a piece of 1 3/4" wood. I carved a groove in the outside end piece, forming a handle to make it easy to pull out the support with one hand.
Once this was built, I cut grooves in the base cabinet where the support would slide, centering them nicely and being careful to make them exactly 3/4" deep (matching the thickness of the slide) depth, so that the hinged end piece would stay up tightly when extended. With the grooves cut and the slide put in place, the top went back on.
Finally, I built a small support to hold up the long slide when retracted, and which also serves as a stop preventing the slide from pulling out too far. It also keeps the slide aligned, so that it slides in and out smoothly. It's mounted to the underside of the cabinet top, using a couple of screws mated to keyholes I cut in the thin top material.
It's not the prettiest looking thing, but try as I might, I haven't been able to find something better looking that matches the functionality this provides, and which also has the perfect dimensions for whichever kitchen I put it in (3 so far). I plan to make a sort of slip cover, maybe with a zippered front, to hide the contents and hopefully give it a better look.
~ Adam, Toronto
Materials: Various shelves and bookcase sides from the as-is section at Ikea, MDF trim, casters, wood screws and L brackets.
Description: I used various shelves and bookcase sides to build a rolling shoe storage for our newly built mudroom bench.
1. A circular saw was used to cut the boards to desired length. Due to the laminate finish of the boards, a ten inch blade with sixty teeth was used.
2. Drawers were assembled using 1 3/4 wood screws and L brackets.
3. Non swivel casters were added to bottom.
4. Decorative trim was added to the front face of the drawer.
5. Front of drawer needed to be painted to match mudroom bench.
6. Tyda satin nickel handles were added. These were found at the as-is Ikea section for .99 cents.
7. Put shoes inside and roll drawer underneath bench seat. :)
See more of the rolling shoe storage.
~ Julie @ Being Home
Materials: 2 Kura beds, 3 Stuva drawers 60x35.
Description: Needed bunk beds for my twin daughters but already had a Kura bed that my son had been using. Decided to buy another Kura bed second hand and essentially used one complete and the base of another. In order to add storage, raised the height of base bed to accommodate 3 Stuva drawers that provide good deep storage. Both sections are fixed together with 6 coach bolts.
Both my daughters struggled with the built in stair so made a new ladder from wood taken from the 'help yourself bin' outside IKEA.
My wife added some wall stickers we bought from next.
We are calling it their fairy princess tree house.
~ Chris Kennedy, Innerleithen Scotland
Materials: board, cutting tool, patience
Description: The Samtid floor lamp is a beautiful design, and will last for many years. Sadly, the skimpy plastic shade that comes with it disintegrates after two short years, and Ikea does not sell replacements. It doesn't matter if sunlight hits the shade, it doesn't matter if you used a low-heat compact fluorescent. They just fall apart. DO NOT throw that base away. Here is a template to make your own replacement shade.
Instructions:
Print out the pdf on regular old letter sized paper. Your printer may cut off the edges of the images; don't worry, just print out at 100% size. Tape the pages together according to the indications. Tape onto your Bristol board, card stock, or sheet plastic. Cut out on lines, "weave" tabs together, and attach to your base. The template includes the original shade, and also a slightly taller and (I think) much more graceful shape.
Years of extended life for a great but flawed Ikea product!
Download the pdf here.
~ Matthew Bird, Providence, RI