carrie over at apartment therapy's ohdeedoh tipped me on a fabulous flickr find. it ain't a hack but i couldn't say no it.
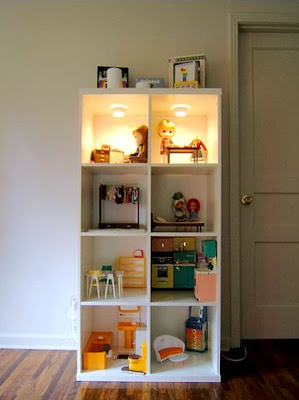
sarah turned a bonde bookcase into a dollhouse, with working lights! it brought out all that girl-envy in me. as carrie noted, the best thing is when your child outgrows the dollhouse, you've got a bookcase ready for service.
thanks carrie! link.
see sarah's doll set on flickr.
Thursday 31 January 2008
Wednesday 30 January 2008
how to make your cat lose weight
can't stay away from food? piling on the pounds? then you've got a fat cat problem. the solution is not gym sessions but a feeder cage.
in cassandra's multi-cat household, she usually leaves dry food for her cats to eat anytime they want to. but vernon, a previous stray, doesn't know when to stop and has become overweight. cassandra built a feeder cage from an ikea kitchen cart (which she have long forgotten the name of) which only allows slim kitties to get in and nibble.
she tells me, "we did it with an old kitchen cart. the little doorway was made from two ikea picture frames. (ed: the cats crawl through the picture frame doorway to get into the cage. the doorway is made smaller than big vernon) the longer sides are hinged and latched with velcro so that we can get in and out for cleaning and stocking."
click the link to see instructions and more pictures of cassandra's cat feeder cage.
a tasteful dog crate you don't have to hide
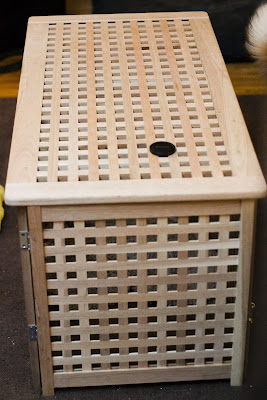
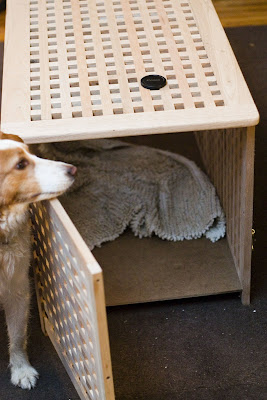
by night, it's for her dog to sleep in. by day, it looks just like any other storage box. sheena turns the hol storage bench into a dog crate.
she writes, "my dog tweed is a butthead after dark, so he can�t sleep in my apartment with the other dogs. however, my studio apartment is really small, and i don�t like having a big ugly dog crate sitting around. so i made a dog crate out of an ikea hol storage bench. it was beyond easy � i simply put the bench together but left one 'end' off, and attached that end with a pair of small, simple hinges to create a door. the door is secured with an inexpensive hook-and-eye mechanism. when the 'door' is closed, it just looks like a coffee table bench.
the only cautions are:
a) it would not suit a dog much larger than about 40lbs / 20� at the shoulder
b) if your dog is an escape artist from his crate, this isn�t sturdy enough to keep him confined � it�s for well crate trained dogs only and
c) you need to reinforce the �floor� and the top sidewalls of the unit with a 1x1 cut to fit across and nailed or screwed (or glued!) into place. otherwise the sides of the unit bend around and the floor might sink.
it was incredibly inexpensive, the bench can be stained to match your d�cor (i haven�t done that yet) and it doesn�t look like a dog crate!"
welcome to the guinea pig palace
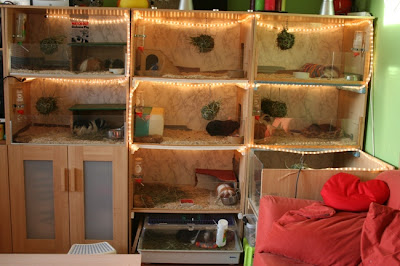
saskia transformed an aneboda wardrobe into a guinea pig palace!
she writes, "what can we do with an aneboda wardrobe? we can turn it over into a beautiful guinea pig palace! i used three aneboda wardrobes for my guinea pigs home. for the left most wardrobe i cut the doors in half, so i have some space to hide my guinea pig stuff."
i heart dogs and cats and guinea pigs too
i've been receiving quite a few pet hacks lately and thought i'll dedicate today to all things cute and furry. to start off, here are some new inspired versions of older hacks. i've posted them after the original hacks. just click through to read the full post.
cat litter box with paw prints
robert also send me his version of a cat litter box, inspired by sara's snack box hack. the full entry is here after sara's.
windowsill and dog bowl stand in one
chloe has a suped-up version of a canine bowl stand. see hers after mark's dog bowl stand hack.
cat litter box with paw prints
robert also send me his version of a cat litter box, inspired by sara's snack box hack. the full entry is here after sara's.
windowsill and dog bowl stand in one
chloe has a suped-up version of a canine bowl stand. see hers after mark's dog bowl stand hack.
Tuesday 29 January 2008
your work lamp can do double duty
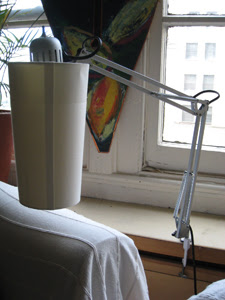
christina turns a work table lamp into ambient lighting for the room as well.
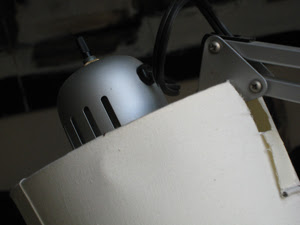
she writes, "i always liked the mobility of a work table light, especially for reading in an armchair. but in a living room, the opaque shade dulled out the light for the rest of the room. so i took an ikea tertial work lamp, removed the original shade, and installed a skimra shade.
to do this, i had to only make a small cut in the skimra frame, using wire cutters. the skimra shade is designed to be attached to the light bulb. so that took care of it being also attached to the work lamp as well.
the shade gives a nice glow to the room, and makes a great reading or general use lamp for the living room."
spongefish's genius hack contest is on!
think your hack is hip enough to win a nintendo wii?
spongefish, a newly launched social site where people share what they know, is running a genius hack contest with fabulous prizes up for grabs.
a little bit on the contest ...
"We're looking for genius hacks. By hack, we mean an act of creativity that solves a problem, alters or adds functionality, or a clever prank. Your hack should demonstrate intelligence, organization, skill and humor, and not hurt anyone or destroy anything valuable. To enter, you should describe the hack and provide some information about how you did it. Visuals help, so please show the hack in pictures or video."
the genius hacks contest runs through february 16th and all you need to do is join spongefish and upload your hack.
prizes!
first prize: Nintendo Wii
second prize: iPod Touch
third prize: $100 Gift Certificate to ThinkGeek
fourth prize: $25 Gift Certificate to ThinkGeek
check out some of the contest entries:
> how to make and hold fire balls
> homemade metal detector
> how to hack open a lock
by the way, i am one of the judges, so i may be biased to ikea hacks. :P
see contest details and entries.
Monday 28 January 2008
a tree in the living room for your cat to climb
barna repurposed the stolmen system into a cat tree. here's what he did.
"my girlfriend and i live with our three cats in a smallish apartment in san francisco. we wanted to give the cats plenty of vertical space, but we loathe both the fuzzy-cutesy look and the bulkiness/'unmodularity' of regular cat furniture. i was inspired by an earlier post on your site that used stolmen components and came up with our own solution. this one has more shelf space, and the levels are not very far apart (one of our cats is limping a little). it is made of only stolmen components, except the rugs, though i imagine ikea would have suitable ones too. we currently have two of these trees set up, one in the living room and one in the bedroom."
see similar hacks:
> stolmen cat gym
> cat stairs
> cat ladder
Friday 25 January 2008
table l'amour - a valentine's project?
michelle gives an old ikea table (now discontinued) a little bit of love.
she writes, "it's an old ikea caf� table that has been painted and weather-proofed based on a design found on the cover of the art book Les Cent Noms de l'Amour (right). i've always been a fan of highly stylized arabic calligraphy (in this case of one of the arab words for love), so this project was a great opportunity to explore its sinuous forms on a functional canvas.
i used several layers of liquitex acrylic heavy body paint and a helmsman semi-gloss urethane finish. the 'strokes' in the calligraphy are actually composed of many small paintbrush strokes."
a little bit of blue for the aneboda
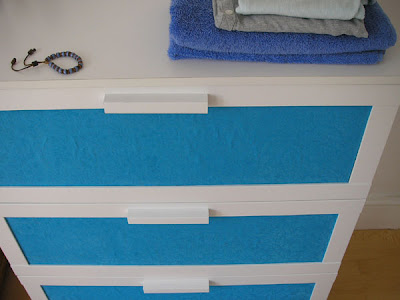
unless you are ultra organized, the transparent panels in the aneboda chest of drawers will always squeal on your less that neat habits. claudia covers them up with some lovely paper from oliver bonas.
to do this hack, you'll need to measure the area to cover with a tape measure. with a pencil, mark the area on your selected paper. place the paper on top of the panel to see if fits correctly and make adjustments, if required.
apply glue on the panels and stick on the paper from one side to the other, pressing with your fingers as you go along to prevent the formation of bubbles. repeat until all panels are covered.
no more "un-neatness".
see more on claudia's superziper blog (in portuguese) or the google translated english version.
Thursday 24 January 2008
try out the ikeahacker app for facebook
a new thingamajig to play with. glen of lifedev (and who runs liferemix, the blog network i am part of) has developed a facebook app for bloggers.
what it does is allow you to receive and share blog content on facebook itself. pretty neat huh?
so if you add the ikeahacker facebook application on your profile, you'll get a feed that looks like this:
go on, add my app or get your own. it's pretty simple, no programming necessary. let me know how it goes.
a breakfast bar saves the day
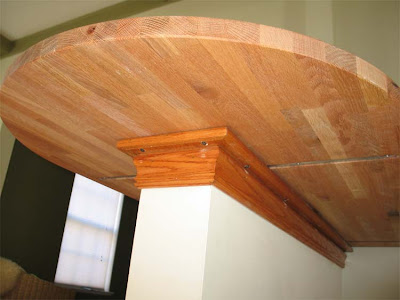
alexandra turns an ugly half wall into a breakfast bar. while there is no straight-up hacking on the ikea countertop, it is a neat idea if you're looking for ways to maximize space or hide mistakes.
she writes, "previous owners took down the wall that separated kitchen from the dining room, all that was left was this column. it was 'begging' to be a breakfast bar. we went to home depot to do the estimate on the counter - over $500 for the 2x5 piece of what's-it-called fake marble plus the installation.
we looked at the table-tops at the ikea, as an alternative. we got vika byske in oak. (it's very well made, but it needs to be oiled or polished)
it was installed right on top of the old column, screwed in from the bottom up. it looks great!
cost? $89 for the table top + labor (easy to do if you have the tools)."
Wednesday 23 January 2008
simple hacks from japan
the first hacks, albeit minor ones, from japan! these are from yoshi, who clearly loves his dog very much.
yoshi printed the photo onto the iron on sheet and transferred it to the solsta pallbo cushion cover.
also check out his stencils and furniture designs.
yoshi printed the photo onto the iron on sheet and transferred it to the solsta pallbo cushion cover.
also check out his stencils and furniture designs.
how to make an inspiration board
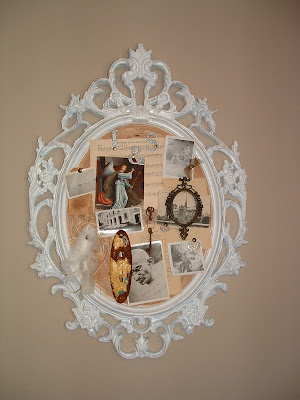
i've been meaning to make an inspiration board but, as usual, got derailed. lisa z's hack re-inspired me again. love the aging of the ung drill picture frame.
lisa writes, "i hacked an ung drill black picture frame by taking out glass. i tried to save it but it broke. i then painted it with white craft paint (from michael's craft store) and an old brush not covering thoroughly as i wanted it to look old.
added 2 layers of cardboard (i couldn't find cork so used what i had). painted the cardboard white then took at walnut stain and sprayed it on and then smudged it with an old paintbrush to make it look aged.
added my foo-foo stuff with upholstery tacks and it looks great hanging in my art studio now."
see more on lisa's blog.
Tuesday 22 January 2008
let's make a memory
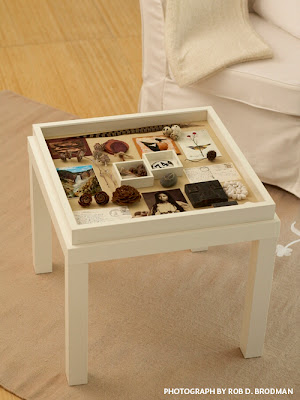
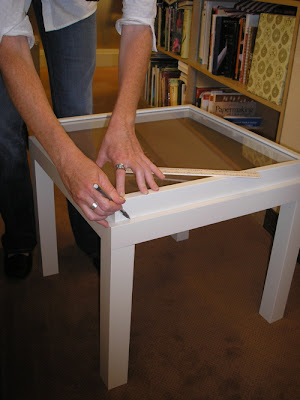
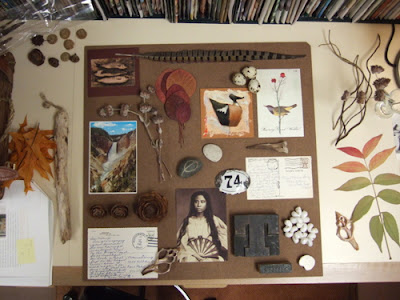
jess chamberlain, a writer for home by sunset made this lovely memory box table top. wonderful way to keep your trinkets with style, without the dust.
you'll need a lack side table, a ribba 19" square frame and of course, the mementos you want to seal in the frame.
see jess' instructions on home by sunset.
see other home by sunset hacks - monica's sunburst mirror and clocks.
you'll need a lack side table, a ribba 19" square frame and of course, the mementos you want to seal in the frame.
see jess' instructions on home by sunset.
see other home by sunset hacks - monica's sunburst mirror and clocks.
Monday 21 January 2008
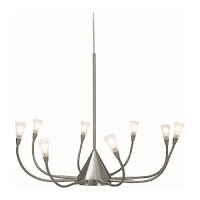
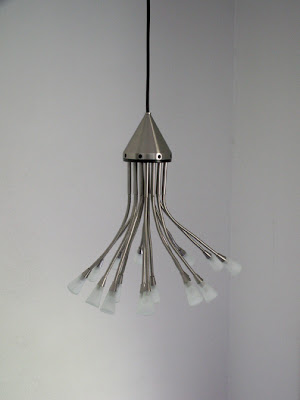
a twin horby pendant lamp
scott bought the horby pendant lamp (right) but it wasn't adequate for the space he intended it for. what to do then? buy two and fuse them together.
here's how scott did it:
1. disassemble both lights of all their parts.
2. drill 16 identical, evenly spaced holes in the flat metal base to hold the new arms. (4x4 square pattern)
3. place second transformer in the ceiling base. (because the voltage on these bulbs are only 12V you must use both transformers that come with each light)
4. use sprinkler cable for the main wire (it has 5 wires-you will need a minimum of 4), you'll need two pairs of live/neutral wires per each transformer/8 lights.
5. wire 8 arms together....pairing each black wire together with one of the live wires from the main.
6. repeat until both live (black) and neutral (white) wires are attached to on of the main wires.
7. use wire ties within both ceiling base and cone base to secure all connections so they don't separate when installed.
8. join the two live wires from the ceiling base together with the main in the ceiling. repeat with the neutral wires.
and here's what he got:
Sunday 20 January 2008
use lack shelves to add storage and interest to a room
cathy makes good use of the lack shelving units as storage and room partitions.
"we wanted to use lack shelves in the kitchen so that they could act as a food pantry, but had limited wall space. by using red polycarbonate sheeting as door fronts, we were able to position the shelves partially in front of a window, so that they admit interesting afternoon sunlight through the doors. the polycarboate was a manufacturer's offcut, sourced at a local recycling outlet reverse garbage, west end.
the red doors are attached with standard cupboard concealed / self-closing hinges, which are recessed into the lack board (drilling a hole using a big drill bit) and fixed on the door side to the timber door stile (screwed to the polycarbonate in pre-drilled holes). actually, how to attach standard door hinges is the ongoing problems of working with the lack board material - the laminate on the honeycomb cardboard core - because the hinges are really designed for solid material. also, the polycarb is brittle and can snap, especially when knocked against something in the cupboard!
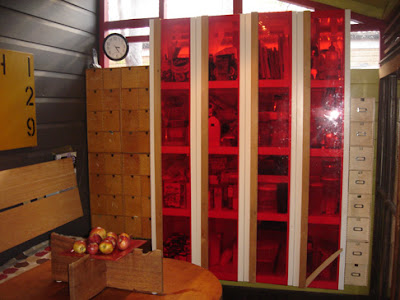
we have ideas about how to easily make the door handles, but at the moment, there are no handles and we simply open the door by pulling the plastic, which is not ideal. but i still like the polycarb effect regardless of these challenges! also seen are ikea plywood storage boxes (no longer available?) fixed to the wall.
another lack deviation relating to limited floor space can be seen in our bathroom partition wall made of four ikea lack bookshelves. we had difficultly finding enough wall space to accommodate these shelves, but desperately needed the storage space for toys and books. when replacing the original termite-eaten, non-structural bathroom wall, we were able to use the shelves to act as the wall instead of creating a timber stud frame. we also painted the shelves white because we had accumulated shelves in non-matching colors and finishes. the cut half-lacks can still fit ikea branas baskets!
Friday 18 January 2008
a server farm right in your living room
the axeman needed a rack to place his cisco switch and huge home server. with the faktum, he got all that he wanted.
here's how he did it:
1. take a faktum FA703 (now akurum) tall module (eventually add more modules, to get almost to the ceiling... you'll need some space to let warm air out, or you can use a fan)
2. the faktum width is almost equal to the width of a real rack, so the hack is very easy: cut 4 pieces of metal shelf beams that fit in the space between the two faktum ledges. there should be the right space needed to hold rack mount modules, as in picture, and all the cables are hidden behind the structure.
3. add your server, UPS, and laser printer, and structured cabling (every one has structured cabling in his flat, right? :-) )
4. hang the LCD monitor on the faktum module side. with a wireless keyboard with trackball, you can use the computer from the couch.
5. DONE! a little piece of server farm in your living room. and with the right screensaver, the monitor act as a nice digital frame.
Thursday 17 January 2008
no space? create storage under the bed
i enjoyed the bathroom day we had on tuesday and thought i'll post two bedroom hacks today too.
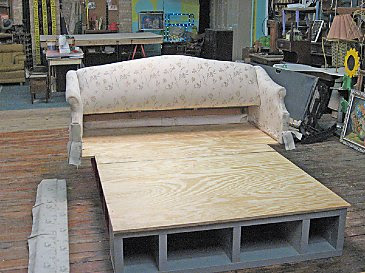
michal spotted this ikea hack on the diynetwork. host samantha gleisten designs a bed with storage for a homeowner who is working full time, going back to school and caring for her mother. the site has detailed instructions but the short version is as follows.
3 lack shelving units in a U shape formation make up the base of the bed. across the bookcases, lay plywood to provide a surface for the mattress.
the headboard is made from an old sleeper sofa with its mechanics and wheels removed to fit the bookcase bed base.
see more on the diynetwork.
see other bedroom hacks.
save moolah and space with the moddi murphybed
lisa sent me a link to moddi murphybed as she was wondering whether anyone out there has built one and if it was any good. so, if you have, please comment away!
for $7.95 you get a set of moddi murphybed building instructions that lets you build a hideaway bed for less than $275. way cheaper than the original murphy bed.
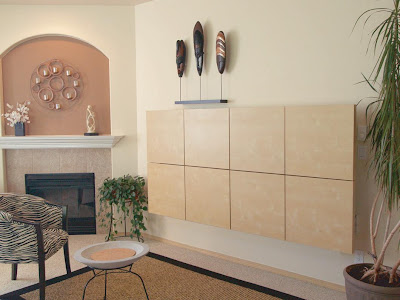
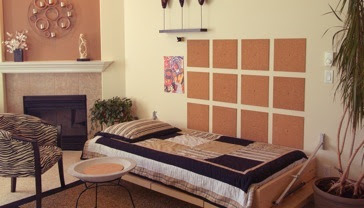
now, why it earns a spot on this blog is simply that the moddi uses ikea! you'll need a lillehammer bed frame, 8 lack side tables and a sultan lade slatted bed base besides a whole plethora of hardware, nuts and blots to make a twin moddi murphybed. more if you're cranking out a double.
i was really hoping to get a good look at the whole contraption but their gallery is down for now. bummer. anyways i managed to find these 2 photos on the site and it does look like a fabulous solution for small spaces. it may not be all that easy to build though.
do you have a moddi murphybed? let us know if it works for you.
click to buy the moddi murphybed building instructions or to view the parts list.
Wednesday 16 January 2008
announcing the ikea hack of 2007
it was a tough fight but in the end, the tortoise turtle really did outrun the others. little did i expect the last minute inclusion of the turtle terrarium would seal its fate as the ikea hack of 2007. the terrarium, marcus winter's far out tv unit conversion, took home 16% of 1422 readers' votes.
coming in second is splatgirl with her lovely bathroom hacks at 14%.
thanks everyone who voted. to marcus and his turtle, a big congrats.
> see all 20 finalists and votes.
> see 2006's top 10 and winner.
coming in second is splatgirl with her lovely bathroom hacks at 14%.
thanks everyone who voted. to marcus and his turtle, a big congrats.
> see all 20 finalists and votes.
> see 2006's top 10 and winner.
Subscribe to:
Posts (Atom)