Friday, 30 December 2011
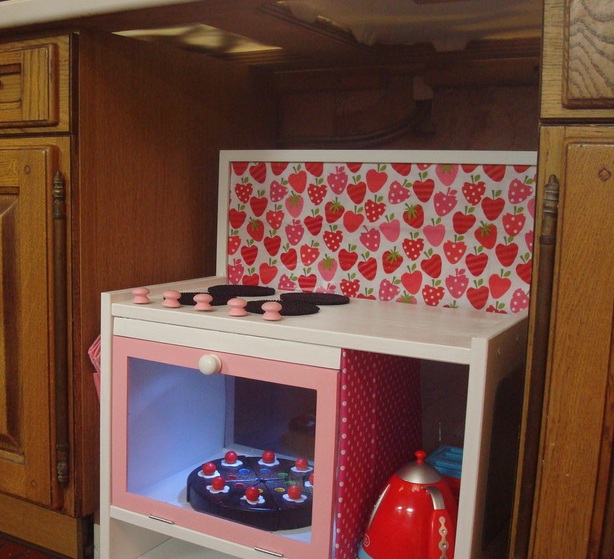
Strawberry RAST Play Kitchen
Materials: Rast Bedside table, RAM frames, RIBBA frame, SORLI mirrors, even IKEA packaging
Description: Mandate: Create a play kitchen for my daughter for Christmas. Needs to fit space where a kitchen base cabinet is missing.
Labour: Building took 10 hours over 3 days. Countless hours on design/getting stuff.
Cost: Probably more than a shop bought kitchen - but that's mainly because I had to buy all tools, paints etc.
I'm thrilled at how well it has turned out, considering that I am a complete novice at DIY, the tight time deadline (before Christmas) and the fact I was nursing a painful tooth!
My heartfelt thanks to IKEA Hackers and play-kitchen-creating mums for all the ideas.
The frame is a RAST bedside table (what else?) I primed, sanded, painted with satin gloss white paint and finally varnished the parts before assembly.
I used a RAM photo frame for the oven door. I painted it a pale pink. I used two flush hinges to attach it to the lower shelf of the RAST table. I tried to screw it in, but after a loooong struggle with the cordless drill, gave up and tried hammering it in. That didn't work either - hammered all but one of my fingers. Finally glued it using Gorilla All Purpose Superglue.
For the base, I bought a piece of 1/4 inch plywood (should have gone thicker!) - primed and painted along with the RAST sections. I screw-fitted SLUGGA castors to attach the plywood to the RAST "legs"
For the back, I lucked out. I got a RIBBA(?) frame, white finish at the Bargain Corner in IKEA for �2. Screwed it onto the back of the table, inserted some fabric for the "backsplash". Done.
For the door inset, I used the perspex packaging from last year's Christmas baubles. (also from IKEA!)
Knobs: Unfinished, screw-fitted knobs bought via eBay, painted white and pink for the hob knobs and oven door knob. Drilled holes and screwed in the knobs.
Hob Burners: Super-glued beaded coasters bought from the supermarket.
Oven Light: Stuck a push LED light on to the roof of the "oven".
Other accessories:
Stuck a couple of white plastic hooks from the local DIY shop for the oven gloves and apron on one side of the table.
On the other side, stuck a SORLI mirror.
For the trim (just above the oven door), I tried cutting a polystyrene block to size, but that didn't work - kitchen floor is covered in polystyrene "snow". My husband helped me saw off a section of a RAM frame (using a craft knife and a bread knife!! I really should have bought a jigsaw!). Primed, painted, superglued on. For the separator between the oven and the shelf on the right, I used a fabric wrapped piece of cardboard - when time permits, will replace with a piece of plywood.
That's it! Whew.
~ Kipsy, UK
Subscribe to:
Post Comments (Atom)


No comments:
Post a Comment