Thursday, 2 February 2012
TOBO 2.0
Materials: TOBO TV Unit & Panel, CAPITA 4" legs (x8), UPPLEVA ORMO, CPU fans (x2), peg board, screws, wood pieces, hinges, drill, saw, various screws, zip ties
Description: This hack came in 3 separate stages, with the final hack being a TOBO unit that can handle hot components, lots of wires, and looks a little bit more appealing. The base of the build is the TOBO TV unit and wall panel.
TV mount:
- Parts: UPPLEVA ORMO
- Follow the instructions provided by Ikea for this part.
Surround speakers:
- Parts: 2 generic speaker mounts, drill
- Following standard instructions provided by mount company, units were attached to TOBO.
- Drill an extra hole below the bottom screw, allowing wiring to pass through.
Cable management:
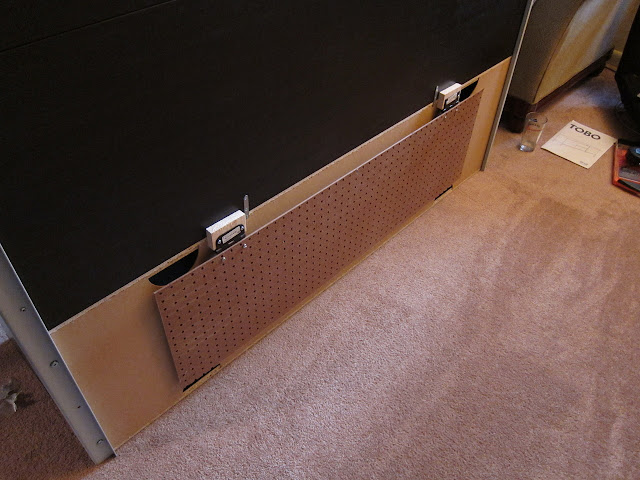
- Parts: Peg board, 2x hinges, 2x wood pieces, 4 screws, 4 short bolts / nuts / washers, 2x rubber door stoppers, saw, drill
- Cut peg board down to 48"x14". If no saw, your local hardware company should do it for free.
- Cut down 3/4"-1" thick wood blocks to allow some space between the peg board and the unit. Ensure wide enough to attach hinges to.
- Drill guide holes into top of main TOBO unit for attaching hinges and wood blocks. This will prevent the TOBO unit from cracking or splitting.
- Using the 4 screws, attach the wood block and hinges to TOBO unit. Pay attention to the way the hinges move, as peg board will need to flip upward.
- Using the 4 bolts, nuts, and washers, attach the peg board to hinges. Use the washers on the nut side.
- Attach desired wiring and power supplies as you wish. I highly suggest zip ties as they are cheap and do the job well.
- Optional: I used rubber door stoppers near the bottom. This prevents the peg board from slamming into the TOBO unit if dropped.
Air management:
- Parts: 2x CPU fans, 4x fan grills, molex to ac adapter, 8 screws / nuts, 16 o-rings / washers, drill
- I chose Antec 52cm tri-cool fans. The large fan size allows for silent operation on low and provides adequate cooling.
- As I couldn't find a circular hole bit large enough for a 52cm fan, I used a razor and a draw on template to cut out the circles. BE CAREFUL.
- Location was placed at the top, as I'm using negative airflow in my case and heat rises. If using positive airflow, I suggest centering the fan on the shelf, to ensure both the top of bottom receive a fair share of air.
- Tape your fan grills over the holes to use as drilling guides. Mark where your holes will go. Drill.
- Pass a screw through the whole unit in this order (from outside to inside): Screw, rubber o-ring, fan grill, metal washer, TOBO wall, fan, fan grill, rubber o-ring, nut.
- Use a 4-pin molex to ac power adapter (roughly $10) to plug into normal wall outlet for power.
Legs:
- Parts: CAPITA 4" legs (2x sets of 4), short screws?
- Self explanatory. Just watch the height of the screws. I may have had to buy new screws that were shorter for the TOBO unit.
The legs were a personal choice as my viewing distance increased upon moving. The whole unit sits pretty flush to the wall, thanks to the cable management. There's about 4" of space between the TV panel and the wall now. This unit receives a workout as it's storing a receiver, 2 video game systems, an external hard drive, and an always-on HTPC. However, the CPU fans keep the temperature in a safe range even on low.
~ Josh Higgins, Charlotte, NC
Labels:
media storage,
Tobo
Subscribe to:
Post Comments (Atom)


No comments:
Post a Comment