Showing posts with label Alex. Show all posts

Friday, 8 February 2013

Hacker help: Ironing Alex?


Materials: Alex drawer unit

Description: I recently saw an Alex drawer unit that someone had fitted with dividers to hold large spools of quilting thread. I don't have large spools like hers, but I thought it was a very clever way to see your thread but then "not see it" when you don't need it. I cut strips from an old piece of foam core, taped them to the sides of the drawers, and arranged my thread by color. Pins stuck into the foam core hold the corresponding bobbins nearby. Very nice!


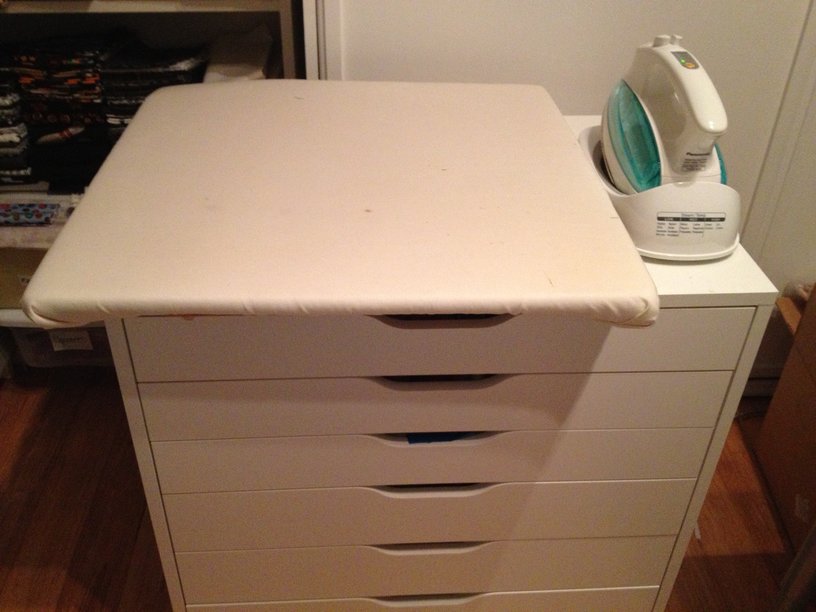
I also discovered that the top of the Alex was a good place to put my little pressing board and iron. The only trouble was that there was "just enough" space for the iron and board and if either shifted, one of them was in danger of falling off. Not nice.

I'd like to find a rack/shelf of some kind that I can attach to the top of the cabinet somehow, and then attach the board to that. And since I'd also like to enlarge the pressing board to a full 24" square (it's only 22" now), it would have to be wide enough to be able to hold the iron completely to the side.

I'm hoping that some of your clever folk might have some ideas for me. Many thanks!

~ Peg Farrell, United States

Tuesday, 1 May 2012

Alex goes to the sea


Materials: Alex, naval charts, wallpaper glue, varnish

Description: I remade a drawer unit called ALEX from IKEA.
I used old naval charts, I got from my father.

The charts are from an area up north in Sweden where I grew up, H�lsingland and the archipelago where I spent lot of my summers.


The steps of making this is...
1. Clean the drawer unit and then glue on the charts you choose.
I used wallpaper glue as the charts are rather thick.

2.When the glue has dried you cut up between the drawers, using a wallpaper knife.

3. Now it's time to seal the paper with some varnish, I used matte deco lacquer.
Go over it at least twice, so you get a hard surface.

4. When the varnish/lacquer is dry, you cut the edges of the paper around the drawers and polish with some sandpaper, I use no. 80

5. After you have finished the surface, go over it with one layer of lacquer again to seal the paper where you have polished it too.

See more of the Alex drawer.

~ Helene Langborg, Sweden

Wednesday, 28 December 2011

Ekby Alex Writing/Sofa Table

IKEA Ekby Alex desk

Materials: Ekby Alex & Vika Lage/Moliden

Description: I was in search for a very small writing table, but could never find one that would fit my small space. I've seen the Ekby used a few times, but not in the combo I ended up using (at least not yet).

Anyway all you need is the Ekby Alex & either the Vika Lage/Moliden legs. It's pretty simple, attach the legs to the Ekby. I pre-drilled the holes to prevent the wood from being damaged further. After I put it together I noticed it was a little tall, not too bothersome though. I have my chair on the highest setting and it's comfortable. This could also be used as a sofa table. When I rearrange I plan on trying it out as that.

~ Carolyn, TX

Tuesday, 27 September 2011

Glamour console


Materials: VIKA FAGERLID (table leg with storage) and EKBY ALEX (shelf with drawer)

Description: My girlfriend and I were looking for a small console because we have little space near the front door, but consoles at ikea were all too big. so my mom came to help us proposing this solution:

We created our own console using VIKA FAGERLID (table leg with storage) and EKBY ALEX (shelf with drawer)


~ andrea e claudia, florence, italy

Saturday, 21 May 2011

ALEX work table with flat files


Materials: 2 VIKA ALEX storage units ($50 each): 601.928.26; 1 ALEX flatfile drawer unit ($120): 401.962.41; 1 tabletop (I used VIKA BLECKET because of the sweet lightbox inlay - $100): 201.036.05; 2 sets CAPITA brackets ($15 each, $30 total): 400.511.96; 1 RATIONELL shelf (30x24, set of 2 for $16): 245.785.10

Description: We finished a basement renovation recently that yielded a small room that I could use for a design/music studio. The room is small (about 10'x10' with a 3' swath of space under stairs) and making the best possible use of the space is key - as is finding furniture that's a little undersized to keep from making the room feel cramped. A goal was also to give my girls a space where they could do art projects and leave them out to dry, or just have the freedom to leave the space a little messier than they could leave the dining room or kitchen counter.

Source: Readmade Magazine, Bauhaus Beauty
I saw an article in a recent issue of ReadyMade (pic, right) about a furniture designer who found a killer Bauhaus-designed house in the hills of St. Paul, MN... anyway, he had built a beautiful work table for his studio. While I lack the skills and time to make the same thing for myself, I was looking through the IKEA catalog and the ALEX components made me think, what the heck, I could probably do something similar.

additional materials/tools:
10 machine screws (pan or truss head) 1/4" x 1-1/2" (mine are #20) with nuts and washers
4, 3" casters (i used two locking ones for the front) with 1/2" wood screws
drill and 1/4" bit, 3/16" bit, philips-head driver bit
handsaw, circular saw or table saw
measuring tape
screwdrivers and crescent wrench

total time: about four hours (not including IKEA run)


Step 1: Locate bolts for linking units together
� Open up one of the VIKA ALEX units and the ALEX flatfile unit.
� The back and front of all the units (whether they're doors or drawers or whatever) land inside the frame, so we need to allow for those when placing our holes. for the machine screws I'm using, I'm centering my holes 1-1/8" from the edges.
� Start with the drawer unit, since it's going to be the hardest to deal with. i put the drawer sides down on the slides so I could see where the hardware had gaps. 3-1/2" from the top, 7" down from there (back side only), 3-1/2" from the bottom. Mark both side pieces of the drawer unit.


� Clamp the pieces together and drill with a 1/4" drill bit. be sure to clamp them together as they will go in your final assembly - obviously you want your holes to line up properly! hint: the clean sides (no factory holes) go together... just be sure that the front of your drawer unit lines up with the front of your shelf unit. also, very important: line them up on the BOTTOM.

Step 2: Assemble units normally
� About halfway through assembly, I started connecting the side pieces. it doesn't really matter when you connect the three units; just don't get the screws super tight until they're all together, or you may have trouble installing the bottom pieces.


� Just don't put in shelves, drawers or doors.
� Make sure they're good and square!

Step 3: Casters
� Turn unit upside down
� Locate caster holes. I used the existing caster hole from the Alex to place one of them, then marked the others.
� Install all four casters. recommended: drill pilot holes. these screws are big and will mess a little with the particleboard.
� Turn unit right-side up.


Step 4: Shelf
� Cut shelf to size (if you haven't already).
� Carve out shelf pin notches


� Place and drill shelf pin holes (mine are 3/16")


� Put shelf in place


Step 5: Install tabletop
� Locate brackets. I'm using the VIKA BLECKET tabletop, which means I have a little lightbox window to avoid, so i placed the tabletop on top of the assembly and marked the edges; then I placed the brackets 1" closer to the center of the table (so they're not right up against the edge of the desk). In my case, I also wanted the tabletop to overhang only at the front, not all the way around, so I positioned it that way when I marked things out.


� Screw the brackets to the tabletop.


� Now that you've got the brackets installed, flip the tabletop over and orient the brackets to the bottom unit. Get it centered and then mark the holes. CAREFUL moving the tabletop around as the brackets will scratch the melamine!


� Now remove the tabletop and drill your holes.
� If you drilled your holes just right, your tabletop should now slide right into place. you may have to enlarge one or two of the holes (don't feel bad).
� Tighten the nuts under the brackets.


6. Finish it off!
� Install doors and drawers.
� Tighten everything one last time.


7. Party.

8. Extra credit
� I picked up a couple FRANKLIN barstools (901.260.57) which sit at the perfect height for me to use my laptop, or for my daughters to sit and work at the table.
� See the large inset at the center back of the work table? Why not use the second RATIONELL shelf to make that space a vertical storage area for large posters and stuff?

~ Graham Stinson, Seattle, USA
Thursday, 17 February 2011

Alex Cooling


Materials: Vika Alex, Revoltec PC-fans, ruler, jigsaw, Codegen 350w PSU

Description:
1. Mod the PSU by short-circuiting it so you don't have to make an on/off-switch. Then cut away all of the cables that you don't need and make it look somewhat more beautiful by using regular electrical tape.


2. Check the fans are working. Check!


3. Cut out some holes for the fans in your Vika Alex, and then install them. Yeah, do that.


4. Put some white electrical tape on the sharp edges, it's actually neater than you might think!

5. Get your stuff in there again, with routers and stuff on the lower floor - and your very expensive MacBook Pro on the upper floor. Now it has very good cooling - and you can hide it away so you don't have to have all of those annoying cables on your desk.


6. Be awesome!

See more of the Alex cooling box.

~ Jesper Karlsson, Sweden

Friday, 26 November 2010

Alex Credenza


Materials: Alex Drawer Unit (40196241) & AVSIKT Roll-front cabinet (#00158439)

Description: I have for a long time wanted to have an old style credenza with modernist influences. I though the Alex file cabinets were very elegant and often overlooked so i wanted to utilize them for this hack. The Alex file cabinets were however, too tall to make a sleek and modernist credenza, so in order to make it work i had to chop off the two bottom drawers and shorten the height of that product all together. Then, once that was done for both cabinets the fun began.

The AVSIKT Roll-front cabinet was perfect for my purposes since it had a beautiful roll front with a metallic finish - the roll front is actually really sturdy so even when i decided to flip the AVSIKT Roll-front cabinet so that the roll front was on the top, it can still actually hold pretty heavy objects (including a flat screen TV if necessary).


With the AVSIKT Roll-front cabinet, however, the depth and "height" was smaller than the Alex cabinets, therefore two pieces of plywood (1/2 in thick) had to be placed on each side. This actually helped strengthen the credenza, however, it did require me to veneer the surface once all the pieces were attached.
Once the pieces were secure to each other using wooden screws, I veneered the plywood pieces with a nice Maple veneer and gave it a couple of light clear coats to preserve the natural color.

The final touches were getting the legs from Home Depot (or your local hardware store, they cost about $2 a piece) and mount them on the bottom and painting them black. I opted for an arrangement of 3 legs in a triangular fashion on each side - I think that works best since the piece is quite heavy (actually, it is really heavy so lift with partner if possible).


I was happy that my vinyl record player fit the compartment in the AVSIKT Roll-front cabinet and i build a little shelf with the spare drawers parts from the Alex cabinet - underneath it is the speaker and wiring, all hidden from sight. I have many pictures of the process but can't supply them all at the same time on the site, if needed please let me know and i'll share them right away!


~ Mark Soares, Connecticut