Showing posts with label Vika. Show all posts

Wednesday, 23 January 2013

Simple But Effective Occasional Table


Materials: Lack Shelf, Vika Adils Legs

Description: A very simple hack. I didn't like the Malm occasional table (or the $130 price tag) so I built one for $34. I combined the 74" Lack Shelf with 4 Vika Adils legs. I have the low headboard Malm, for the high headboard the Vika Kaj legs would be better.

Freestanding it's not the most stable but behind the headboard its solid as a rock, it is about 1/2" lower than the headboard which provides a nice lip to keep items from falling on your head.


~ Matt Hannan, Wheat Ridge, CO

Tuesday, 13 November 2012

Multi-Kid Drafting Table


Materials: Vika Byske Table Tops, Vika Moliden Legs

Description: The table tops were cut to a width that our kids could reach across. They are fastened to a 2x3 frame with hinges to allow their slope to be adjustable. The legs were fastened to this frame and braced for added stability.


A gap is left between the table tops for a lower shelf to hold the Ikea containers for pencils, pens, etc. Each child can have their side of the table at the slope they want depending on what kind of project they are doing. The Ikea jr chairs are the perfect height for this table.

See more of the kid drafting table.

~ Erik, Minneapolis

Friday, 4 May 2012

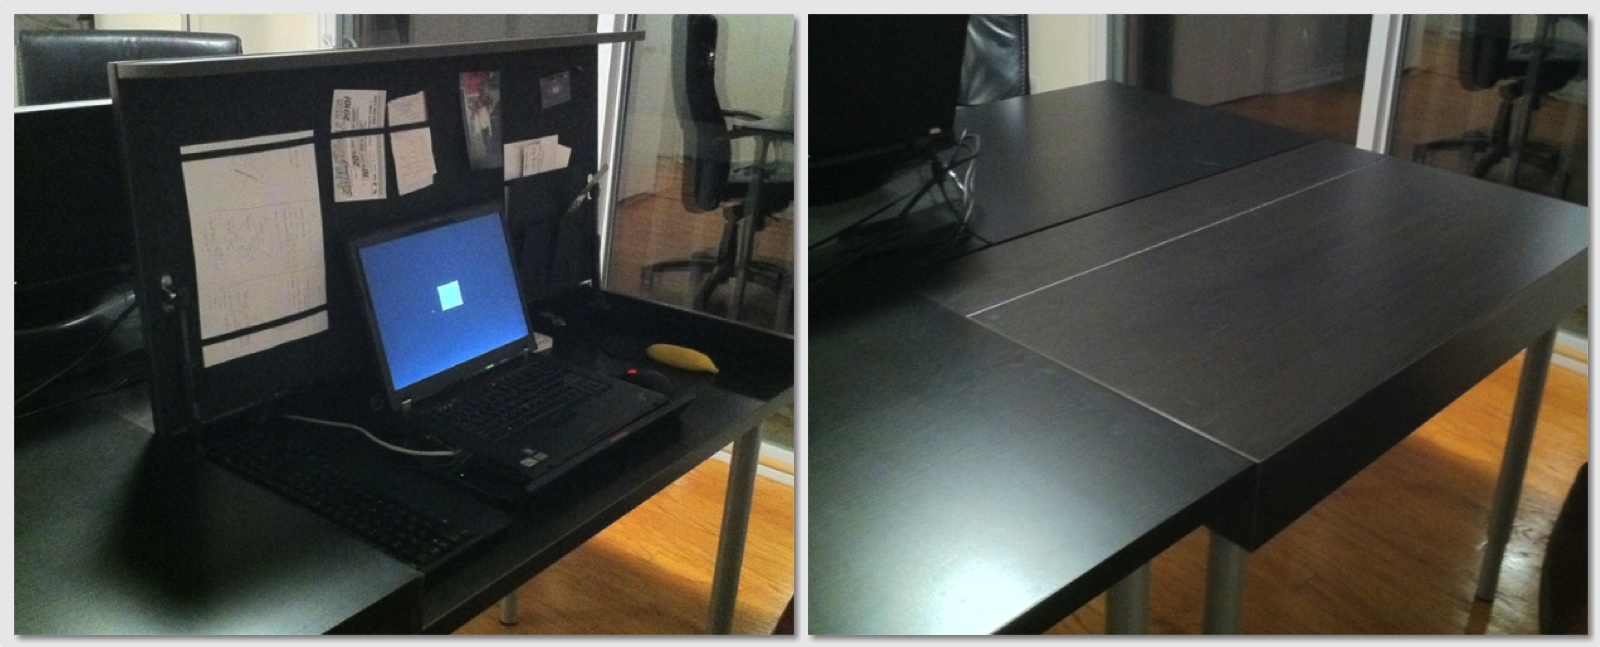
Vika Veine convertible computer desk


Materials: Vika Veine + legs, a desk pad, LED screen, thin keyboard

Description: I was in search of a good way to hide away my keyboard and monitor since I had to use my living room as part of my office.

I saw this item at IKEA and bought it figuring that I could make it work.

I bought a Viewsonic LED monitor because they're super-thin, and have both a VESA mount, and an DVI jack that's parallel to the screen.


The most difficult part of this project was to drill the VESA holes through the top of the desk accurately. I countersunk them, then attached the monitor to the inside of the desk. I filled the holes on the top with some wood filler to keep it flat, then used some silicone caulk to attach the desk-pad permanently.

Care must be taken when choosing the components, as the inside clearance isn't very much. Between the LED monitor and THIN Logitech keyboard, I was able to make it work!

Sorry about the not-so-good photos, but you get the idea. Also, need to work on some cable management.

~ Tak, Boston, MA

Thursday, 29 March 2012

Auto On Vika Vanity


Materials: Black Vika Viene table top, Vika Legs, Mirrors, LEDs, Reed Switch

Description:
After seeing the previous Vika Vanity on here I knew I had to make one for my girl friend as she did not have a place to get ready in the mornings :(

I bought a black Vika Veine table top, attached the legs, placed (2) 12x12 mirror tiles from Home Depot ($10 for a 6 pack) with velcro and ran the LED strip.

The LED strips have adhesive on the back so it worked out great, very simple. I then wired in a Reed Switch so that when the top is opened the LEDs come on automatically.


The Wifey spruced it up with some matching fabric in red with sparkles as well as all her makeup.

The side unit has all her bottles, nail stuff and irons and I believe I saw our kitchen sink somewhere in there as well.

She's in love :)

~ James, California

Wednesday, 19 October 2011

Office Party of Two


Materials: Vika Veine, Vika Amon, Vika Kaj, Aspvik Cabinet

Description: My wife and I both work from home, so we needed a solution that addressed a few needs...

1. Desk big enough for both of us to work on. More room to write notes, look through papers, etc.

2. Some way to hide all the clutter. Working for a tech company and being gadget geeks, we had a lot of equipment that needed to be organized.

3. Provide some personal space for each of us. Because if I sat side-by-side with my wife for 8+ hours a day, she'd probably kill me.

We brainstormed, went to IKEA, and came up with a solution that would fit all our needs using a mix of cabinets, desks, and some good ol' hackery.


Shopping List

1. Vika Viene Table Top (for my wife, a cool desk that opens and closes so all the work clutter is out of sight when not in use.)

2. Vika Amon Table tops (long one for my side of the desk + a shorter one for Christy's side - which we had to cut to size so that both our sides matched up in length.)

3. Vika Kaj Adjustable Legs (8)

4. Aspvik Cabinet with sliding doors (to house all the electronics)

The Aspvik cabinet was assembled straight-forwardly and would serve as the base for our Tabletops.

For the tabletops we wanted to pair a Vika Veine desk with a small Vika Amon tabletop on one side (Christy's) and a larger Vika Amon tabletop on the other (mine).

We cut the small Vika Amon tabletop to size on one end using a power saw (a literal hack). The Vika Amon tabletop is hollow on the inside, so we faced the hollow side toward the wall so you don't notice.

We then put on the legs, and adjusted them so that all the tabletops were the same height. The adjustable legs are a necessity, because the Vika Veine desk has a taller width (to accommodate the fold-up feature).

After getting to that stage, we realized we had to come up with a cable management solution (IKEA never considers this it seems). We didn't just want them going over the top of the desks.

So Christy came up with the genius idea of raising the height of the desks a bit and putting in place hacked risers. Each riser was made by taking 4 felt pads, and two rubber desk feet we picked up at our local hardware store. We then sandwiched them together, felt in the middle, rubber feet on the ends (all OREO resemblances are purely coincidental).

We put the risers on opposite ends of the desk where the Vika tabletops rest on the Aspvik cabinet. The effect is a cool "floating" desk that allows our cables to run under the table instead of over it!

We then put all the electronics in the Aspvik cabinet and cut a couple holes out back for routing the wires and to serve as ventilation for the computer (we also got a small USB fan to help push out the hot air from inside the cabinet).

The end result is just what we wanted, a clean, neat, organized office for two (and a cat).

See more of the home office remodel.

~ Chris, Austin, TX

Tuesday, 27 September 2011

Glamour console


Materials: VIKA FAGERLID (table leg with storage) and EKBY ALEX (shelf with drawer)

Description: My girlfriend and I were looking for a small console because we have little space near the front door, but consoles at ikea were all too big. so my mom came to help us proposing this solution:

We created our own console using VIKA FAGERLID (table leg with storage) and EKBY ALEX (shelf with drawer)


~ andrea e claudia, florence, italy

Tuesday, 1 March 2011

Rolling Craft Table


Materials: Vika table top, ClosetMaid 2 shelf organizer, Casters from Harbor Frieght

Description: I used 2 Closetmaid organizers (from Target) and 2 Vika table tops and four casters. I attached the casters to the underside of one of the Vika tops. I liked these clear retro looking ones from Harbor Freight, they spin nice and come in locking and non-locking. They were only about 5 bucks each. I used 2 of locking and 2 non locking so I could lock the table when I really needed to.


I then attached the Closet Maid organizers to the Vika top with screws. I placed them on the outside middles so I can have optimal storage underneath and on the shelf's in the organizers themselves. The table is the perfect height for me to work on and I have lots of extra storage all the way around. Voila!...an inexpensive and super handy table.


~ MsKitty, San Diego

Friday, 14 January 2011

"iMac"king a Vika Workstation


Materials: Vika Amon Table Top, Vika Curry Legs

Description: TOOLS

Jig Saw
Cordless Drill w/ Drill Bits
Level
Measuring Tape
Stud Finder
Pencil

DIRECTIONS
1. Measure the wall to decide on how to best configure the table tops, which are 40" by 24".


2. Once you figure how you'd like to place them along the wall, take the measurement and subtract 1 inch or so from the edge of the table.

3. Take that measurement and and cut your furring strip, or thin long wood beam. This will become a rail that you install against the wall.

4. Take your Vika Curry leg and measure it's height. The top of the furring strip/rail should be attached to the wall at the same height. (Take into consideration that when installing the table over carpet to adjust for the cushioning. Normally you need to lower the rail about 1/16" - 1/8".

5. Utilize the level to ensure the rail is parallel to the floor. Once you have done so draw a pencil line along the rail to mark where it needs to be installed.

6. Before installing it, mark & drill holes every six inches or so along the rail. These will be used later to attach the table top to the rail.

7. Once complete, find the studs within the wall. Mark them accordingly. Now place the rail in position based on your level pencil line from earlier. Mark where the studs are on the rail and pre-drill holes accordingly. Now utilize the 3 inch screws and attach the rail to the wall. Check to ensure the rail is sturdy.

8. Now take the first table top and lay it face down (white surface on the floor). Do not attach the Vika Curry Legs in the Ikea pre-drilled holes! Attach the leg and mendor over the table edge. It will used to secure the table tops together later.

9. With the leg and mendor attached, flip table right side up and place it along the rail. Have a friend press the table firmly against the rail, while you use the pre-drilled holes you made in the rail earlier as a guide. Utilize the 2" screws, because they will go through the board and table top without coming out the top. (To help with securing the table to to the rail, it helps to pre-drill a hole in the table bottom prior to inserting the 2" screws.)

10. After attaching the first table securely to the rail, repeat steps 8 & 9 on the second table top, utilizing the vika curry leg and mendor to attach the table top edges securely.

11. Lastly attach the last 2 table legs to the last table in the pre-drilled ikea holes and attach the table top edges using the vika curry legs and mendor that you added while installing the second table top.

12. Viola, you know have a custom installed workstation for $62.13! You can adjust the plans to allow the table top to span an entire wall or protrude further out. It provides a professional look with minimal installation. Enjoy....


~ Jeff D, New Jersey

Monday, 10 January 2011

Lego table from IKEA kitchen cabinet door


Materials: Ikea kitchen cabinet door, VIKA legs, Trofast bin, LEGO base boards

Description:

Last month IKEA in Florida were discontinuing a lot of kitchen cabinet doors for $3 a piece. I bought a bunch of them to my Playstation 3 Racing cockpits (for this see p.83 post #1650). Some where left over and since I needed a Lego table I made this one in less than 90 minutes.


With a jigsaw I simply made a hole in the middle.
I glued the Lego base boards for durability.
I attached 4x VIKA legs ($3.50 each)
I attached a Trofast bin by screwing it on the underside.
Thats it!

P.S. You can also easily modify this. If you dont want to make a hole you can instead use a Trofast bin as a drawer. You will need the rails from the WHITE Trofast cabinet (the pine colored does not come with
rails). If in stock IKEA customer counter or AS-IS will usually give them for free.

~ Erik

Wednesday, 1 September 2010

Classy built in bedroom


Materials: Effektiv, Hopen, Micke, Vika

Description: Once I figured out what I wanted to do this hack was pretty simple, knowing is half the battle. I used the Hopen 5 drawer units for the base Then I set the Micke drawers on top. On top of Micke I put an Effektiv cabinet with frosted glass doors. I mounted the Effektiv unit to the wall and screwed in two Vika legs under for extra support. Considering that I am going to be sleeping right next to this Ikea tower.


To add my classy details I used 2 rolls of damask printed wrapping paper from Target. On the glass drawers and doors I simply taped it on the inside. On the Micke drawers and on my wall I used Mod Podge (one of my favorite mediums) it can be found at any craft store.

~ Liz, CA