Showing posts with label Faktum. Show all posts

Tuesday, 4 June 2013

Faktum Storage Bed

Materials: Faktum (or equivalent) cabinets, Box Spring Bed (mine is Sultan Salhus), plywood, lumber for footing and inner structure, assorted tools, screws and various bits


Description: - Measure the space you have and figure out what size of cabinets to use and how to lay them out.

I used 9 Faktum cabinets in total: 4 x 80 cm wide, 1 x 60 cm wide (total width of the space was only 230 cm) and 4 x 40 cm wide, layed out as in the picture.

- Assemble all the full height cabinets. Leave the backing off one of the big ones - this will be the doorway to the storage space.


- Shorten the cabinets as needed prior to assembly. This is pretty easy to figure out when you look at the pieces, if you have prior DIY experience with tools. I'm looking into creating a tutorial for this, when I have the time...

- Lay out the cabinets. Optionally lay cabinets on a lumber footing, so they're easier to open. This also helps to attach the cabinets: you can screw them on the footing.

- Attach cabinets to each other and build an inner structure to reinforce them and to take the most of the weight of the bed and anyone laying on it.

- Optionally cover the tops of cabinets with plywood (or other material) for a sleeker look. Treat your chosen material (I waxed the plywood after sanding it fine) so it's easier to clean and will keep looking nice.

- Attach the bed on top of the structure. I used steel brackets (used them on a lot of places in the construction as well).

- Attach doors and handles. Line up the doors.

- Step back and enjoy! And then fill it up. There's more photos in my blog.

~ Nora, Espoo, Finland


Thursday, 23 May 2013

Faktum as walk-in closet


Materials: Faktum, Besta, Rationell, Härlig

Description: When we moved in, we finally had place for every woman's dream: a walk-in closet.

As we are renting the place, we don't have a lot of possibilities for a walk in closet. We first bought a wardrobe (Pax from Ikea) and as I didn't want to go more than 1,80m into the room I needed 40cm depth cabinets.

That's why I decided to use Faktum kitchen cabinets (Ikea). They are cheap, sturdy and with two cabinets on the top of each other, I was able to build it to the ceiling.


Here's what I needed to complete this project:
[2x] Faktum 60x70x37cm cabinet
[2x] Faktum 60x195x37cm cabinet
[6x] Härlig 30x70cm doors
[2x] Härlig 60x195cm doors
[As needed] Rationell 60×35 shelves
[1x] Besta 180cm rail system

The DIY after I came up with this idea is pretty easy.

First , I mounted all the cabinets according to the manual and placed the bigger one next to each other. I attached the cabinets and the added an attachment between the last cabinet and the wall for safety.

Then, I mounted the smaller cabinets on the top and fixed them also to the other cabinets. Finally, the Besta rail was fixed on the bottom and the top of the 3 bigger cabinets.I attached wheels onto the doors, placed the smaller doors like usual and placed also the shelves.

As the back is not really pretty with Ikea's classic brown compressed wood panels, I covered it up with wallpaper!

See more of the Faktum walk in closet.

~ Laura, Liège

Friday, 17 May 2013

Laundry organizer from kitchen cabinets


Materials: Faktum article number: 441.786.10

Description: This describes a solution to be able to organize white and coloured laundry.

Take 2 Faktum kitchen 441.786.10 units and one package of shelves

1) Trim a little bit the bottom side panel so you can nail the back panel later on without any obstructions.

2) Put the unit together as planned but flip the bottom panel in this way that the "nice" side is on the outside of the unit

3) Flip the complete unit so the top goes on the bottom and add the front panels

4) Nail one shelf per unit on the bottom, or you can use it as a "threshold"

5) Put a bucket on the top and draw a circle, cut it out

6) Nail some cable conduit clips to the border of the inner circle to have a nice finish

7) You can nail some "felt" caps on the bottom so they are not touching the ground

8) Fix them together and adjust the door panels (you can also flip the doors as desired)

9) Enjoy your creation

~ Mortias

Saturday, 11 May 2013

Hacked UDDEN kitchen


Materials: Ikea Faktum cabinet and Udden kitchen

Description: We painted the Udden kitchen with spray paint.
Placed the cabinets and replaced the fronts of the Faktum cabinet with wooden fronts.


We made new doors for the cabinet in the kitchen. Placed the cabinet under the Udden kitchen and finished the outside with wooden planks.

~ Robbert, Holland

Sunday, 7 April 2013

My cat's litter box


Materials: FAKTUM and SAMLA
Description: Using FAKTUM kitchen cabinet for my cat sand box, their utensils and also to store food. One of the shelves make a separate section for his food storage. I removed the cabinet base so that my cat can come and go, to use the SAMLA sandbox.


Using a drill and a drill bit I made the holes to put the food and water bowls, plus I made a cushion to lie in the sun in winter. I put his name up in vinyl.

~ Miguel, Madrid, Spain.

Saturday, 23 March 2013

Lift door Faktum for TV


Materials: Faktum: 3 elements 60 x 70 (35cm deep), 3 elements 60 x 70 (60cm deep), 2 elements 80 x 70 (60 deep), 2 elements 30 x 70 (60 deep), Integral hinges, Rationell drawers and custom made doors

Description: After the domestic success of my 1st hack, it was time to tackle the TV corner. We have enough toys lying around so the goal was again to have a closed clean unit.

The unit had to go between a wall and the fire place and turns the Faktum cabinets were the ideal solution for this.

I started building the base and then I started adding the 60 cm deep cabinets.


I did not find a Faktum cabinet wide enough to fit the TV so made this piece myself. I ordered special hinges (Aventos HL) to have a lift door to hide the TV.


Once all Faktum pieces were assembled, it was time to add all custom doors.

Et voila, another clean closed unit with a lot of storage for toys and media.

There is 1 door missing as I need to get an extra pair of hinges from Ikea.

~ Kris Legroe, Belgium

Thursday, 7 March 2013

Self-made kitchen


Materials: Faktum cabinets, Atlant siphon, NUMERÄR countertop

Description: Basic kitchen build completely from Ikea Faktum cabinets.

Doors and the cover panels are made from pallet shelves. The doors are simply glued together using construction-glue, no plugs are needed. To fill the doors inner area, I decided to use a bamboo mat which is stapled to the door from behind. After finishing all the woodwork, I painted everything in white.

The sink is made from an old washbowl. I drilled a hole in it for the siphon, which is quite difficult because of the enamel coating of the bowl.

As countertop I use the Ikea NUMERÄR and cement tiles from Portugal (under the tiles I used a composite panel)


Parts and costs:

Ikea stuff (Faktum cabinets, siphon, countertop, hinges etc.) - about 400 Euro
pallet shelves - free
sink - free
bamboo mat - about 30 euro
Indian door knobs - about 20 euro
tiles - about 150 euro

I think the interesting thing is that the doors are quite easy to build and you can fill the them with whatever you want, and like (example: fabric, wooden grid, plexiglass ...) you can simply glue or staple it on the back side of the door.

~ Tobias, Germany

Tuesday, 15 January 2013

Bespoke AV Cabinet


Materials: Faktum/Applad base cabinets; Profile Aurora Laminate Benchtop; Soundlabs Acoustic Speaker Grille Cloth

Description: I was unable to find any off-the-shelf solutions that would house full size audio visual equipment. Most AV cabinets are too shallow and/or too short. I soon realised that I needed a bespoke solution. I designed and built this solution at a fraction of what it would of cost to pay a professional to get it wrong ;)

I wanted something that would house the 3 front speakers, full sized receiver, NAS, Xbox, DTV etc and keep the clutter concealed without any negative impact on sound quality.

I opted for Ikea Faktum kitchen cabinets to form the base. I custom cut a German made laminate bench top since the cabinet is 2500mm long and Ikea only supply benchtops up to 2400mm long.


The doors are Ikea Applad White and started out as solid doors. I routed them out, routed a rebate in the back, painted the routed edges and filled the routed holes with white German made acoustic speaker cloth. The doors make valuable use of Ikea soft closing hinges and spring loaded releases which remove the need to add handles to the doors.

~ Ryan, Australia

Monday, 7 January 2013

FAKTUM sideboard - Revisited


Materials: Faktum, Perfekt, Rationell Variera

Description: Since I was quite satisfied with my first FAKTUM sideboard, and I wanted another cabinet in the same room, I decided to do another one, with a little twist: it should double as a herbs greenhouse.


I used:
4x FAKTUM wall cabinets, 50cm wide
2x PERFEKT grey cover panel for wall cabinet
1x PERFEKT grey cover panel for tall fridge cabinet (60x211)
4x ABSTRAKT white doors for wall cabinet, 50cm wide
4x YSTER door handle, white
2x wooden beam (height 48mm)
3x RATIONELL VARIERA kitchen cabinet tray
Wood screws


How to:
The cabinets should be put together as described in my first FAKTUM sideboard, but before putting the cabinets together, make sure to cut out the shape of the makeshift flowerpots from the cabinet sides and tops. Before adding the top cover panel, cut out holes for the flowerpots in there as well.
The cabinet is installed in my corridor to the garden, having lots of sun as the garden faces south and the corridor has a transparent roof. Perfect for fresh herbs during the winter.

~ FoxVictor, Sint-Truiden, Belgium

Wednesday, 19 December 2012

Faktum kitchen cabinet into desks


Materials: Faktum Kitchen Wall Unit, Lagan Solid Beech Worktop, Vika Kaj Legs

Description: I have twin girls who needed a desk each. I wanted solid wood for longevity and aesthetics. The Faktum wall unit has solid beech doors and drawer fronts with beech affect end panels.

I had to cut the 2.4m worktop in half and after cleaning off the supplied wax finished I added to coats of Dulux Diamond Hard varnish.

The wall units were simply screwed to the underside of the worktop. NB the wall cabinet end panels are slightly taller than the wall cabinets and hat to be trimmed. The cut edge is up against the underside of the worktop so is not visible.


In order to raise the units of the floor so that the door would open cleanly I added some simple rubber feet from local hardware store.

Tow adjustable Vika Kaj Legs were the added to each desk.

Hope you like them

I am considering making a much larger version of these desks for or living room using the full 2.4m length of the worktop with double cupboard/drawer units either end.

~ Andy Parsons, France

Monday, 10 December 2012

Appl�d storage bed


Materials: Appl�d faktum top cabinet for fridge and mdf

Description: Our daughter needed a new bed. To utilize the little space she has, we wanted a bed to go under her window. The problem was that her room is only 204 cm narrow. No bed available for that in full size. That's when it hit me, lets make an Ikea hack.

First we bought three Appl�d Faktum cabinets made for wall mounting above the fridge.

Size is 57 cm high, and 60 cm wide. Depth is also standard 60 cm. Total 180 cm wide. I made a frame to fill in the caps on both sides of the cabinets and fasten the mdf "bed bottom".


Making the frame- had to find out where to cut the skirting
The skirting is cut to size. Also got help from the inspector to check that everything was up to ordered standard.
Cabinets and frame mounted to the wall and around the cabinets. Also note the beam so I could use to sheets of mdf.
Everything covered in mdf. Used wood screws. Preparing for painting in colour "cotton"

The bed is 90 cm deep, but the cabinets are just 60 cm deep. So I made the bottom out of two sheets of mdf. One is 60 cm wide, and the one in the back is 30 cm wide. I also drilled two holes for easy lifting with two fingers. This makes the room behind the cabinets available. We us it to store an extra mattress.


~ Markus, T�rn�sen, Norway

Thursday, 6 December 2012

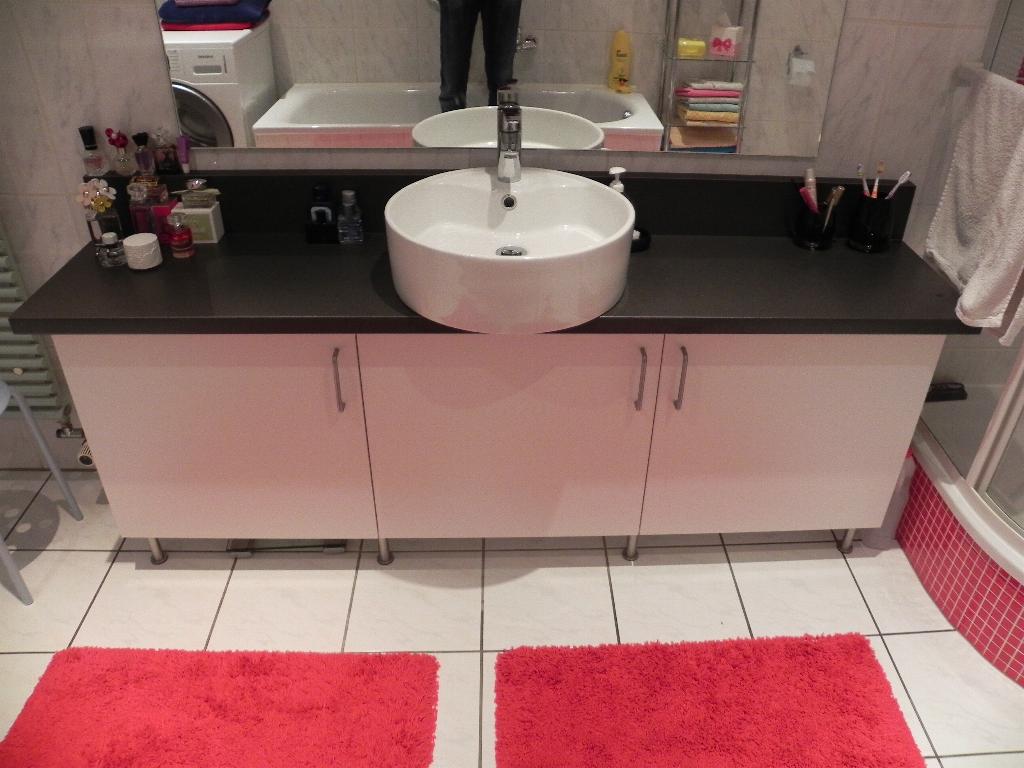
With FAKTUM/AKURUM in the Bathroom


Materials: FAKTUM/AKURUM cabinet, H�RLIG fronts, PR�GEL Countertop, CAPITA Leg, sink (TOOM hardware Store)

Description: I used 3 FAKTUM/AKURUM cabinets 60x57x37cm (for extractor fan) with shortened and cut PR�GEL countertop (186cm), H�RLIG fronts and ATTEST handles. I screwed the rest of the countertop vertical on the backside and mounted the sink in the middle. The legs are CAPITA 4''. The water pipe installation is located in the middle cabinet.


On the wall I used 2 horizontal FAKTUM/AKURUM cabinets 92x40x37cm also with H�RLIG fronts and ATTEST handles. Underneath I screwed another cut PR�GEL countertop (186cm) with the wiring for the lights and socket inside.

Clean look and a lot of space inside for only 300,- EUR.

~ G. B�hm Erfurt, Germany

Wednesday, 5 December 2012

Scandin'hack Corridor piece of furniture


Materials: 3x Faktum, 2 Applad doors and oak

Description: This corridor piece of furniture is the result of a 2-step thinking :
- functional for the inside : using Faktum elements for kitchen
- external shape : Applad doors and oak corpus


First, the depth of Faktum elements has been reduced, as well as the height of the Applad doors

Then, the smallest Faktum has been hand-painted in dark grey (not so easy, but nice result finally)

To finish, the corpus has been made with pieces of oak and varnished.

~ Esteban, Strasbourg

Friday, 16 November 2012

No more tangled cables - Sideboard with hidden cable storage


Materials: IKEA Faktum cabinet, IKEA Faktum Doors, IKEA Capita Legs, IKEA Signum Cableholder, Jigsaw

Description: Like many People we have a lot of electronic gadgets like cellphones, tablets, notebooks, etc. Therefore we have also a lot of cables and charger. In the past all the cables are laying around, are tangled and to pull the plug I must crawl under the couch.

Therefore I wanted to build a simple, stylish, clean and easy to use storage for all the cable stuff. In the living room I have a sideboard built from some Ikea stuff (IKEA Faktum cabinet, IKEA Faktum Doors, IKEA Capita Legs).


With the jigsaw I cut a rectangle hole in the top of the Faktum cabinet. On the top I used 2 identical chipboards. These are custom made at a online shop (schnitt-stelle.com). To drill the hinge on the back wall of the cabinet, I build a stiffener (you can see on the picture).

To hold the cables I drilled the cableholder (IKEA Signum) under the hole on the top. One of the chipboards was fixed with Tesa Powerstrips, the other one was drilled with the hinge on the back wall. Between the two chipboards is a gap (ca. 1cm) to lead out the cables.

What I have to do: ...attach a loop to the movable board to open it easily.

See more of the gadget cabinet.

~ Daniel, Dresden, Germany

Ikea kitchen counter for under 70�


Materials: Faktum wall cabinet, H�rling door (40 x 92 cm), Vika Amon tabletop, Capita legs, 2 Rationell shelves, 2 edge protectors, 2 mounting brackets with drill holes, 2 chipboard screws 3,5 x 40, 2 chipboard screws 3,5 x 20 , 2 expansion anchor 8mm and 2 screws for the expansion anchors

Description: You start by building the Faktum wall cabinet by following the Ikea descriptions. Then you can screw on the Capita legs, just like in the first picture.

The next step is to place the cabinet in front of the wall, which will later be used as the supporting wall, with about 40cm space between them.

Now you take the Vika tabletop and put it on top of the cabinet, push everything cautiously against the wall and align the tabletop with the cabinet. Make sure everything is even by using a water level.


Now mark the wall with a pencil, so you will know where to put the mounting brackets later on. Take down the tabletop and drill two holes in the wall where you put your marks for the expansion anchors and put them in.


Then you can screw in your mounting brackets and push the cabinet about 65cm from the wall, like shown in picture 3.

The next step is to put the tabletop on top of the cabinet and onto the mounting anchors and put them together with screws.

And last but not least you can put the edge protectors on with some glue.


See more of the Faktum breakfast bar.

~ New Swedish Design, Berlin