Showing posts with label Melodi. Show all posts

Monday, 25 March 2013

Concrete Umbrella Stand from Lamp Shade


Materials: IKEA Melodi Lamp Shade, Plywood Base Board, 2.5" Galvanized Pipe, Foam Strip, Modeling Clay, Silicone Caulk, CHENG Outdoor Pro-Formula, 100+ pounds Concrete Mix

Description: The IKEA Melodi lamp shade makes a perfect concrete mold for an umbrella stand. It's cheap, attractive, re-usable, and comes in two sizes.

The first step is to drill a 2" hole in a plywood base. A PVC or galvanized pipe fits in the hole, then the lamp shade slides over the pipe and onto the base board.

A small wooden frame is built to hold the lamp shade in place, and some modeling clay and silicone are used to seal the form at the bottom.


Filling the form with concrete is the easy part. Wait a few days for it to cure before taking the concrete out of the form, then cut the pipe down with a hack saw, polish the top of the concrete, drill a drainage hole and install some furniture bumpers to protect the concrete and the floor.

The finished umbrella stand weighs about 100 pounds, making it stable enough to hold the biggest umbrellas.

Check out the Instructable in the link for the full step-by-step.

~ CHENG Concrete, Berkeley, California, USA

Monday, 18 June 2012

IKEA Melodi - Knitted lamp


Materials: IKEA Melodi lamp, (white) wool, quick knit ring, universal glue 23 cm

Description: I was inspired by a knitted lamp I spotted on a DIY page, but I had no knitting experience. So I used a quick knit knitting ring which has a really easy stitch. I like the end result, the light it transmits is warm and it looks natural I think.


Instructions
I followed the instructions that come with the knitting ring to create a hat, but I didn't finish it off. I left the top open and pulled it over the Melodi lamp. I tied the top with the yarn ends. I didn't increase or decrease (that looked too difficult to me) so I just used the stretch of the yarn. I attached the bottom with dots of universal superglue, holding it down for some minutes with clothes pegs until the glue had dried.

I used handspun pure wool that I found in a second hand store. I guess you could use any type of yarn, as long as it stretches enough (or else you'll have to in/decrease). You can of course also use round knitting needles.

~ Laura, Sweden

Saturday, 16 June 2012

Crochet Seashell Lamps


Materials: Melodi, Manljus, Minut, cotton yarn, crochet hook

Description:
Like most people, at Crochet Today we love the convenience of IKEA furnishings, but enjoy personalizing them with YARN. This project involves three IKEA lamps, the Melodi, Manljus, and Minut. Each lamp has a new crocheted covering, made from cotton yarn (acrylics could melt, so cotton is the best choice for this project).

We provide stitch patterns and dimensions in the project pages in our magazine, but what's important to remember is that each person's gauge can be a little different, and personalizing the covers is probably the part that's most fun! So take chances with color and stitch patterns, and keep the lamp handy so you can test-fit your cover as you work.


The Melodi and the Manljus styles are a little tricky, but the Minut lamp is very spherical, which makes it a *lot* like an idealized human head--do you see where I'm going? You're making a lamp hat! Take a chance and try out hat patterns that will come out about lamp-size.

We're planning more IKEA hacking at the magazine--everything can use a little more crochet, we think--and would love to see your versions of these lamps, whether or not you use our patterns. Have fun!

See more of the crochet lamp shades.

~ Rose White/Crochet Today magazine, South San Francisco

Photo credit: Nicole Hill-Gerulat

Wednesday, 18 April 2012

MELODI upgrade


Materials: MELODI + some wood

Description:
I gave my MELODI lamps a little upgrade.

I took a bunch of green colored wooden sticks and drilled some holes into the shade to hold the sticks.

It now has this nice nest like look.


Important is to not follow a pattern with the holes or sticks.

An alternative would have been to weave and bend one long colored pipe through the shade.

~ Patrick, Amsterdam

Thursday, 1 September 2011

Coffee filter light assembly


Materials: Melodi light fixture/with cord assembly

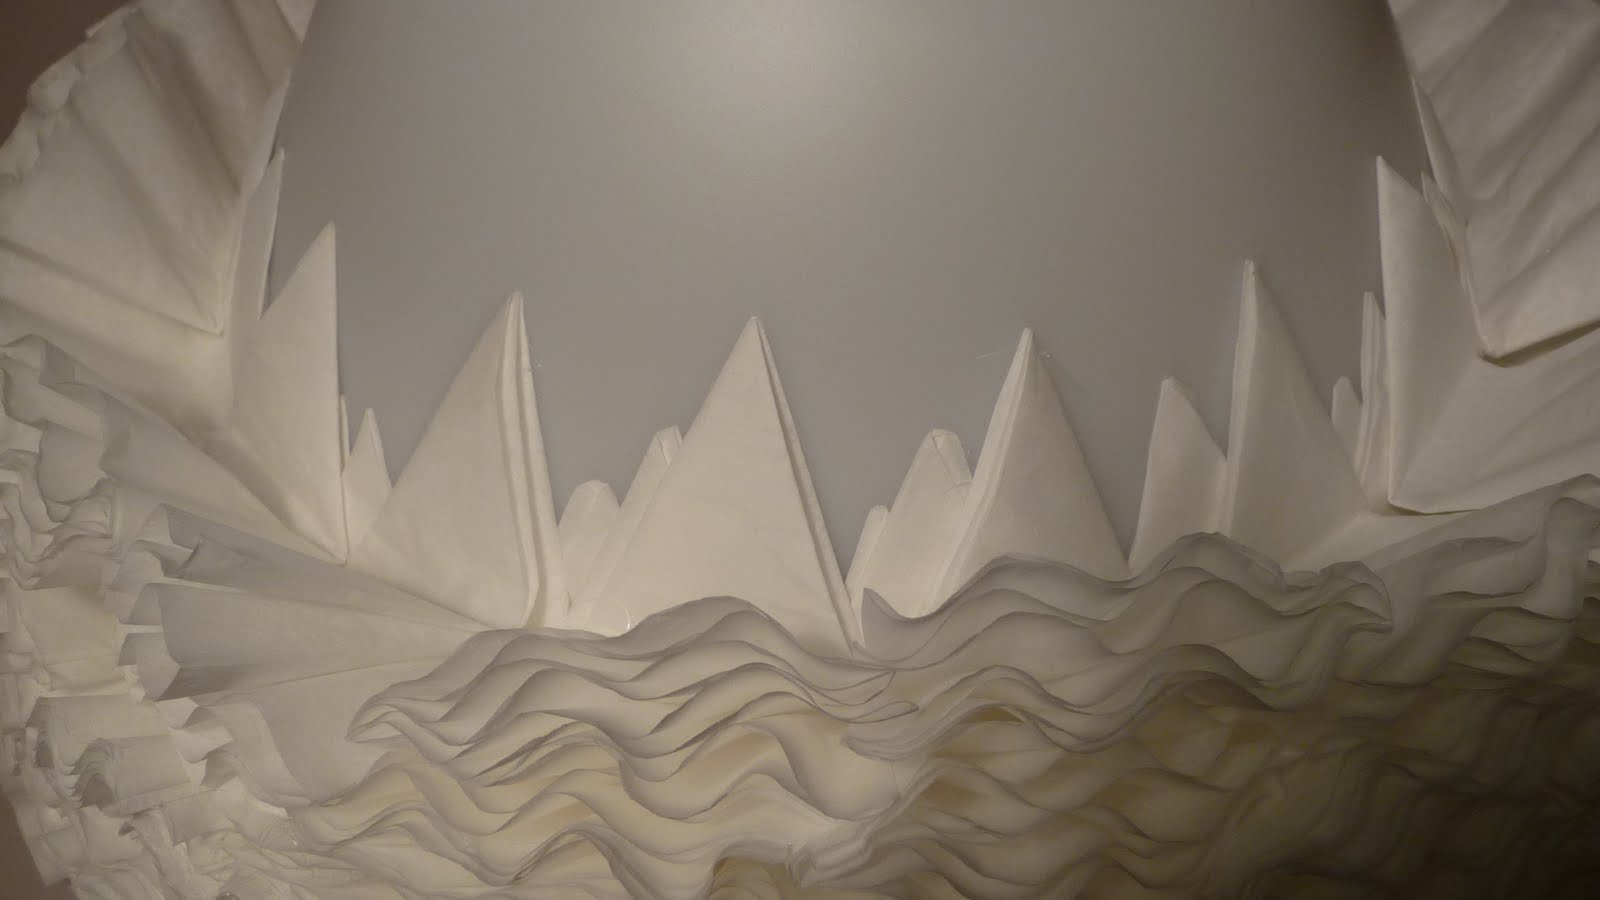
Description: I needed something a bit more elaborate for a modern, hip den (not formal living room), so I purchased three packs of bleached coffee filters (480 ea)and folded each and everyone of them on half, and one more time half, sort of created a paper flower with frills.


Than glued them on top of the shade (White Melodi, and I am still working on it...it takes forever, so please arm yourself with patience!!!!) to achieve a very posh effect.

I will post the pictures I have taken from the process and the finished product when it is installed. Similar fixtures can be find at Fab.com for over $1200.00 I saved about 1118.00 and you can too!

~ Mila Ilieva, Oakland

Thursday, 25 August 2011

Upgraded Melodi lamp


Materials: MELODI

Description: I love this MELODI ceiling lamp. I love its shape and its clean look. But for my daughter's room I thought it might be nicer to decorate it a little. I pierced it with a hot nail. It is very easy since it is made of plastic. After that I inserted a dozen butterflies made of feather around it. The effect is stunning.

~ Eleanor atrakji, Israel

Wednesday, 10 August 2011

Grundtal's Melodi


Materials: Grundtal rail, Melodi lamp

Description: I was sick of my Regolit lamp. The main reason I bought it was because it is cheap and does not look too awful. But after one year sitting under Regolit there was need for something new.

I wanted my new ceiling lamp to illuminate my table in a better way, so I decided it has to have at least three bulbs. I did not want to waste too much money, so I hang three 28cm-Melodi in a row.

It looked okay, but not like ONE ceiling lamp.


I had to combine all three parts to one, so I bought a 120cm Grundtal rail and drilled three holes in equal space to pull through the cables. Et voila: Grundtal's Melodi was born.

~ Gerrit Fries, Ruhrort, Germany

Friday, 10 June 2011

Meddling with Melodi


Materials: Melodi pendant lamp

Description: I've wanted a feature lighting pendant for some time for our dining nook. Any of the beautiful pendants I've seen have unfortunately been outside of a reasonable price, so the opportunity arose for me to come up with a little something of my own. Here is what I came up with ...

Materials used
- One IKEA Melodi pendant lamp
- Felt sheets {I used roughly 8, at €0.72 per sheet}
- Glue/adhesive
- Scissors
- Measuring tape {not necessary}
- A steady hand and a good eye for cutting straightish lines


I began by cutting the felt into 1x5 inch strips - by cutting the felt rectangle into vertical strips, then cutting the vertical strips in half. Pretty easy, but you can choose whatever length or shape you like.


I started at the top of the Melodi lamp, and using a small dab of glue at the end of each piece, I placed the felt evenly around the top of the lamp. For the remainder of the lamp, there is no right or wrong method to placing each piece of felt. I continued to dab glue to the end of each piece, and placed them underneath the felt above, making sure to underlap {as opposed to overlap} to cover the exposed Melodi lamp.


Not to make it too repetitive, I decided to stagger the lengths of the felt. I simply did this by gluing the felt, and then trimming it to varying lengths where I saw fit. Don't be afraid to hack into it. I continued this process until no parts of the original lamp were visible. The entire process took two evenings {an after work job}, accompanied by some decent TV.

See more of the Melodi with felt shade.

~ Hydrangea Girl, Ireland

Tuesday, 24 May 2011

Ikea MY melodi


Materials: IKEA Melodi, Staedtler permanent Lumocolor (S, F, B, M)

Description: I wrote my favorite recipes from "The Silver Spoon" (the Italian culinary bible) with permanent markers from Staedtler (Pen Sizes S, M, F, B) on the big IKEA Melodi (14,99 Euro in Germany) ...


See more of the delicious Melodi.

~ Bruno Schulz, Bad Kreuznach - Germany

Saturday, 9 April 2011

7 euro light wonder


Materials: Melodi, art podge, Ikea napkins and fabric

Description: I wanted lighting that was custom to each room, and my budget was small, so I got some art podge when I was in Hungary and bought a few Melodi lights for our new place on sale at 5 euros a pop.

For the napkin (blue flowers) lamp I took the decorated part of 3 Ikea napkins and separated them from the rest of the layers of napkin, cut everything into rectangles, and used diluted art podge (with water) to get the napkins in the right shape and glued onto the outside of the Melodi. Then I left it hanging on the shower curtain rod to dry for 24 hours, put another coat of straight art podge over the whole thing and voila, a custom lamp that matches our Ikea bedspread.


The second lamp was done with the kids material you can find in the store because it was for my girls' room. This was only one step, using straight art podge with the fabric and left to dry for 24 hours. The only thing you need to remember is that the light is going to shine through, so if you mind the layered look when the light is on, you will need to do a lot of cutting and puzzle piecing to get the whole lamp covered without much overlap. Enjoy!!

~ Kristin, Athens, Greece

Friday, 25 March 2011

Melodi for the birds


Materials: Melodi Lamp, shape print out, stencil sheets, stencil knife, thin brush, acrylic paint, tape

Description: When I bought this lamp, I already knew it was in for some changes. I didn't know exactly what I'd be doing, but then a light bulb went off (pun intended): stenciling!


I found the images that I wanted online, adjusted the sizes and printed them. The next step was to cut out stencils from the printed shapes. Using the inside of the stencil cut out, I used painter's tape to secure the shapes to the inside of the lamp. I then used acrylic paint and a thin brush to paint in the outline.


~ Santa Martin

Friday, 4 February 2011

Triple MELODI feather shade


Materials: Melodi lamp

Description: It is quite simple hack transforming dull Melodi lamp into large and unique triple shade.

The goal was to keep it cheap. For this reason Melodi was great (cost around 4 Euro per piece. After hack it looks more $ophi$ticated :)

You will need:

- 3 x MELODI lamps
- about 200-250 gams of feather (I bought mine in online store with florist and wedding accesories. Cost about 8 Euro)
- bottle of transparent universal glue
- some thin steel line (length dependant on hanging height)
- few electric connectors (some to be extracted from plastic insulator)
- basic hand tools, small drill ~3mm


Hack:

Hope that my drawings will help.


First drill small holes (~3mm) in tops of all shades. Now you can glue feathers to them (that is the boring part). When glue is drying you can make all electric connections. First cut all 3 ledas about 15 cm from bulb socket. remove insulation and connect all 3 to double electric connector. To its other side connect cable that goes to ceiling. Insulate the connection with tape. Ceiling cable should be long enough to stay loose when lamp is hanging. After lamp is assembled you will be able to hide cable conection between 3 shades.

Now fixing system. cut 3 pieces of steel line about 10 cm long and fix extracted cable connector on one end. Then pull them through small holes in the shades. Connect all three with another connector and pull them tight. Now main rope. Pull it through ceiling cover and make 2 loops to fix it to ceiling hook and triple shade. Remember about another connetot on yhis line to fix ceiling cover in place (it will not be stable on cable, because it has to stay loose.

Now you can put everything together, hide the electric connection inside triple shade and install the lamp. Important - it must be hanging on steel line only. Cable has to stay loose!

See more photos of the Feather lamp.

~ kedzil, Poland