Showing posts with label Grundtal. Show all posts

Friday, 10 May 2013

Closet Toolshed


Materials: Grundtal magnetic knife rack and desk organisers

Description: I had a small space in the electrical cabinet in our small unit. I love my tools and working with my hands so I fashioned a small toolshed from the Ikea magnetic knife strip, desk organiser and some plastic organisers also from Ikea.

Since the strips were too long to put lengthways across the door I had to put them on an angle. Simple mounting and it was as easy at that.


I found some brackets for a foldable hinge and using an old wood shelf (also from Ikea cut down to fit) I now have a tool shed with all my tools in front of me and a basic bench.

The lights were some old LED spot light from by motorbike that I never fitted and am using a lipo battery to power them. But you could use some Ikea stuff there.

I also have used some old neo-molly magnets to hold things in place on the metal circuit breaker cabinet for extra space.

~ Doug, Singapore

Tuesday, 26 March 2013

Grundtal Hanger Airport Extreme Mount


Materials: 4 Grundtal Hangers, Ikea item no. 300.612.47, Drill and bit for wall anchors, Screwdriver, 5 tacks, Template (posted in this link), Spirit Level, Fasteners (wall anchors) for the Grundtal hangers

Description: I looked for retail mounts, but I had a real problem with spending $40-$50 for the available plastic mounts. However, the Grundtal hangers 300.612.47, that I had installed on the inside of the coat closet looked ideal for my purpose.

They looked great and fit perfectly in the channel around the Airport Extreme. The Grundtal hangers also allowed space behind the router for wires and airflow.


Instructions:
Place the template on the wall. Allow for room from the to let router slide into the mount. Place a tack only in the center. (download template here.)

Use the spirit level to straighten the template on the wall.

When level place a tacks in the center of each of the four circles in your template.

Remove tacks and template from wall.
Use the four tack holes from step two to locate where to drill the holes for the fasteners.

Install Grundtal Hangers.

Wire up router and Slide it in position.

All done.

See more of the Grundtal Airport Extreme mount.

~ David Goodier, Maryland, USA

Wednesday, 19 December 2012

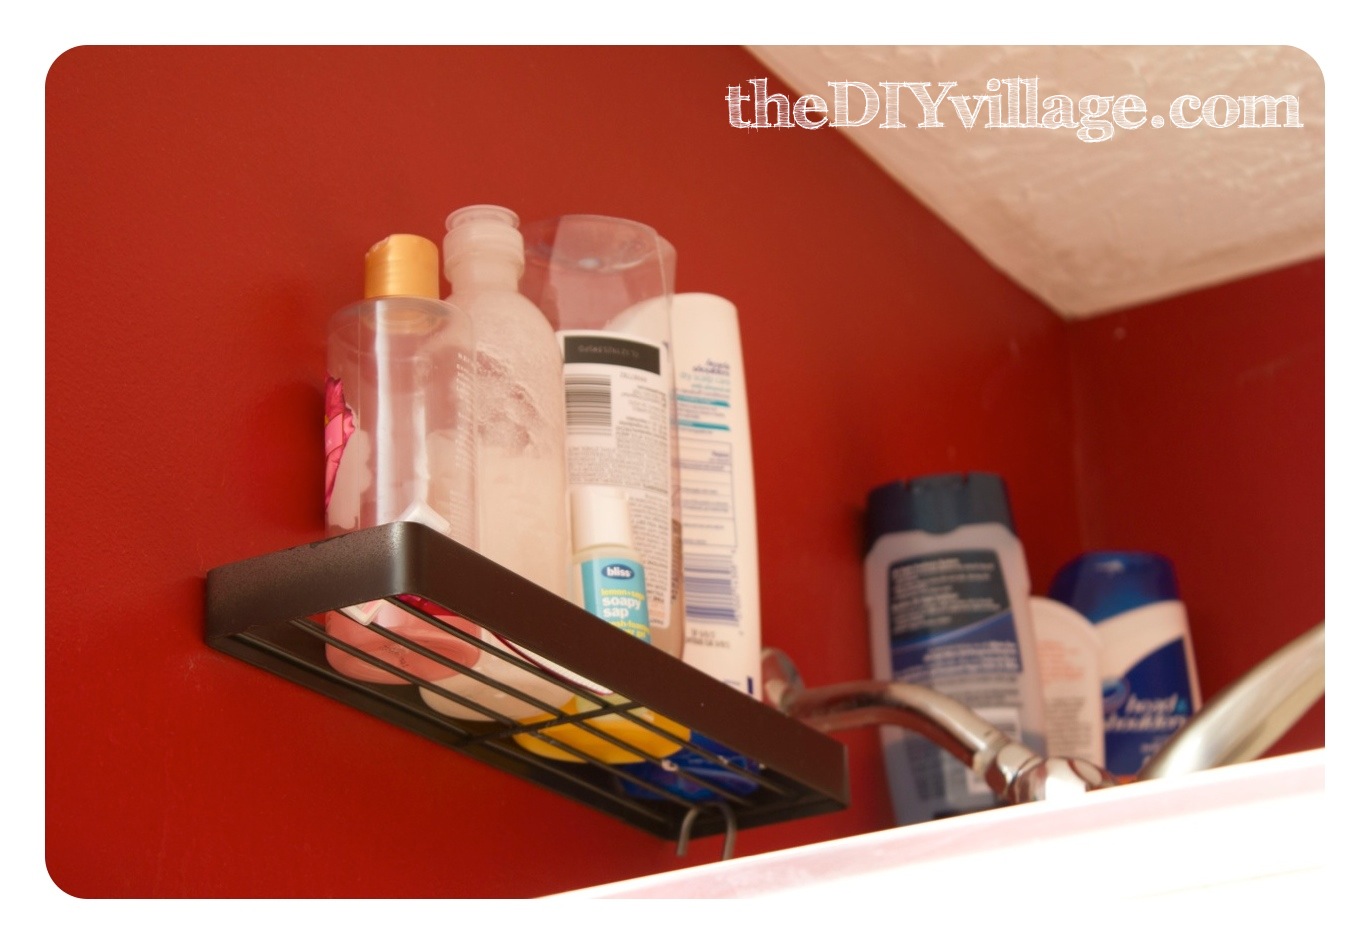
From Grundtal to Shower Shelf


Materials: Grundtal hanging system, wall anchors with screws, silicone, Grundtal 'S' hooks

Description: Turning the Grundtal hanging system into a shower shelf is easy. Instead of hanging the shelves on the hooks enclosed use the predrilled holes to attach them to the shower wall using wall anchors. Once the screws are in the wall cover the screw heads with silicone to keep the moisture from rusting the heads.


If your bathroom fixtures are oil rubbed bronze lightly sand the shelves and use oil rubbed bronze spray paint (any brand) to change the look. Make sure to follow the manufactures instructions for drying before you hang your shelves to avoid any scuffs. The Grundtal 's' hooks are great for hanging your shower poofs and wash clothes from.


See more of the Grundtal bathroom shelf.

~ jacque, Tennessee

Tuesday, 16 October 2012

GRUNDTAL Lightweight Speaker Stands - 3 Different Sizes!


Materials: GRUNDTAL Rails, 20 or 25mm MDF, Flat Head Hex Bolts

Description: Time to improve the sound of your bookshelf speakers.

Design is pretty straight forward but you will need a moderate amount of skill and some basic power tools.

Top and bottom plates can be made with any dense material (HDF, MDF or metal is ideal because they will not compress or split) I cut the shape using my speaker box as a template but you could also make the bottom slightly larger and/or double thickness for more stability. Finish with a lacquer or satin enamel paint for best results and use grippy foam pads to hold the speakers in place.

GRUNDTAL Rails come in 40, 60, and 80cm (GRUNDTAL wall shelf) They make for a sturdy and modern looking stand and should support most bookshelf speakers. Lateral support is a tradeoff with this design so place in a low traffic area or use additional rails per stand. Be creative with your rail (post) layout however having them close to the edge will increase stability.


While you're at Ikea, pick up 12 - 35mm (or longer) flat head hex machine screws from the returns/exchange desk. The screws supplied will not likely be long enough and this hardware is difficult to find at building supply stores. Using the hex socket will greatly help, they also countersink nicely if you carefully machine out a little material with a 1/2 drill bit. GRUNDTAL can handle considerable amount of torque so using a stainless steel fender washer will prevent the rail end from sinking in to your wooden plates.

Best luck and happy hacking!

~ Ryan Swim, Canada

Friday, 20 April 2012

GRUNDTAL Coathanger


Materials: GRUNDTAL

Description: GRUNDTAL Coat hanger

The Grundtal is originally made as a kitchen shelf.

By adding a two-bar hanger upside down it makes a nice coat hanger.

This one is the 120cm long one but it tends to bend a bit when you hang a lot of heavy winter coats on them. Better is to use the 80cm in that case but i needed the space on the top part.

~ Matthijs

Wednesday, 11 April 2012

Gruntal for a bike light mount


Materials: Grundtal hangers

Description: Becki Becki tips us on a bike light mount that is made from a pair of "GRUNDTAL" hangers, some v-brake spacers, a flat washer and an M5 bolt and nut (3 cm long). Nuno the hacker of the bike light says a light mounted lower and nearer to the ground makes it easier to see where you're going.


See more of the bike light mount. [via Bike Hacks]

~ becki becki

Sunday, 8 April 2012

Vinyl-Player-Front Jacket-hanger


Materials: Grundtal

Description:
Unscrew the Front of an old Vinyl-Player (in this case a Dual HS37).
Unscrew the single knobs (for volume, panning, etc.)
Drill Holes in the middle of the knobs.
Screw Grundtal Hangers on the knobs (you will need flat washers for that).
Screw the front with the Grundtal Hangers on the wall.
Finished

Very simple, but looks cool.

~ JohnnyGerman, Germany

Saturday, 7 April 2012

Small-room bath vanity/sink (16 inches)


Materials: Lillangen sink, Grundtal faucet, Besta base units

Description: The vanity is comprised of Besta units which come in different widths and heights. Their depths match the depth of the sink (16 inches) so you can configure to your own needs. I added one draw and three doors with shelves. Use any single hole faucet and use any handles or none at all. Legs are also Ikea. Use your own preference. You adjust your interior to fit plumbing and you are good to go!

~ Helen

Friday, 6 April 2012

Star-Mirror


Materials:
Grundtal mirror, 6 round strips of wood, wood glue, spray paint

Description:
Inspired by this expensive catalogue mirror I set out to create my own.

It was a simple matter of cutting the wood, gluing it together, making all the pieces fit together (notching), gluing some more, removing excess glue and than spray painting it and attaching the wood pieces with double sided tape...


More detail photos can be found on my blog.

~ Jenn(ifer), Kiel, Germany

Sunday, 25 March 2012

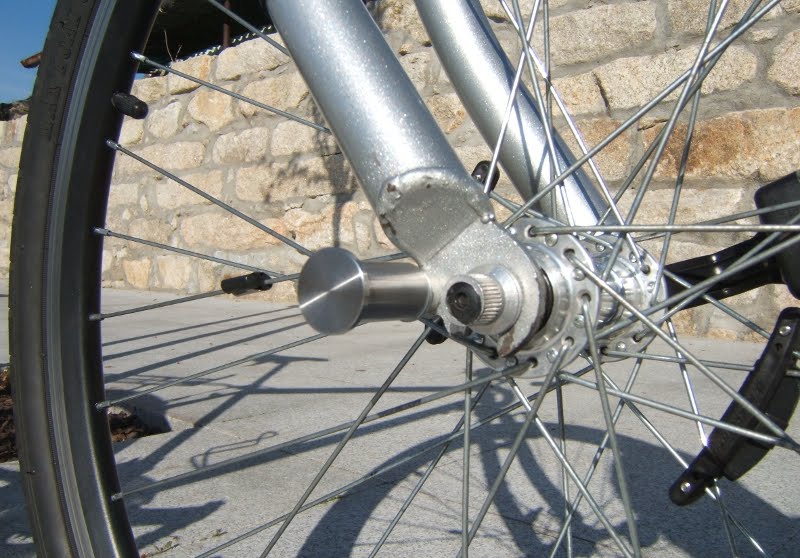
GRUNDTAL fork light mount


Materials: Grundtal hangers, v-brake spacers, 1 flat washer, M5 bolt and Nut (3 cm long)

Description: Lights are an essential item on every commuter's bike. Most commuter lights, when mounted on the handlebars, only allow you to be seen on the road, not SEE the road. So fork mounts were the answer. Closer to the ground, most of the light is direct to it. I could have gone for one of the many commercial solutions on the market but they are too expensive.

Firstly got a pair of Grundtal hangers from Ikea and some v-brake spacers I had home. If you don't have those spacers just go to your local bike shop, I'm sure they will give it to you for free, or just simply use nuts to work as spacers.


1- Put the M5 nut inside the plastic part of the hanger.
2- Insert one spacer through the bolt and then the bolt through one of your fork's dropout eyelets.
3- With the bolt in place, insert more spacers (as needed) and a washer (this will hold the hanger's stainless tube). Tighten the set.
4- Insert the tube and the hanger's locking piece and tighten it.
5- Place a small sponge and place your light on your brand new fork mount.
6- Enjoy.

~ Nuno Regadas, Porto - Portugal

Friday, 16 March 2012

Spotted: Grundtal as a door handle


Materials:
GRUNDTAL Rail

Description: I came across an elevator with a Ikea Grundtal rail used as a door handle.

A more functional than pretty hack but a hack nonetheless.

~ Heco, Romania

Saturday, 11 February 2012

Hanging Desk Organization

Hanging Desk Organization

Materials: Bygel Rails, Wire Basket, Grundtal Caddies, Grundtal & Bygel S-hooks, Ledberg Light Strip, Ivar Shelving, Goliat Computer Desk

Description: The Goliat desk fits neatly inside the space of the wider Ivar Shelves. I was using the space behind my monitor to store office supplies and whatnot, but it was cluttered, and I was always moving things to get to other things.

So I went to IKEA to pick up some organization.
I found that by using the Bygel rails, baskets and Grundtal caddies, I could get a lot of stuff both easily accessible and up off the shelf.


Hanging Desk Organization
before
Hanging Desk Organization
after

1 - Install Rails.
Obviously, the shelf has to come off. I used two of the 21" Bygel rails in a staggered formation with #10 3/4" wood screws and a little really strong glue. The long rail was too long, and the short ones did not provide enough space and would have to be staggered anyways.

2 - Install the brackets for the Ledberg light strip.
Always measure first. I have wanted to have backlighting for my monitor for a while, and it also provides light on the supplies.

3 - Reinstall shelf, populate with organized goodness.
These hanging baskets and hooks are awesome. I can get to everything without moving things, I can see what I have and what I'm out of. Overall, I'm really happy with how it turned out.

~ Eric Heald-Webb, USA

Wednesday, 25 January 2012

Grundtal Wine Rack

Grundtal Wine Rack


Materials:
Grundtal double towel bar

Description: Stainless steel wine rack made from Grundtal 80cm double towel racks. Racks are screwed to a welded metal frame made from 1" x 1/8" steel strip. The base width of the Grundtal towel racks is inconsistent, to conceal this there is a 1" wide steel strip on top of the towel rack bases - the screws go through this cover strip, through the Grundtal mounting holes, and into the steel frame underneath. The screws are 10-32 machine screws, they thread into tapped holes in the steel frame. The frame and cover strip are finished with an 80 grit flap wheel on a grinder and then clear coated. You could also finish with a hand sander or paint the steel.


Grundtal Wine Rack
Grundtal Wine Rack
Grundtal Wine Rack
Grundtal Wine Rack

The result is a very sturdy, contemporary stainless steel wine rack. It could be made to any size desired.

~ Geoff Shorten, Calgary, Alberta, Canada

Sunday, 22 January 2012

GRUNDTAL double curtain rod


Materials: Grundtal towel rails, stainless steel pipes

Description:
I cut the GRUNDTAL pipes in two halves (20 cm each) and made the necessary extension using 25 mm diameter stainless steel tubes.
The GRUNDTAL pipes fit perfectly inside the steel tubes.


~ Ricardo Gon�alves, Porto,Portugal

Saturday, 21 January 2012

Lack Grundtal kid's kitchen


Materials: Lack, Grundtal


Description: Deb spotted an Ikea hack on Apartment Therapy. Submitted by Kirstin, this play kitchen can be played with on all four sides. It's kinda like a kitchen island for kids. Also, more than one kid can play at a time. Nice. Yes, cooking (even pretend cooking) should be a social activity.

See more of Kirstin's play kitchen. [Via Apartment Therapy]

Thanks, Deb!

Thursday, 19 January 2012

Stainless steel shelf with attached lamp

Stainless steel shelf with attached lamp

Materials:
KVART, GRUNDTAL, Drill, Drill Lube, Center Punch

Description: I found this site after doing this, so I didn't take notes on the drill bit sizes, but there are 3....
1. Drill out a hole for the main shaft of the lamp. When positioning the hole, keep in mind the flange around the base of the lamp.
2. The little hole for the nub that keeps the lamp from rotating. The spacing in relation to the first hole is important and you may want to drill a hole that's a little big in case you don't get it perfectly.
3. From the back, widen the first hole using a very large bit until the mounting screw can sit down inside of it and be flush with the surface of the stainless steel.

Stainless steel shelf with attached lamp

I did this with a handheld drill but a drill press would be preferable. Punch the centers of the first 2 holes and be sure to use lube and nice sharp bits.

~ Cory, Los Angeles

Sunday, 1 January 2012

GRUNDTAL Beauty Bar (and laptop table!)


Materials: GRUNDTAL rail, S-hooks, spice jars, cutlery caddies; NORBERG drop leaf table; SPONTAN magnet board; LOTS mirror; FRANKLIN bar stool; HEMMA lamps with RENATE shades

Description:
I'm a mess in the morning. I have ADHD, which makes digging through drawers, baskets, and piles a nightmare, and I have to compete for one of two bathroom vanities: my husband shaves in the en suite bath while my daughter primps in the other. Our condo is tiny and our bathrooms are tinier... no room to share!

I often forgo 'beauty' altogether instead of digging through random shoe boxes for cosmetics while looking at myself in the next-best mirror (which is in the kitchen).

[I do have a proper dressing table. It was repurposed into a aquarium stand for our turtle long ago. Heh. It's not IKEA or I'd tell you more.]

My ADHD coach/organizer has been encouraging me to use vertical storage wherever possible. I tend to only use regularly the things I can actually see; vertical organization prevents the piling-up that makes my needed items go out-of-sight-out-of-mind. Every object needs a specific home. A home that I can *see* into. No doors, drawers, boxes, baskets, or cabinets.

But how can vertical organization work for a dressing table?


IKEA to the rescue! I decided to use GRUNDTAL as the solution. I had already tried some BYGEL rails and buckets for the wall just above the commode and it's really cut down on the bathroom clutter. GRUNDTAL is nicer, and this wall is visible from my bed.

I had intended to buy a picture shelf to set items currently in use, but I saw the NORBERG table in the IKEA showroom and instantly knew that I could give it a dual purpose on a currently wasted bedroom wall, conveniently near the en suite bath.

My husband hung the NORBERG at "pub/bar table level" (get "molly" bolts if you can't attach to at least two studs). Then he hung the GRUNDTAL rail high enough to allow for the stored items to hang underneath.

I used the double-sided tape that was supplied with the LOTS mirrors to affix a LOTS tile to the SPONTAN board. I suggest marking the placement of the mirror on the board and of the board on the wall before making the mirror permanent!

I prefer to apply make-up standing up and very close to the mirror (yay, myopia!) so I have it placed pretty highly on the wall. One could easily lower the whole shebang and use a stool or chair of regular height. I actually decided on my mirror height by using a dry erase marker to draw a 12 X 12 square (LOTS size) around my face in my full length mirror and then measuring from the floor to the square.

I used GRUNDTAL doo-dads to finish it out:

I used one S-hook and a large binder clip to hang the hairdryer, curling iron, and straightening iron by their cords. (By the way, I also looped the cords through the NORBERG assembly to keep them out of sight. I had to momentarily un-assemble the arm, pull the cords through, and pop it back in. It was well worth the 90 seconds it took.)

S-hooks are also holding my brush, elastics, rings, and earrings. I hung my necklaces, bracelets, and my watch directly to the rail.

The cutlery buckets are holding skin care products and make-up brushes/pencils. I love this because I can see what I've got quite easily and there isn't a risk of knocking over a cup of brushes in my pre-caffeinated stupor.

The magnetic spice jars are fabulous. I can see what's in there without any digging and I've got my cosmetics organized by the order in which I apply them. I have make-up on one side and skin/hair on the other. Brilliant.

The bonus feature might be my favorite... when the table leaf is up, I've got a nice place to pull up the barstool and set my laptop. Dual use of furniture in a tiny condo is always an epic win.


Thoughts after completion: I wish I had used the longer GRUNDTAL rail. I used the 30.5" length which lines up nearly exactly with the NORBERG. Overhang on either side would have been nice. I need another cutlery caddy or two. A reason for a trip back...

~ Shannon, Austin, Texas

Saturday, 24 December 2011

Grundtal garden


Materials: Grundtal magnetic spice jar

Description: Saw this via apartment therapy and thought it was too cute not to share...

See more of the Grundtal terrarium [via Apartment Therapy].

~ Shel, London

Thursday, 17 November 2011

Personalized Grundtal tins


Materials: Grundtal tins, Paper

Description:
I have developed free downloads to personalize the Grundtal tins. Just print the pdfs (two different alphabets, one bold, one normal) and place them in the Grundtal lid.


Free download at my non commercial personal blog (no ads whatsoever!)

In the "Link to this hack" option I filled in the post where I describe everything (in German). When you scroll down you find the two links where you can download the free pdfs.

Go get your free Grundtal personalisation download.

~ meinesvenja, Munich, Germany

Friday, 14 October 2011

Once, twice, maybe thrice


Materials: Grundtal leg (as is-pair) $5.00; Vika Byske 1-leg (new) $20.00; Vika Byske 3-legs (as -is) $3.00; Lesvik top 23" x 46" (as-is) $10.00; Unknown Ikea shelf 1/4" x 35" 17-1/2" (as-is) $1.90 . Non-Ikea items; concrete screws & wood screws $5:00; fluorescent lamp (free).

Description: If I had known about this site earlier, I would have properly documented my build.

The Grundtal legs, Leksvik top and unknown Ikea shelf, in its first life it was my coffee table. In its second life I decided I needed a more mature laptop desk with shelf space.


I simply attached the Vika legs to the Leksvik top. Then I used the Grundtal legs as wall brackets securing it with concrete screws. And placed the 1/4" top on the wall bracket to rest with the fluorescent lamp against the wall.

I wonder what I will do for its third life.

Just a side note those chairs hanging are Jokkmokk. I live in a small apartment and needed some space. And until the time call for it. These will be my shelves

~ Wycliffe, Toronto, ONT