Showing posts with label holiday. Show all posts
Monday, 4 February 2013
Valentine's Day wreath from Christmas ornaments
Materials: Ikea Christmas wreath, Ikea heart ornaments, wire hangers
Description: The Valentine's Day wreath is made from Christmas wreath (white/red polka dot garland and white fuzzy heart ornaments).
STEP 1
Take a wire hanger and shape it into a heart by pushing inward the hanger part of the hanger.
STEP 2
take the Ikea Christmas garland and tie with red wool to the wire in between the beads. Cut the garland to the exact length of the heart.
STEP 3
take fabric scraps about quarter inches wide and tear to strips. Wrap the top part of the hanger and secure with glue gun.
STEP 4
hang any heart ornaments (or those from Ikea) and glue on a bow.
Hang wherever it looks great! :)
See more of the Valentine's wreath.
~ Elvi, Brooklyn, NY
Monday, 24 December 2012
Fa la la la la la ...
![]() |
| Free printable from 12 tribes |
It's Christmas and I am taking a day off from blogging, unplugging from the Internet and connecting with everything warm, toasty and family. But I will be back with the usual programming tomorrow.
In the meantime, let's revisit some hacks from Christmas past.
1. The Snow Globe: Make a whimsical snow globe from IKEA wine goblets. Reindeers complete the scene.
2. ISIG ornament glitter: Tired of your blah ornaments. Glamourize them with a little glitter.
3. The Expedit Advent calendar: Book mark this and make your own Expedit advent calendar next year.
4. The IKEA Xmas tree: Who says trees have to be green? Here's one that will light up your nights.
Glanza Christmas Wreath Chandelier
Materials: Glanza Light, Garland, Christmas Ornaments
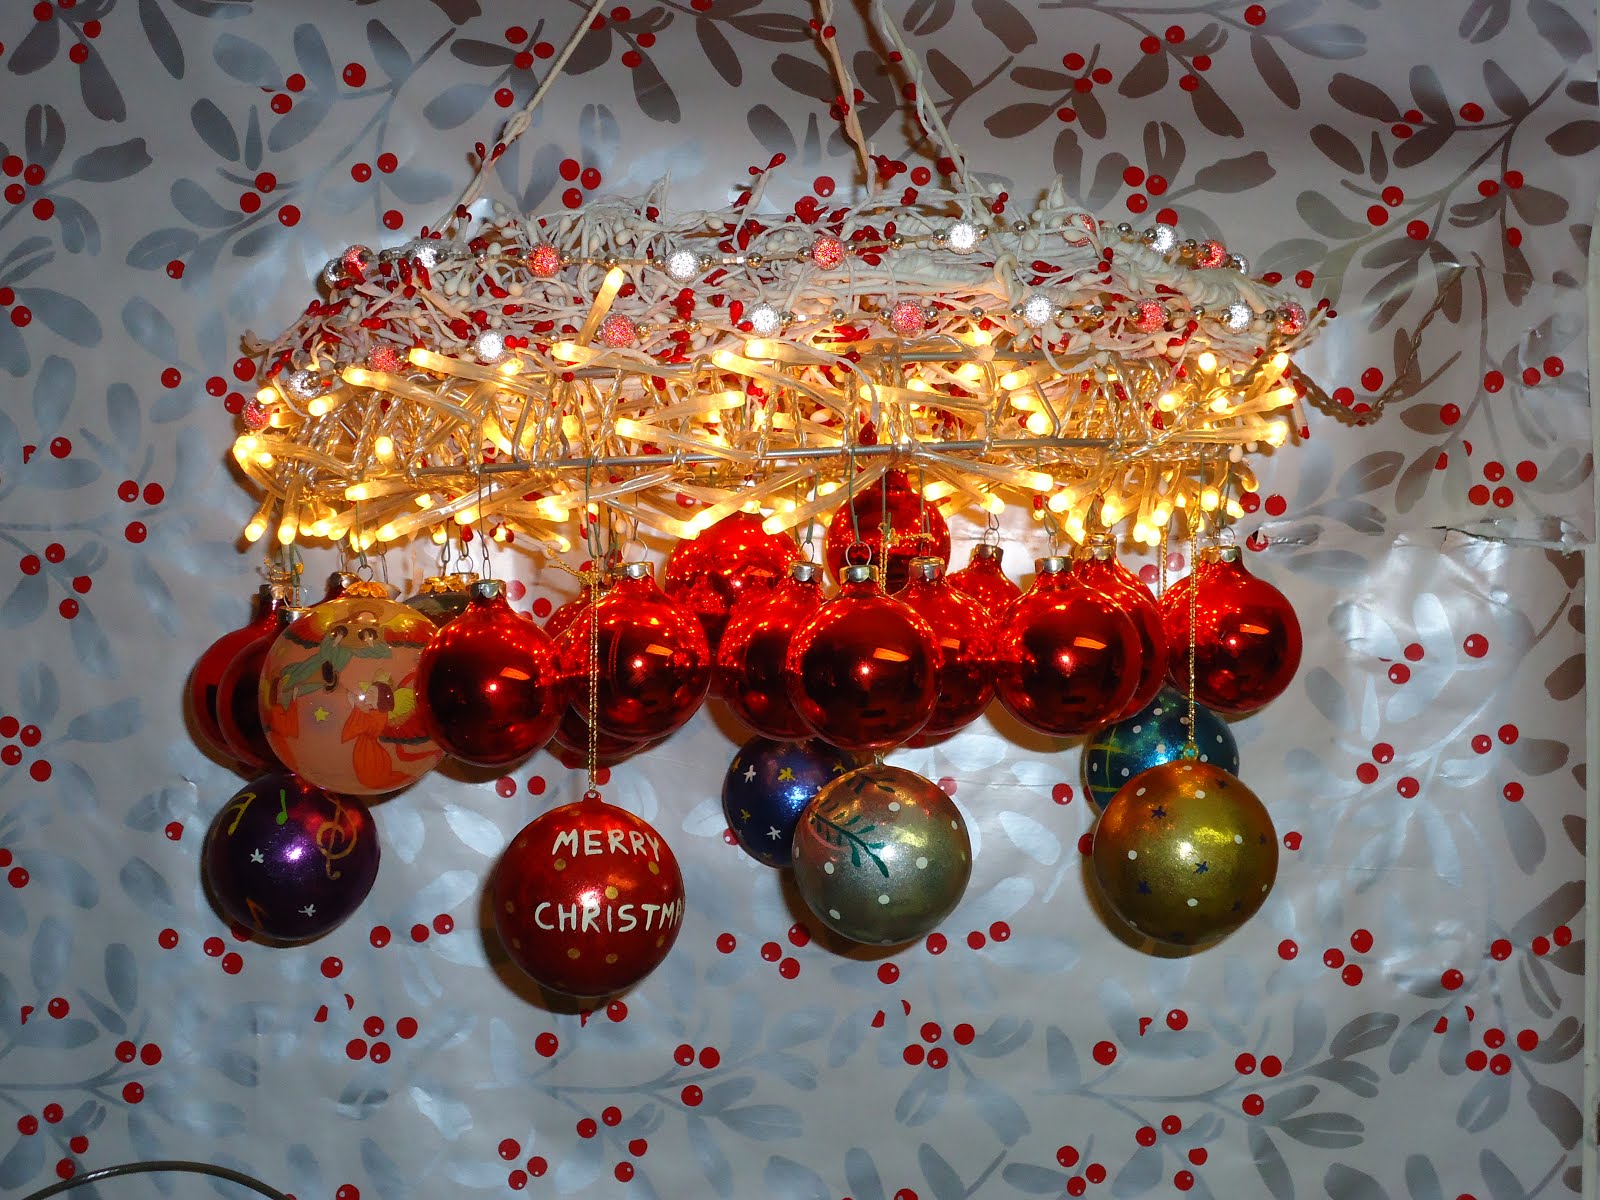
Description: I found this Glanza chandelier at a local flea market still in the box not knowing exactly what I was going to do with it but LOVED it.
So Christmas rolls around and I come up with an idea. I found some white and red bud garland (but any could be used to suit your style) and set it atop the chandelier. In a hanging position I just started hanging ornaments on it until I was satisfied with the results. Plugged it in and Voila!!! This is hanging above my kitchen sink and it makes me happy to do the dishes (well maybe happy is an exaggeration) but still it's lovely. I staged the area with Christmas wrap for affect. The whole thing cost me about ten bucks!
Enjoy!
~ Deborah, sf bay area
Wednesday, 12 December 2012
Light Up Nose for Rudolph
Materials: STR�LA, Light Blub, Faux Taxidermy Deer Head
Description: What's a mounted Rudolph head without a light up nose? Just a lame old deer head, that's what! So if you have one of those cardboard taxidermy deer heads (or you can download a template to make your own here) and want to make it a bit more festive, I've got the perfect hack for you.
Here's what you'll need: a strand of battery operated red LED lights (STR�LA $3), a hollowed out light bulb that is sized appropriately for your deer head, some Krylon Looking Glass spray paint, electrical tape, and wire strippers.
Since I didn't want to be able to see the LED lights on the STR�LA strand, I sprayed the Looking Glass spray paint inside of the bulb and distressed it with a little water to get a faux mercury glass look.
Next you will need to remove any excess LED's from the STR�LA strand. Figure out how many led lights will fit through the opening of your light bulb. In my case 5 LED's could fit. I cut out the extra LED's from the middle, leaving as much excess wire as possible connected to my 5 LED's and the battery pack. Strip the last quarter inch of these wires and reconnect the battery pack wires to the led's. You will need to turn the battery pack on to make sure they are working, if not switch the wires.
Once the lights are working use some electrical tape to secure the wires separately. I also used the same electrical tape to bundle all the LED's together.
Then it's as easy as cutting a hole through a few layers of your Deer Head, fishing the wires through, and hiding the battery pack. In fact, if you use the template from Instructables (blown up 400%) the pack will tuck nicely in one of the cavities.
Now, invite some people over to your holiday party so they can admire your handy work.
If you'll like more details to create your own Mounted Rudolph Head come on over to my blog, The Ambitious Procrastinator.
~ Nikki Kelly, Denver, CO
Monday, 10 December 2012
Spruce It Up
Materials: MARGARETA + KVARTAL
Description: I created a curtain Christmas Tree using the MARGARETA fabric and KVARTAL top and bottom rail from Ikea in just 5 easy steps.
1. I measured to the center of the fabric using a tape measure and ironed on a 4 inch strip of Pellon 808 craft fuse Iron-on backing down the center. This enabled me to cut the fabric in half without the fabric fraying once it was cut.
2. Once the fabric was in two pieces I measured the length of the KVARTAL rail and cut each piece of fabric on the outside edge to be one inch longer than the rail.
3. Using my iron on the hottest setting I ironed the outside edge under by the extra inch. I secured the top and bottom KVARTAL rail to each half of the fabric
4. I took down the two center panels of my KVARTAL curtains and hung the two tree panels in its place.
5. I added the ornaments by affixing green craft wire to the ornaments and poking the wire through the fabric. Once the wire was through the fabric I just bent it down flat against the back of the curtain.
Now I have a no-mess, no-space-required, Christmas tree!
~ Camron
Friday, 7 December 2012
Having a crafty Christmas?
Ahh ... tinsels and carols. The season is definitely coming. And I am busy making new ornaments from IKEA JULKUL cupcake liners.
It's a first for me - making ornaments, that is. Decided not to go the store-bought route this year and so far, I am having fun.
You can check out my tutorial over at JULES.
What are you doing differently this Christmas? Or what are you crafting for the season? Let me know (or share your link with us) in the comments below. I'd love to see what you've done.
It's a first for me - making ornaments, that is. Decided not to go the store-bought route this year and so far, I am having fun.
You can check out my tutorial over at JULES.
What are you doing differently this Christmas? Or what are you crafting for the season? Let me know (or share your link with us) in the comments below. I'd love to see what you've done.
Wednesday, 31 October 2012
Happy Hack-o-ween!
Materials: IKEA HELMER rolling drawer unit, PVC tube, casters
Description: My daughter was so impressed with the service on Singapore Airlines this summer that she wanted to be a "??Singapore Girl" for Halloween. It just so happened that a PANYL customer had turned me onto the IKEA HELMER a few weeks earlier. This metal drawer unit on wheels turned out to be the perfect size for a miniature beverage trolley.
For a handle, we fastened a piece of 1�"?� PVC tube between the sides of one drawer, instead of the snap on drawer front. We used heavy-duty double-sided tape to attach this drawer to the top surface of the HELMER. This would be the open bin for the taller bottles and cups.
We also swapped small, fixed casters that come with the HELMER for bigger 1�"?� swivel casters, since the Brooklyn sidewalks can be pretty rough.
As a final touch, we used some gold and blue PANYL scraps to make some decals.
Hack or treat!
See more of the Helmer Singapore Airlines trolley.
~ PANYL, New York, NY
Thursday, 12 April 2012
Spotted: Ikea Santa
Materials: Frakta
Description: I was in NYC around Christmas and I came across this great Ikea Frakta outfit!
~ Tyler, Baltimore
Monday, 2 April 2012
Tiny Easter diorama
Materials: Grundtal (magnetic spice container)
Description: I added nice papers and printed words to the containers; also artificial grass, ribbon and a cute chicken. So the magnetic containers became unique Easter presents.
See more of the tiny Easter diorama.
~ doro K.
Saturday, 31 December 2011
LUPIN X-mas tree
Materials: LUPIN Venetian blind, carriage bolt with nut
Description: I took the thick slat from the bottom of the LUPIN blind and 16 thin slats, put a hole at the top of the slats (all at the same place) and bound them together with a carriage bolt and nut. Then I hung it up, spread the slats out like a fan, and pinned christmas decoration on it. - Done
~ Sabine, Basel, Switzerland
Friday, 23 December 2011
Mega Menorahs using waste bins
Materials: Fniss
Description: Massive lawn menorahs constructed from Ikea FNISS. We drilled holes in bottom and stacked on pvc poles that were driven into the ground. We filled with lights and topped with candles and sparkly wrappings.
Voila! Festive Hanukkah lawn decor to keep up with the Joneses 7ft Santas and mechanized reindeer.
See more of the giant menorah.
~ Ciaran Blumenfeld, Southern California
Wednesday, 21 December 2011
Goblet Snow Globe
Materials: IKEA wine goblet and brandy glass, artificial snow, bottlebrush trees, cardboard, origami paper & glue gun.
Description: Trace mouth of IKEA goblet onto cardboard and cut out. Glue bottlebrush trees to cardboard. Add a few tablespoons of artificial snow to glass and glue cardboard to mouth of glass. Flip glass upside down and display for the holidays.
See more of the stemware snow globes.
~ Camilla Fabbri, Evanston IL USA
Sunday, 18 December 2011
Expedit advent calendar
Materials: Expedit bookcase
Description: This Expedit bookcase is perfect for making an Advent calendar. Since the bookcase is divided into 25 rooms, I have put small gifts in each square. A small gift for each day leading up to Christmas Eve. I have only used Christmas wrapping paper (and lots of tape) to create this calendar (not exactly the best packaging, I am sure that others will do it better).
On the back of the shelf, I have covered with a plate so that it is not possible to see in from the back.
~ Martin Bentsen
Thursday, 15 December 2011
Ikea X-Mas Tree
Materials: Stranne table lamp and ornaments.
Description: This is a really easy hack. You buy small ornaments and bend the arms of the lamp to hold them. It is very festive and best of all it saves energy! The lights are LED.
Merry Christmas!
See more of the easy Christmas tree.
~ Juliet Rizek, Chicago, IL!
Sunday, 13 November 2011
A Lill Creepy Halloween Party
Materials: Lill, Vate, Regolit
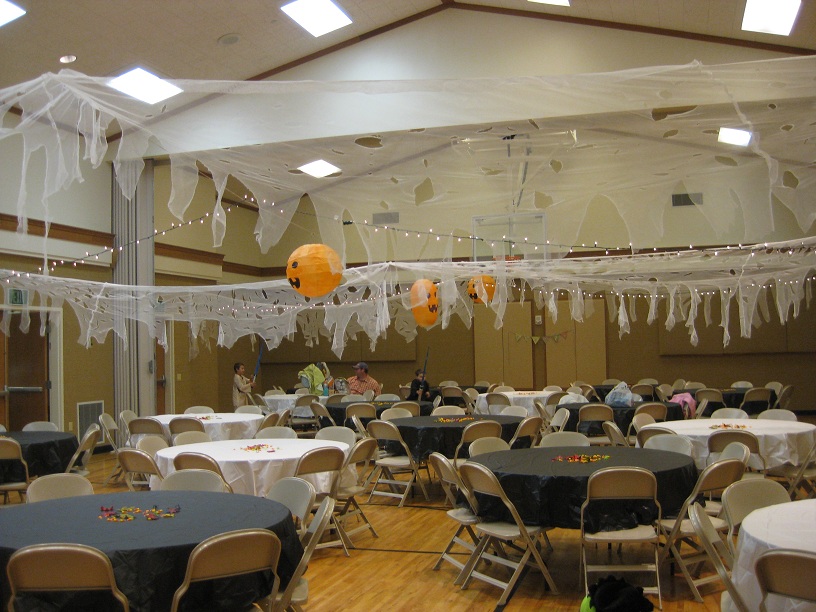
Description: I was looking for inexpensive, cool Halloween decorations for a party. Thus Ikea! I was working with a gym here, so not that attractive. I tied some twine across the basketball hoops to drape things across.
To create some creepy cloth I took three Lill curtains (which come in pairs) and cut them horizontally. Then I snipped them at the bottom and torn them upward and jabbed a pair of scissors in a few times to create jagged holes. I stitched the panels together because I needed them to span about 36 feet.
Next I took the Regolit and Vate paper lanterns and turned them into Jack O' Lanterns. The Vate was a steal in the 'As Is' section for only $1.50! I spray painted them with orange and let them hang to dry.
Then I painted the faces on the lanterns with black acrylic paint. I hung the lanterns and strung the 'creepy cloth' along with some white lights for class :) and ta-da!
Entire project: $36...not bad!
~ Ashley Rochelle, Laurel, MD
Friday, 17 December 2010
Not so boring Christmas wreath
Materials: Ikea SN�VITA wreath, felt, scissors, glue
Description: I personalized the SN�VITA wreath using stash of felt I had at home.
I made one with Saint Nicolausand another one with the 3 magic kings (a spanish tradition, on the 6th of January they come to every house and leave gifts and stuff).
It was a nice easy way to get a different Christmas wreath for less than 30$!
See more of the Christmas wreaths.
~ Julia, Zurich/Barcelona
Wednesday, 8 December 2010
Santa Claus lighting advent calendar
Materials: Dudero lamp
Description: My children love this lighting advent calendar, which returns every year.
Paint your Dudero standing lamp (cost around 10 euro) with simple water colour to red, and create a Santa Claus. Stick cotton beard on it, and put a red Santa Claus hat on the top. You can hang on small bags with sweets, number it 1-24.
Have good fun!
See more of the Dudero Santa Claus advent calendar.
~ Dekormama, Budapest, Hungary
Monday, 6 December 2010
Unexpected advent calendar
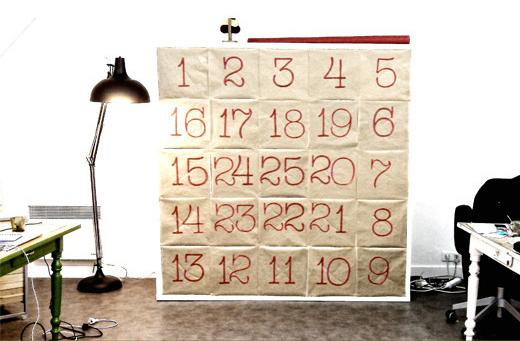
Materials: Expedit, Kraft paper, Scotch tape, red paper
Description: This is an advent calendar
Find below the instructions to make it.
1- Buy an Expedit
2- Cut out squares of paper
3- Print and cut the figures
4- Stick figures
5- Arrange the gifts in boxes
6- Hang the squares with scotch tape
7- Play day by day
See video of the advent calendar.
~ Agence nu, Paris
Friday, 19 November 2010
Thanksgiving Centerpieces
Materials: Florera Fin 4-inch candles, Palitig Vase, Onska Ribbon, autumn leaves, and a hot glue gun
Description: This Thanksgiving, decorate your holiday table with a simple centerpiece made from IKEA products and leaves from your backyard!
1. Take 1 Palitig vase and wrap a length of beige Onska ribbon around it twice. Hot glue the ribbon onto the the vase just below where it widens.
2. Insert a single autumn leaf into the ribbon wrapped around the vase.
3. Place a Florera Fin candle in a fall color (purple, green or orange), and you're done!
See more of the Thanksgiving centerpiece.
~ Biscuitwheels
Subscribe to:
Posts (Atom)