Tuesday, 27 November 2012
Tranby spoon starburst mirror
Materials: Tranby mirror, glue gun, glue, plastic spoons, knife, sanding paper, paint, paint brushes
Description: I've seen it few months ago on some DIY website and I loved it. On Sunday morning I decided to make one for myself, so I sent my boyfriend to the shop to get plastic spoons. He was a bit surprised but its not the first time.
First I had to cut handles of all spoons leaving about 5mm so it's easy to glue. I started from outside row (didn't measure as much, just when I had about 10cm left I made sure I was putting them the way to cover all), progressing second, third and fourth row exactly the same way.
Spoons for last row I cut really short and sanded (actually my boyfriend did - had to mention) the edges to make nice shape. As glue dries quite fast I could start painting each of them.
I used just 2 colours I used on walls and mixed them together to make different shades. I still need to put some kind of varnish but as I would like to put shiny one I have to buy it.
I really do love it and I hope my guests as well.
By the way .. it's second makeover of the same mirror.. you will see that if all photos will be added (I just took of the paint with a bit of water and scrub).
~ Agnieszka & Wayne, Dublin
NUMERAR + AKURUM + DIY = Chic Wine Bar
Materials: Akurum Oak Butcher Block Counter Tops, Numerar Base Cabinets, Rationell Drawer Fronts
Description: For our IKEA Hack we used several standard kitchen elements and a significant modification to one to transform an underutilized section of our house's kitchen into a chic wine bar and storage area.
Since our house is an 1885 Victorian Row House, we didn't feel the standard IKEA butcher block counters really "went" with the home's style. To remedy this, we used our router to put a more decorative edge on the butcher block.
We assembled the cabinets, placed our wine fridge between two Akurum base cabinets, and placed the counter top on the cabinets.
We also constructed a few DIY shelves, one with integrated LED lighting and hanging wine glass storage, to balance the whole area and accessorize.
The end result is a functional and stylish wine bar/food prep area that greatly expanded the storage capabilities of our kitchen, all while keeping with the style and feel of our antique house.
See more of the wine bar.
~ Alex & Wendy - Old Town Home, Alexandria, VA
Monday, 26 November 2012
MARIUS Mongolian Lamb Stool
Materials: MARIUS stool
Description: Lastly I noticed those beautiful Mongolian lamb stools in many stunning interiors! The problem is, as you can imagine, the price of these beauties!!!
As I'm actually working on a girl bedroom project I absolutely wanted to include one of these Mongolian stools for the luxury touch they add and for their incredible softness ...!
So I decided to make my own Mongolian lamb stool thanks to Ikea and their Marius stool. The great thing is the very small price of this stool and the easy way to customize it :)
If you want to have the whole "how to" step by step you can check out the post on my blog.
You'll find the entire DIY including all the pictures step by step here.
~ Nadia, Paris, FRANCE
Easy Expedit Kitchen Island
Materials: Expedit Cabinet, Expedit Castors, Grundtal Rail, Lamplig Chopping Board, Grundtal S-Hook
Description: We needed a Kitchen Island for a moderately sized kitchen, but could not find one that we liked. Taking inspiration from IkeaHackers, we decided to set about making our own. Using all Ikea products the whole project cost less than �120 pounds and I think has created an Island worth at least twice that when looking around at what is available.
First I built the Expedit cabinet, we went for the four version, I then fitted the Expedit doors in two opposing corners.
Then attached the Expedit locking castors.
Next added the Grundtal Rails to either end of the unit, for storage.
Assembled the Pjas baskets.
Finally with the help of contact adhesive the 2 Lamplig chopping boards where then stuck to the unit to give a overhang on 3 sides.
~ Karl Pearson, Newton-Le-Willows, UK
Vertical garden for small plants or herbs
Materials: Ordning Cutlery stand and Dignitet Curtain rail
Description: Wanted some plants to hang vertically in front of the glass panel on the door in the kitchen.
So I used 5 (you could always use more) cutlery stands and two curtain wire mounts from Ikea to create the vertical garden in the kitchen. You can put normal plants in it or even herbs.
I wove the stainless steel wire of the curtain wire through the outside holes on the cutlery stand and it is very secure once tightened.
You can Jumbo size this idea and make it longer and bigger.
~ Doug, Singapore
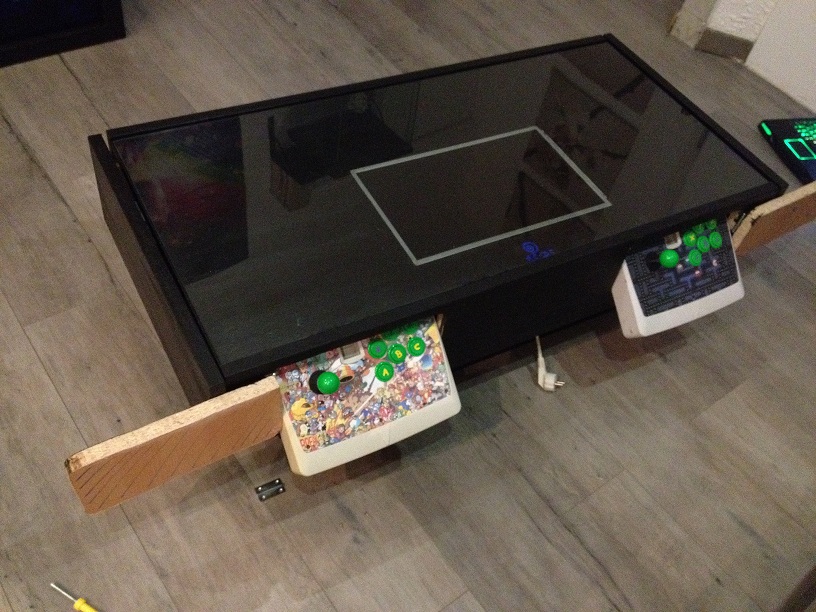
[A.C-DC Project] Arcad Compil DreamCast
Materials: Ramvik
Description: Who has not ever dreamed to have an arcade machine at home?
Dream of all men.
When I was ten, in video game rooms, it was necessary to pay 5francs (almost 1$) to play and I didn't have a lot of pocket money.
Now, I decided to build my own arcade machine, with a Dreamcast (SEGA). On this, you can play Neogeo games (Puzzle bubble, Metal Slug, King of Fighter, etc, etc...), Super Nintendo games (DonkeyKong, Tetris, Mario, PacMan)
Step one: Cut the table with worked, moderate and thought measures, To be able to incorporate TV, the joysticks and electronic (speakers & co).
I have disassembled the television, to remove the hull.
I have only the electronics and the paving stone.
I cut the main board to incorporate the screen.
When all the cuts were made, I have everything repaints in black and I varnished.
To bring out joyticks, I created two small doors with hinges.
And now with my arcade table, I can play (with friends) to old school games!
See more of the Arcade coffee table. (in french)
~ Mikael, Marseille, France
Friday, 23 November 2012
EXPEDIT Storage Bed
Materials: EXPEDIT Shelving unit, 4 Plywood, 4X4, 5' Hinge, Black King size sheets
Description: As we live in a condo we really needed more storage space so after visiting this site (thanks a lot for the inspiration) I decided to build my own bed, for a Queen size mattress using 3 Expedit Shelving units and the other materials previously listed.
Sadly I only have pictures of the finished product.
The whole thing is pretty simple:
Cut the 4 by 4 (you need 5 legs) to the exact width of the Shelving units. Those legs will be between the plywood INSIDE the space between the shelving units. One in the middle and one in each corner. So the weight of the mattress and the people sleeping on it will both be on the legs and the shelving units.
You need a total of 4 plywood panels, 2 for the upper panel and 2 for the lower one that rests on the floor.
The upper plywood is in 2 piece linked with a hinge so we can remove the mattress, open one side of the bed and access all that space between the shelving units.
Both upper and lower plywood are simply wrapped in a Black king size sheet and we used wood tacks to fix it.
It really give a great result and a LOT of storage space for everything we don't use too often like camping stuff. You can put baskets in the shelving units for everything you use more often.
~ Alex, Quebec province
Subscribe to:
Posts (Atom)