Showing posts with label av aids. Show all posts

Tuesday, 7 May 2013

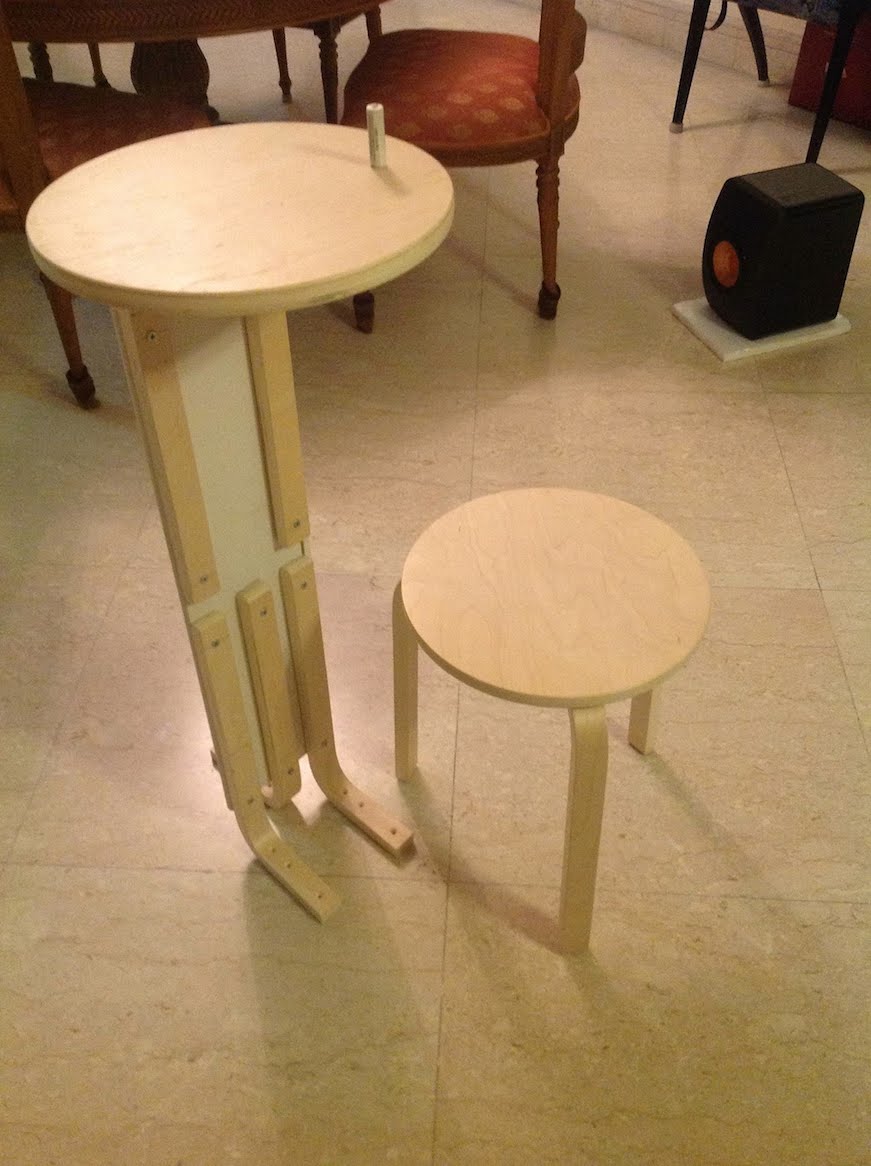
Frosta Dual Speaker Stands / Bar table


Materials: Frosta Stool, Malm 3-cabinets drawer

Description: As I got some new speakers and limited space, I've been trying to find dual speaker stand which can position two speakers on top of one another. Standard speaker stands are not available, and I tried to google Ikea stuff, and voila! I got my inspiration from the Frosta speaker stand which was posted about a week ago.

Based on the same idea, I bought four Frosta stools, and here's how I made them into speaker stands (two levels).


1. Attach three legs of Frosta to the round wood. I made mine positioned at 120 degrees from each other.

2. Prepare backside of Malm drawer, attach three legs for base, two legs stick out to one side (front)' another one to other (back ) side. Let's call it base and center section.

3. Attach two legs into round wood, make sure these two legs stick out to front side of Malm board (see step 2)

4. Attach the assembly on point 3 to base and center section.

~ Andre Lim, Singapore

Tuesday, 5 March 2013

Speakers built into book shelf


Materials: Book shelf, drill, measuring tape, pencil.

Description: My old, black speakers and stereo was taking up a lot of room on a window sill and all the cords were in oe big mess. After carefulle measuring out the shelf of our IKEA book shelf, I was able to cut them in length so that the speakers would fit as seen on the picture. All the cords are run through holes in the back plate and is connected with the stereo out of sight.

~ Jesper, Denmark.

Tuesday, 5 February 2013

Laptop Charging Stations


Materials: 2x4 Ikea Expedits, power strips (5+), casters (optional), Expedit Doors, zip ties. Tools: power drill, Forstner bits, staple gun, countersink bit, 3/4" screws.

Description:
1) Assemble Expedit as directed.

2) Take apart 2 power strips and drill through the power strip and the shelf in a location where the screw will not come in contact with the electrical pieces of the power strip. Use those as templates for the other shelves.

3) Reassemble the power strips.


4) Place the power strips.

5) Drill through the bottom of the shelves using a countersink bit. Screw your 3/4" screws through the shelf into the base of the power strip.

6) Continue until all four power strips are installed.

7) Assemble and install the Expedit doors *backwards* so that you are seeing a flat panel on the front of the Expedit and the door is on the back.

8) Drill a hole between the two door units big enough for a plug to fit through.

9) Using a small Forstner bit, drill a notch into the bottom left shelf so that the plug can go directly into the cube that is covered with a door.

10) Drill a similar hole in the bottom right shelf, bit enough to allow three power cords to go into that cavity.

11) Staple a row of zip ties down the center of the Expedit. You may need to lightly hammer the staples into the zip ties to get them flush.

12) Line up the cords along the zip ties and secure them.

13) Put the bottom left cord through the shelf and the hole drilled between the two door cavities.

14) Plug all of those plugs into a power strip in the bottom right door cavity.

15) Drill a hole through the bottom of the door for the cord of the power strip to get out to an outlet.

16) Trim the zip ties.

Use a Sharpie close in color to the color of your Expedit to mask the particle board where holes are cut.

Done!

See more photos.

~ Jonathan Briggs, Eastside Preparatory School Kirkland, WA

Monday, 28 January 2013

Invisible flat screen TV suspension on SLOPING wall


Materials: IKEA REDD shoe rack

Description: Unfortunately the REDD shoe rack is out of production now, but there must be thousands of them out there...
1. Cut off the folded edge at the bottom of the shoe rack with an angle grinder or hacksaw.
2. Cut off the corners (e.g. in an angle of 45o) on the part that will be placed on the sloping wall. This will make the suspension even more ??"invisible".
3. Find/buy 4 bolts that fit into the mounting holes on the back of your TV. Be sure that they have the right length.
4. Place the shoe rack on the backside of your TV and determine where to place the four bolts. (see picture) Be sure that the top of the shoe rack is placed so it cannot be seen from the front of the TV - but also so the top edge of the TV does not touch the sloped voila!
5. Precisely mark the spots for the 4 bolts and use your drilling machine..
6. Find the right place on the sloping wall for your TV and place the shoe rack there. Use some appropriate screws to fix the shoe rack on the wall. You might have to drill 2-3 extra holes for some screws "??behind" the big holes in the top of the front of the shoe rack. Be sure that the wall is strong enough for the weight!
7. Now you are ready to fix the TV on the shoe rack... and you will see it "??soar" in the room.

~ Leif S�nderby, Harlev, Denmark

Wednesday, 23 January 2013

Mammut Retro Arcade Cabinet


Materials: Mammut Children's Shelf Unit

Description: About a year ago I bought an X-Arcade Tankstank, a pro-quality joystick designed mainly for playing retro arcade games. The joystick itself was fine, but playing with an arcade stick on the sofa didn't feel right, so I set about creating a more arcade-like experience.

I didn't have the time, space or budget for a full replica arcade machine, but what I did have was a spare 32-inch LCD TV, so I set about finding a piece of furniture that could house it.

The unit had to be sturdy and it had to fit in with the look of our summer house, which is basically a room for my three year old son. When I saw the Mammut shelf unit in IKEA it seemed like the perfect thing.


Step one was to find a way to mount the television. I bought a cheap �10/$15 LCD wall mount bracket from the local supermarket. I then used half inch square metal tubing to build a couple of uprights coming out of the top of the Mammut.

For strength I bolted them through the sides, and angled them so that they exited at the top of the rear of the unit. An old wooden shelf joined the two uprights across the top and gave a mounting point for the TV bracket.

The Tankstick is bolted to the top shelf of the unit using a couple of old L-shaped brackets I had lying around (no doubt from previous IKEA purchases).

I then used one of the Mammut shelves to create a door on the front of the unit to hide the PC, speakers and other components. The door is mounted vertically, hinged on two mirror screws at the top, and secured my a magnetic latch at the bottom.

An additional shelf was added at the top to house the wireless keyboard, instruction manuals and other misc items.

The bottom shelf was intentionally left free for storage of kids toys and games.

The PC is a completely bare bones system comprising an ASRock motherboard, AMD CPU, budget power supply and an old scavenged laptop hard drive.

The speakers are a recent addition, giving a pleasing retro thump to games like R-Type Leo. A second output on the motherboard goes to an old Denon amp powering the main summerhouse speakers, so I can get the whole arcade vibe going, minus the sticky carpets.

The whole kit is finished off with a chrome power button on the left, a Pepsi bottle opener on the right and a five meter string of LEDs on the rear which can be set to just about any colour.

The stickers on the wall are from IKEA too!

~ Grant Gibson, Scotland

Friday, 11 January 2013

Ribba tablet/phone stand


Materials: RIBBA, cable canal, saw, drill, sandpaper, paint

Description: I needed something to stand my tablet on while using it for controlling my music at home. We recently moved to a new apartment and had a bunch of spare RIBBA picture ledges lying around.

So I ended up sawing a piece of shelf to the width I wanted. Then I used the already present hole and drilled it with an 8 mm drill, just enough room for one of Apples lightning connectors to pass through. This is not really needed but it helps the charging cable not slip away when not in use.


I chose to glue on the top lid of a spare piece of cable canal as an inner step for standing the tablet in an almost upright position. But you could skip this part if you want. After a bit of sanding and painting the sides you're done. Dead simple!

This would work in smaller pieces for say an iPhone bed-side stand as well.

~ Peter, Sweden

Tuesday, 8 January 2013

Lack Arcade Coffee Table


Materials: Lack coffee table, Raspberry Pi, Happ arcade joystick and buttons, Dell LCD monitor, speakers, Logitech MK260 keyboard and mouse, i-Pac keyboard encode by Ultimarc

Description: I had purchased a Raspberry Pi (RPi) credit card sized computer and wanted to do something fun with it. I saw another article on how to make an arcade coffee table and thought I could do it easier by hacking an Ikea Lack table.

The Lack is easily hacked by cutting it's hollow core material using a utility knife. I outlined the shape of the LCD monitor and carefully cut out the hole.

Next I cut out the holes for the joystick, buttons, and control board area. Initially I tried using a 1 1/8" hole cutter to cut through, but it was tricky. I ended up using that hole cutter to score the shape of the holes and then finishing the cut with a utility knife.


The RPi runs a version of Linux. I hacked together a simple front-end for selecting the games in Python using some sample code I found on pygame.org. For the games, I used a version of advmame compiled for the RPi.

Sound is provided by a pair of cheap speakers I got from Walmart. These items are hidden by a small enclosure I made that is glued to the bottom of the table. It also has a wireless keyboard and mouse for programming and configuration. In it's final form, the table is completely controlled by the joystick and buttons so the keyboard is only used occasionally for fine tuning.

The kids love playing the the old arcade games like Donkey Kong and Galaga.

~ Manny Flores, Chicago

Monday, 31 December 2012

Ikea elevated DJ booth


Materials: Expedit 8 bay shelf, 42" Stolmen shoe shelf, Vika Adils legs

Description: I researched for weeks and found two ideas that I liked for my DJ setup and combined the two.

For years, DJs have been using the Expedit shelves for their durability and size. I follow with this same thought.


1. Assemble the Expedit as per the included instructions.

2. Loosely assemble the Vika Adils legs to the Stolmen shoe shelf. The purpose is to decide what width you want to between the base of the legs.

3. With this measurement, layout the leg bases evenly and equally.

4. Tighten up the legs.

5. Tighten up the joints and brackets for the Stolmen shelf.

~ Marcuis Wade, United States

Wednesday, 26 December 2012

Amped-Up Fixa


Materials: Fixa toolbox, 4-channel amplifier module, hardware, speakers, iPod

Description: For this iPod amp, I emptied a Fixa box of its contents, traced and cut the shape of the amp and power supply, and mounted the parts. Holes were drilled for the knobs, power button, RCA inputs, and speaker jacks installed on the back (all parts from Radio Shack).


A hole was cut in the top of the box for the cooling fan. at 100 watts per channel, this box rocks!

~ Jeff Carter, Chicago

Thursday, 8 November 2012

EXPEDIT iTunes Speaker Hack


Materials: IKEA EXPEDIT, EXPEDIT door insert kits, speaker parts

Description: In addition to being PANYL's shop manager, I am a pro bassist and a dedicated audiophile. I've been building my own speakers since I was a teen. So when I found a bunch of perfectly good speaker parts in the garbage, that was a pretty clear sign that it was time for me to do my first IKEA hack. Make sure to watch the video at the end!

What you will need for this hack:

- An EXPEDIT bookcase (any size will do, as long as it has two free slots for the speakers)

- Three EXPEDIT door inserts

- Two woofers, two tweeters, two speak jack assemblies, two crossovers and the associated wiring.


STEPS:

1. The EXPEDIT insert kits were already assembled so I removed the doors and caulked the interior joints. I set aside the door pieces to use as the front of the speaker cabinet, which is called the "??baffle"�.


2. The insert kits each have 4 of the 6 sides necessary to build a cube. I used the panels from a third insert kit to cut out the remaining sides I would need to complete the two cabinets. Because the panels that form the inserts aren't all of the same dimensions, for each speaker I wound up cutting a 12�" x 13?" and an 11 13/16" x 13 ?" panel. I glued and screwed these in place so that I had 5-sided cube, and caulked the inside joints.

3. To affix the the front baffle to the cube, I used 1" x 2"?� trim from Home Depot to cut out two 11 �" fastening blocks.


4. On the front baffle, I cut holes out for the woofer, the tweeter and two "ports" (these are holes that allow air to go into and out of the speaker when the woofer moves back and forth). I used a hole saw for the tweet and port holes, and a jigsaw for the bigger woofer hole.


5. To connect the fastening blocks to the back of the baffle, I roughed the back surface of the baffle with a sharp blade and then used construction adhesive and screws to mount the blocks. One important step was to countersink holes on the front surface of the baffle so that the screw-heads would be totally flush.

6. The next step was soldering the woofer and tweeter connects and the input jack to the crossover, and then putting all the outward facing pieces into the baffle.


The next-to-last step was to cut holes in the rear of the boxes for the input jacks.

Finally I put some foam batting inside the boxes to dampen internal reflections, and slid the front-baffle assembly into the cabinet. I fastened the baffle by drilling flat head screws into the mounting blocks from the sides of the speaker box (again I countersunk holes into the side exterior).

The sound is clean and robust - and they can handle quite a bit of power. Audio-enthusiasts know that MDF, which is pretty much synonymous with IKEA, is the go-to material for building speakers because it's so dense.

Please watch the video on the PANYL website and let me know what you think!

See more of the Expedit speaker.

~ PANYL

Tuesday, 17 July 2012

E-Reader Boom


Materials: 
- TERTIAL desk lamp
- Exogear Exomount car holder
- Mounting tape
- LED Reading lamp (optional)

Description: I'm too lazy to hold my E-Reader in bed :)
- Unplug the lamp!
- Cut and remove electrical wiring from TERTIAL. Hint: To remove the bulb socket, you need to lift two opposite tabs on the outside of the socket, but it's optional. And be careful of the sharp edges.


- Line the clamping area with anti-slip tape, then attach Exomount there.
- Attach E-Reader (or small tablet) to the Exomount suction cup.
- You can store reading glasses etc where the socket used to be.

PS: Maximum gadget weight ~300g

Enjoy!

See more photos of the e-reader holder.

~ Tony Rex, Melbourne, Australa

Wednesday, 29 February 2012

Expedit into active stereo speakers

Expedit into active stereo speakers

Materials: Expedit, misc. shelves, mini amplifier, misc. speaker units

Description: I wanted to get a very discrete stereo system in our dining area. I have a Logitech Squeezebox radio that I wanted to use as source, but the small speaker in it doesn't go a long way.. At first I thought of connecting a pair of PC speakers and hide them inside the Expedit, but I really wanted to get a full and deep sound that I wouldn't get from most PC speakers or iPod docking stations etc.

Then I got the idea to make the Expedit itself into a speaker.


Expedit into active stereo speakers

I used various shelf plates and dividers (including some IKEA's) that I had lying around to make the front and rear baffles as well as for bracing and side wall stiffeners. I installed some old speakers that I used for my car hi-fi back in the days - Boston Acoustics tweeters and Vifa bass/mid 6,5" units. For amplification I used a cheap but surprisingly good Dayton Class T desktop amplifier, hidden away on the rear panel. The bass ports and crossovers were properly measured and tuned to get the most out of the system, and of course a good amount of acoustic damping material.

The fronts covers are cut out of ply, painted white and covered with speaker cloth. Snap-in fasteners.

The amplifier has a standard line input jack allowing the Expedit to be driven by any kind of source - an Internet radio, iPod, bluetooth receiver, you name it.

~ Affi, Strand, Norway

Saturday, 25 February 2012

Headset Wall Mount

Headset Wall Mount

Materials: Capita 11cm Article number: 200.545.63

Description: I saw the headset stand made here on Ikeahackers, and wanted to make one for wall mount instead.

Headset Wall Mount

I just took the Capita saw some of the metal away, painted it black and good to go!

~ Daniel Bachmann Mikalsen, Norway, Vestfold

Sunday, 12 February 2012

Dish drainer => shelf and soap dish


Materials: Magasin dish drainer

Description: When the dish drainer started to become wobbly, we decided to give it a second life.

To construct the shelf we cut the large part of the drainer in half and screwed 8mm chipboards (37cmx30cm) to the top and the bottom. The two additional boards can be put into the shelf at your convenience. All in all 30mins to create shelf where our modem, router etc fit perfectly without a big cable mess.


For the soap dish we used a small part of the drainer and cut off a piece on 13cm length. To make it symmetric we fixed a part of the leg of the drainer to the soap dish with two short nails.

~ Pierre-Alain, Switzerland

Wednesday, 26 September 2007

harald pimps ikea for his mac mini

the mac mini. it's way too cute to be hidden. so harald pimps a stand for apple's smallest desktop computer.

"after experimenting with three trunna lights (can't find the link on ikea's website) from ikea germany (regensburg), i made these two light mods for my mac mini.

i just cut the cables and soldered new connections. then i glued the acrylic in symmetric positions on thinner acrylic plates. for the console i used milky polycarbonate from the hobby-store, cut it round and attached it top and bottom.

unfortunately i sold the mini a year ago and the trunna lights at ikea are now round."

see more of harald's mini mac console at www.pimpmymini.com.