Wednesday, 31 August 2011
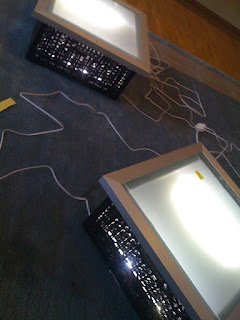
Backlit nightstands
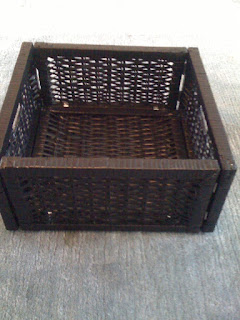
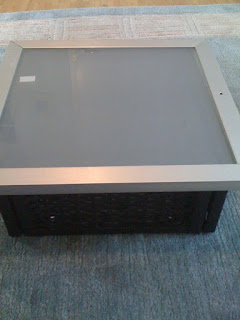
Materials: Effektiv door, Branas,
Description: I got two milk-glass doors in the As-Is section, put them on top of Branas baskets where I had installed the Inreda lights beforehand. Now I have two beautiful nightstands with some storage room inside (for books etc.) for less than 45euros.
~ Markus, Cologne, Germany
Drilling machine table
Materials: BEKVAM and ERIK
Description: Just build the Bekvam table and don't put in the middle shelf. For better stability in future I used steel "L" profiles in corners. You can buy them certainly in any hardware store. And I also "reinforced" the sides of the table with OSB boards. So it should stay stable enough in future as well. Then you just put the Erik drawer box without wheels inside and somehow try to fix it there (I used again those steel plates from hardware store). So there it is. Stable, durable driller-table :)
~ Jan Prokop, Czech Republic
Tuesday, 30 August 2011
Custom computer desk for whining husband
Materials: Expedit bookcase 2X2, Micke desks
Description: My loving husband was annoying me to get a bookcase to place his precious books in our office, nothing a quick trip to our local IKEA can't solve!
We already had the MICKE double desk, so i bought a second one but the small one, and only assembled the top and left side (no drawer).
At the hardware store I bought corner braces and mending plate, and also short wood screws (short so they won't go through the whole desk)
I assembled the second MICKE desk to the first with the corner braces ( I used 2) and the EXPEDIT bookcase on top of that.
It's that simple!
~ Cartouche, Montreal
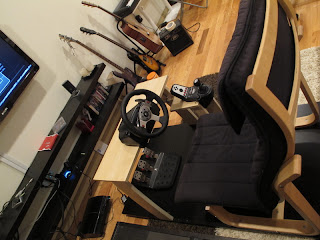
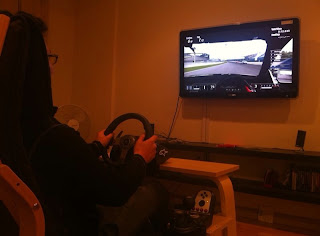
POANG IKEA powered GT5 racing cockpit
Materials: POANG chair, VIKA OLEBY, as-is Table top, wheels ,shelf tops and good idea :)
Description:
1. Mark all spots on table top (floor) basically use dimension from your car.
2. Invert Poang chair legs and cut off top as needed
3. Screw down all parts on the floor piece
4. Make shifting panel from piece of cut off wood
5. Eureka! you got GT5 racing cockpit :)
~ JTsunnyday, United States, Michigan
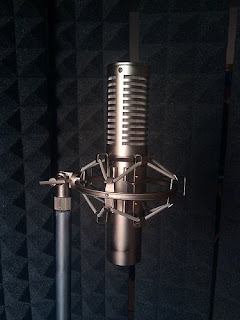
Not a mic stand...
Materials: Not lamp, piece of wood, cement, mic screw
Description: Take a broken Not, pull away lamp, diffuser, just keep the stick and the cone. Combine them stiffer with some Quick Metal moldable wax. Fill the cone with cement (to make it heavier) and dig a piece of wood into the cement. Screw a larger piece of wood to the former one to widen the base. At the other end of the stick join a mic screw for the mic holder.
Done!
~ ugo, italy
Monday, 29 August 2011
Skurar Pendant lamps
Materials: Skurar pots
Description: I've made two pendant lamps of two tin-pots named Skurar. I drilled a hole in the bottom and put a small lampholder with a cord through the hole. Then a connection-box to connect the two cords. But, since the Skurar pots is not tested to use as a lamp, you have to use energy-saving-lamps (CFL?) so it doesn't get too hot in the tin-pot!
~ Lotta Vesterberg, Linkoping, Sweden
***
Erik's version of the Skurar pendant lampDescription: My mother bought some white Skurar plant pots for her kitchen window and wanted new pendant lamps aswell.
I came up with the idea of turning Skurar plant pots into pendant lamps.
Turn the plant pot upside down, drill a hole at the pot bottom (now top...) and attach a lamp holder with a cable to it - voila! ;)
A very easy way to get matching pots and lamps! :)
More pics of the pendants lamps on my blog.
~ Erik Maki, Sweden
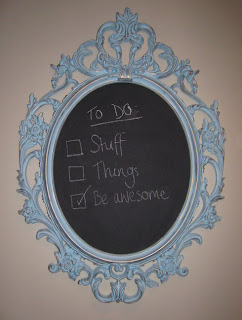
Pretty Frame Turned Chalkboard
Materials: Ung Drill frame, primer, paint, Rub n Buff, chalk board paint
Description: I took a black Ung Drill frame, primed it then painted it in Ben Moore's Tranquil Blue. I used Rub n Buff to give it an antiqued look, then painted the glass with chalkboard paint.
See more of the Ung Drill chalkboard.
~ Lizzie, Chicago
Bedside-Table-Cabinet-Lamp
Materials: JANSJ�, F�RH�JA
Description: The IKEA Bedside-Table-Cabinet. Amazing in itself, but somewhat lacking functionality when darkness falls.
What we do is take the IKEA JANSJ� worklamp, and combine it with the F�RH�JA wall cabinet to create the amazing Bedside-Table-Cabinet-Lamp.
1) Remove lamp from packaging
2) Measure out where to drill holes
3) Drill holes (this means using a 5mm drill bit, and widening the hole enough to get a snug fit - a 6mm drill bit made the hole too big, so beware!)
4) Insert lamp
5) Insert screws
6) Plug in lamp, and enjoy!
See more of the bedside table with light.
~ Samuel Caesar Hav, Danmark
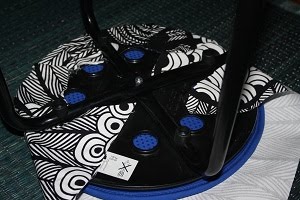
It's Black It's White - Pimping Up Ikea Basic Stools
Materials: 2 Marius black Ikea Stools , 2 Ikea Cilla Cushions , 1 Meter Sara Lisa Black and White Ikea Fabric, Hot Glue Gun
Description: We have 2 basic Ikea stools in our home and they are at the entrance. We use them to sit on and put on shoes etc. They were annoying me simply because of their lack of any aesthetic value they added to the area. So I had this thought of decided to give it a try. I was very happy with the outcome and also how they brighten up the area they were in.
How to do it:
Step 1: Assess your stool.. then place the cushion on top of the stool and cut out the bit of fabric you will need to fit and cover it. Be a bit generous as it's always good to have a bit more instead of a bit less.
Step 2: Heat up your glue gun. Place the cushion on top of the stool seat and keep lifting it up and putting the hot glue between the seat and the cushion and pressing it down immediately. I realised hot glue cools very fast and doing it this way ensures you can quickly stick the cushion to the seat.
Step 3: Lay your fabric down print facing the floor and then put your stool upside down with the cushion on the back of the fabric. Make slits to the fabric in accordance with where the legs of the stool will come and then pick up your glue gun and start gluing the fabric to the underside of the stool seat. When doing so try and ensure that there are no creases and that the you neatly fold the fabric on the sides.
Step 4: The back of the stool doesn't look the prettiest and in the case of an Ikea stool you can screw off the legs in the beginning and when you are done with the seat put a piece of material over it or a cut out board. Lazy me I've just left it as I don't really think people will be looking under the stool. But once you are done with you're gluing ... Voila! You have a set of nice to funky stools and in my case definitely made the entrance a bit more attractive than it was previously.
Price wise 2 stools were 90 Nok (that's 2 cups of coffee here in Norway) The fabric 50 Nok, the Cushions 100 Nok also both from Ikea and the glue another 50. So in about 300 Nok I have 2 fun stools.
Time Taken: 2.5 Hours in One evening To do both Stools
See more of the stools.
~ Helen Issar, Oslo, Norway
Sunday, 28 August 2011
Hemnes for the kitchen
Materials: HEMNES add-on-unit for secretary
Description: My favourite 'AS IS' section had the HEMNES add-on-unit for a secretary for 19 Euro!! at IKEA Frankfurt.
We needed a cabinet for you kitchen. So I added feet (wood from construction market), changed the knobs to silver IKEA ones and covered the top (with many holes for cables ecc.) with tiles that I found in the recycling court of our city.
Inside I added some more shelves and painted them with BEHANDLA with.
I love it as it is not too deep for storage.
~ Heiko, Frankfurt/Germany
Low cost clothing rack
Materials: Skuggig curtain rail
Description: I needed somewhere to hang my shirts and jackets and had only a tiny room and little cash. So I decided to get a curtain rail from IKEA, put it up and use it as a clothing rack. Does what I needed it to do, easily and cheap.
~ Walter Vos, Groningen, The Netherlands
Frack Hack
Materials: Frack
Description: Oh, you've probably gotten this from a bunch of his fans, but you've gotta see this one: the Frack Hack.
~ njw, DFW, TX
Saturday, 27 August 2011
How-to: New life for Ikea's Urban Chairs
Materials: Sunbleached Ikea Urban Chair, Penetrol
Description: Need to bring your Ikea Urban chairs back to life? Try a Scotchbrite and Penetrol (then protect with 303 Aerospace Protectant).
On a lark, I remembered what magic Penetrol did for Eames fiberglass chairs, so I gave it a try on these Urbans. First, clean well and "exfoliate" the seriously ashy bits with a Scotchbrite. Protecting the area well (dropcloth, etc.), saturate a rag with the Penetrol and wipe liberally on the chair. Rewipe if necessary and let dry for a few minutes. Wipe (or even out any excess). Let it dry a day and protect with 303.
You're ready for another season or two...
See more of the new lease of life for urban chairs.
~ Hunter, SFBay
Ikea fabric as a canvas
Materials: Saralisa fabric b/w, acrylic paint, stretcher bars
Description: For me the hardest part of painting is the drawing, since I'm not that good at it I decided to use Ikea's fabric as a canvas with stencil.
I just bought the stretcher bars and all the tools needed like a special stapler and the fabric grip. Very carefully you need to follow the instructions to frame the fabric the right way, from center to edges (in any art supply store you can get them) otherwise the fabric isn't tense enough.
I mixed my own colors with acrylic paint and started painting.
~ sandra
Expedit with stripped-painted finish doors
Materials: Expedit, plywood sheathing, acrylic paint, acrylic protector, handles, hinges, screws
Description: In my case I bought the Expedit to use as an extension of the kitchen cabinet since we didn't have a lot of storage space for dinnerware. The problem was that the dust was covering all the plates and glasses so I decided we need to cover some of the shelves.
I went to a hardware store and bought small pieces of plywood sheathing (the small leftovers are really cheap) and I asked them to cut them about an inch bigger than the holes of the furniture.
I also picked a bunch of regular hinges, in my case the darker the better so they don't stand out too much, and four different handles just for fun.
I sanded the 4 pieces of plywood sheathing very well and then applied 2 thick coats of acrylic white paint. When the second coat was still wet I made the lines with a pencil, since the wood is irregular it's easy to make them crooked and the effect it's less rigid and boring. Afterwords, I applied one extra coat of acrylic protector.
The last part was the difficult one, to measure the exact point where to engage the doors so they all be aligned.
After that the only thing missing was the handles...just a couple of screws and you're done!
~ sandra
Friday, 26 August 2011
You got the Besta me
Materials: Besta Cabinets, Framsta Panels, Tofta Doors, Inreda Drawers and Lights
Description: I ordered a new HDTV and my wife and I weren't going to be satisfied with just putting it on a stand. So we did what we always do....go to IKEA and try to find a cool, modern solution.
We'd been eyeing their Besta cabinets for a while, and always liked them. So decided it was time to take the plunge. But before, we dove in we had to know what configuration would fit in our space.
Using Google Sketchup, I drew up all the cabinet sizes and doors, and tried a few options until I arrived on something I liked.
We then got all the supplies and started putting things together. We wanted our whole cabinet install to fit against the wall, and this introduced some issues with wiring all the equipment.
To solve that, we drilled holes in the backs of cabinets, through the sides of cabinets, and through the metal Framsta panel frames with a circular bit. Now, wires could move up, down, and between our cabinet for connecting all our AV equipment.
We then wanted a couple drawers for storage of Blu-ray discs, and game controllers. But we found that IKEA only sold small height drawer fronts. We wanted drawer fronts the same height of our doors.
So we took a drawer front, and noted the hole locations for mounting to an Inreda sliding drawer. We then stuck our drill in the holes of the drawer front, and marked where the drill stopped with masking tape.
We marked the hole locations and then drilled the holes in the door in the same configuration and depth of the drawer front by drilling until the masking tape met the door.
Our chosen configuration spanned three Framsta panels wide, which was a little bit too wide for one set of Inreda lights to span across.
So we needed to do another hack. This time we simply just got some electrical wire and spliced into the Inreda wires to make them longer.
Last thing we had to do, was simply drill and mount speakers, and the Framsta TV mount to the Framsta panels themselves.
We then put all the equipment in the drawers, mounted the cabinets to the wall, and the TV on the mount for an end result that is something we're pretty proud of.
See more of the Besta TV cabinet installation.
~ Chris and Christy Perez, Austin, TX
Subscribe to:
Comments (Atom)
